Cisco C931-4P configuration
This page discusses a few general items of information that are good to know when configuring a Cisco C900-series router, and a basic configuration for using this router in an advanced home or small-business network connected to the Internet via a single Ethernet ISP connection. It does not include configuring a connection of the router to a VPN server, which is usually required when this router is used as a branch router. In this configuration, the four Ethernet LAN interfaces of the router are used as switch ports connected to a single VLAN (the default vlan 1). I verified the configuration example discussed below by connecting the C931-4P to my home LAN. This means in practice that the C931-4P is sitting behind a Cisco RV40 serving as edge router. Both routers, as well as two or three more routers belonging to my ISP, provide dynamic IP NAT, and my PC connected to the C931-4P is connected to the Internet via a daisychain of at least four or five NAT devices. Whenever necessary, I run VPN client software on my PC to connect to a commercial VPN server on the Internet. The VPN tunnel passes through all NATs and makes my PC appear directly exposed on the Internet. It turns out that VPN pass-through does not need any special configuration on the C931-4P. If your local ISP does not provide an Ethernet connection, you should use a different router equipped with the appropriate type of WAN interface, or add an external modem or media converter to this router, as appropriate. The hardware and mounting of this router are discussed here.
To take advantage of the C900 capabilities, one must master a sufficient knowledge of Cisco IOS. Once you
master the general principles, you can find information on how to achieve a specific goal by checking the
abundant literature on the Cisco support web site, and if you fail to find a solution you can ask
questions on the Cisco user bulletin boards. Apparently unsurmountable problems and illogical router
behavior usually have pretty simple solutions once you get the right help.
It appears that there once existed
one way
to configure a C900 router by means of Cisco Configuration Professional, which is software that must be
installed on the router, as an alternative to the IOS CLI. However, this software relied on insecure,
easily exploited browser frameworks (Java for web browsers and Adobe Flash). Cisco never went around to
redesign this software to make it secure and just discontinued it, with no replacement available and no
plans to develop something safer on the C900 series. General principles of C900 configurationThe C900 routers are configured through their ROMmon and Cisco IOS CLI. The initial configuration must be done with a terminal emulator (I recommend PuTTY) connected to the RJ45 serial console port of the router. If you don't have a serial port on your computer, you will need to use a USB to serial adapter, which, in turn, usually requires the installation of a driver on the computer. After the initial IP configuration, all subsequent configuration can be done though the network. However, errors or intentional changes in the configuration may cause the router to lose contact with the network, or parts of the network. I find it easier to continue using the console for all configuration, but this may not be practical if the router must be operated at a physical location (e.g. a network room) separate from where your computer ordinarily sits. As typical of Cisco routers, at boot time the router copies its startup configuration to its running configuration, then leaves control to the latter. This has two important consequences:
Operating modesImmediately after login, the IOS CLI prompt is C931>. This is known as USER EXEC mode. At this prompt, you can issue just a few commands like ping, enable, and a subset of show. After issuing the enable command (abbreviated to ena) and optionally logging in to the new level, the prompt becomes C931#. This is known as the PRIVILEGED EXEC mode, or EXEC mode in short. This is mostly used for displaying current configuration information, e.g. with the show command. After isuing the configure terminal command (abbreviated to conf t) , the prompt becomes C931(config)#. This is known as CONFIG mode, and it is where you begin most configuration. Further modes are reached while configuring specific items, for example C931(config-if)# while configuring a specific interface. To move down one mode, issue the exit command. Most commands can only be issued at a specific mode. However, you can issue an EXEC-mode command at any prompt level by prefixing it with do, e.g. do show run. This makes it possible, for example, to issue an EXEC-mode command without exiting from the CONFIG mode. This is especially useful to save time when you need to list the current configuration while performing a new configuration task. See here for more information on operating modes. Interface namesSince the C931-4P is a fixed-configuration router (in the sense that the hardware is not upgradeable), it uses a slightly different way to specify an interface name than modular routers. For example, instead of GigabitEthernet0/0 or GigabitEthernet1/0/1 as you may be used to (where the digits indicate module/port or module/submodule/port), on the C931-4P you just use GigabitEthernet1, and you can shorten the name to G1 or g1 when typing it. When displaying the configuration of interfaces, the router usually displays the interface name as Gi1 or GigabitEthernet1. The interface names are g0, g1, g2, and g3 for the LAN ports, g4 and g5 for the WAN ports, and usbflash0 for the USB port. While you can directly assign an IP address to g4 and g5, you cannot do this with g0 - g3. Instead, you assign an IP address to a VLAN, and then assign one or more LAN interfaces to the VLAN. By configuring a trunk, usually compatible with the IEEE 802.1Q industry standard, a single interface can be made to carry traffic for two or more VLANs. 802.1Q does this by inserting a tag in each Ethernet frame between the Source MAC and Ethertype fields. This tag contains a VLAN identifier and a few other fields. As a result, only 802.1Q-aware network devices (in practice, managed switches and routers) can process these modified frames. Computers typically don't know how to process this tag, and this requires the switch at the client endpoint of the trunk to un-tag the traffic before forwarding it. The switchport command is used to configure trunking on a Cisco switch interface, including the LAN interfaces of C900 routers. 802.1Q allows up to a maximum of 4,096 VLANs. The C900 routers, with trunking enabled and in combination with additional switches, can accommodate a larger number of VLANs (25, according to the specifications) than the number of their physical LAN interfaces. A few VLANs, including vlan 0 and, on Cisco devices, vlan 1, are reserved and cannot be excluded from a trunk. vlan 1 is the default VLAN on C900 routers (and virtually all Cisco routers and L3 switches) and cannot be deleted. If you assign all LAN ports to vlan 1, and additionally set them to untagged with switchport mode access like I did in my example, the four ports effectively work together as a single dumb switch, and all routing and NAT take place between vlan 1 and the WAN ports.
Configuration exampleThe following basic configuration of the C931-4P makes it suitable as a home router, connected to a WAN via g5. This interface receives its IP configuration from a DHCP server. G4 is not used in this example. The four LAN Ethernet ports of the router are configured as a switch with a single VLAN and no trunking. The LAN of the router in this example is the network 10.10.10.0/24. The WAN as configured by DHCP on g5 cannot overlap the LAN IP address space. In this specific example, to keep things simple, the WAN is 192.168.1.0/24. The router's DHCP server reserves the IP addresses 10.10.10.50 and 10.10.10.100 to specific LAN clients via DHCP, and assigns addresses in the range 10.10.10.101-192.168.100.254 to other DHCP clients. It routes all IP traffic from LAN to WAN while providing dynamic NAT between the WAN and LAN interfaces. It also provides a single, static NAT from IP address 10.10.10.50 to 192.168.1.50, in order to make the device at 10.10.10.50 (a printer) available on both LAN and WAN. WAN computers, intentionally, are not allowed to initiate an IP connection to a LAN address, nor to ping LAN addresses. LAN computers, on the other hand, are allowed unrestricted access to WAN addresses. enable
! set up the terminal emulator window terminal width 160 terminal length 0 ! eliminate the **more** prompt no logging console ! prevent log messages from interrupting your workflow The above commands must be issued every time one logs in to the router, they are not "remembered" between sessions. You could set up these commands as a macro in the terminal emulator, to issue them quickly. There is also a way to define macros in Cisco IOS, but the command for executing a macro is relatively lengthy, and only worth if the macro contains several commands and/or multiple named parameters. conf t
! assign router and domain name hostname C931 ip domain-name <your-domain>.local You must replace items between <angle brackets> with your choices. You can also choose a different hostname for the router. From now on, the hostname will be used as the prompt in the IOS CLI. The .local top-level domain name is reserved for domains not registered in DNS, as typical for domain names only used in LANs. ! configure SSH crypto key generate rsa 2048 The recommended number of RSA key bits is at least 1024, but it does not hurt to double it. ip ssh version 2 line vty 0 4 ! require a password session-timeout 300 exec-timeout 300 transport input ssh ! require SSH login local ! require username + password exit
no ip domain-lookup ! prevent DNS from looking up mis-spelled commands
! create user account username <your-username> password <your-password>
! create non-recoverable password enable secret <your-password> SSH is used to connect to the router's CLI via the network. A high timeout is better while experimenting with router configuration, because it will lessen the need to login whenever the timeout expires. Once the router configuration is stable, for security reasons it may be a good idea to reduce the timeout, especially if other people have easy physical access to your computer (e.g. in an open office environment). High timeouts are also advantageous, for the same reason, on the serial console port if you use the latter for router configuration. Unless the console port is connected to a telephone modem, this port in general can be regarded as safer than access via the network. However, unauthorized physical access to the router must be prevented by physical means (i.e. lock and key). No security can otherwise be guaranteed, since anyone with physical access to the router and its console port can easily remove the router passwords. exec-timeout, which controls the timeout for SSH and telnet sessions, can be set to infinite with the exec-timeout 0 0 syntax (where 0 0 means 0 minutes, 0 seconds). This, however, is regarded as a poor security practice because it is easy to forget resetting the timeout to a finite time afterwards. The delay for session-timeout can be set to infinite with the no session-timeout command. ! configure WAN interfaces interface g4 no ip address shutdown ! we keep this interface shut interface g5 ip address dhcp ip nat outside no shutdown exit As mentioned above, we do not use g4, only g5. In principle, if g4 is not used as a redundant WAN connection, it could be configured as a generic router interface for other uses. Note also that we are beginning to configure NAT on g5. ! configure LAN interfaces vlan 1 interface vlan 1 ip address 10.10.10.1 255.255.255.0 ip nat inside no shutdown interface g0 storm-control multicast level 70.0 30.0 switchport mode access switchport access vlan 1 no shutdown interface g1 storm-control multicast level 70.0 30.0 switchport mode access switchport access vlan 1 no shutdown interface g2 storm-control multicast level 70.0 30.0 switchport mode access switchport access vlan 1 no shutdown interface g3 storm-control multicast level 70.0 30.0 switchport mode access switchport access vlan 1 no shutdown exit We similarly configure vlan 1 as the LAN IP interface for the NAT, and assign all LAN ports to vlan 1. ! configure DHCP server for LAN ip dhcp pool BORG host 10.10.10.100 255.255.255.0 client-identifier 01f0.2f74.16ad.0a default-router 10.10.10.1 dns-server 8.8.8.8 8.8.4.4 ip dhcp pool PRINTER host 10.10.10.50 255.255.255.0 client-identifier 0148.9ebd.6ea9.ef default-router 10.10.10.1 dns-server 8.8.8.8 8.8.4.4 ip dhcp pool LAN network 10.10.10.0 255.255.255.0 default-router 10.10.10.1 dns-server 8.8.8.8 8.8.4.4 exit ip dhcp excluded-address 10.10.10.1 10.10.10.49 ip dhcp excluded-address 10.10.10.51 10.10.10.99 We reserve two IP addresses for specific devices (the Borg PC and a network-connected printer). There are two ways to specify a hardware address, hardware-address and client-identifier. The client identifier is just the same as the hardware address prefixed with 01. Sometimes hardware-address does not work with a specific network device (the client receives an address from the dynamic pool instead of the reserved address), sometimes client-identifier does not work. It even happened to me that hardware-address did work until I changed the network address in the router, then it stopped working. Use whichever command works for your specific network device and network. Note the unusual dot format for these addresses. You cannot use dashes or colons as separators, and the address digits are separated in groups of four, not two as usual. Stick to lowercase for the hexadecimal digits (the general Cisco IOS rule is to use lowercase for all commands, and to use uppercase for identifiers to prevent confusion with commands). Finally, note that the excluded address ranges are declared globally, not as part of a DHCP pool. If you need to delete these ranges, it must be done globally. The excluded address ranges are not listed with the show ip dhcp pool command, either. They are included in the running configuration, and you can display them with show run | include excluded. ! static route ip route 0.0.0.0 0.0.0.0 192.168.1.1 1 We can specify a static route to the default router of the LAN g5 is connected to. In most cases, however, the C931 can figure out this route even if we don't declare it. If it works for you even without declaring the above default route, skip the above step. Having to manually delete this route is one less thing you will need to do if you decide to move the router to a different network at a later time. ! create a basic access list ip access-list standard ACL1 permit 10.10.10.0 0.0.0.255 exit An access list is required to configure dynamic NAT, even when the access list just allows all trafic. ! configure static NAT ip nat inside source static 10.10.10.50 192.168.1.50 ! printer
! configure dynamic NAT ip nat inside source list ACL1 interface G5 overload exit Static NAT means that, once the router receives an IP packet from a specific LAN IP address, it replaces this source address in the packet with the remapped IP address (192.168.1.50). Additionally, all IP packets received by the WAN interface with destination IP addresss 192.168.1.50 are remapped to IP addresss 10.10.10.50 and forwarded to the LAN. This implies that static NAT assigns to the WAN interface one additional IP address for each LAN client using static NAT, in addition to the IP address of the WAN interface (assigned by the WAN DHCP server in this example). All addresses mapped by static NAT onto the WAN are permanently in use and respond to pinging from the WAN, regardless of whether there are LAN clients at the corresponding LAN addresses. The purpose of static NAT in this case is of making the printer accessible at a fixed IP address from computers on both LAN and WAN. Dynamic NAT in this case means that every IP packet sent by LAN clients to the router has its source address replaced with the IP address of G5. Source port numbers are also remapped, to avoid conflicts when two or more LAN clients use dynamic NAT simultaneously. The router keeps track of each IP session using NAT, and whenever an IP packet for an ongoing session arrives from the WAN, it remaps its destination IP address and port to the corresponding LAN address and port. ! set router clock ntp server pool.ntp.org clock timezone CET +1 Depending on your geographic location, you may need to choose a different NTP server pool and time zone. ! save the configuration copy run start Once you are satisfied that the configuration works as expected, don't forget to copy the running configuration to the startup configuration, to make the new configuration load at the next router startup. A few tipsConfigure AutoSecureAutoSecure is a wizard-style configuration utility that makes several changes to the router configuration, in order to remove multiple exploitable weaknesses. You receive multiple yes/no questions during this process. More information is available on the Cisco web site. I do recommend you use AutoSecure because it has few drawbacks and closes significant security holes. One of the side effects of AutoSecure is enforcing the use of multiple prompts for passwords during the configuration process. You can disable most of the password prompts on the serial console with the following commands: ! issue the following commands at the C931(config)# prompt) no enable password no enable secret ! if enable secret was previously issued line con 0 no login no password end Backup the running configuration to PCRunning a TFTP server on your PC helps in several respects, while configuring a Cisco router. I tested a couple of free TFTP servers for Windows, and settled on the SolarWinds server because it proved reliable. I also tested TFTPD, but it stopped working after a while and I was not able to make it work again. Cisco used to make a TFTP server for Windows available for free. It has not been updated for a long time, but it can still be found here. One of the uses for a TFTP server is that you can save a backup of the current running configuration on the PC. In this way you can save a snapshot of the current running configuration even though you are not yet ready to copy it to the startup configuration. You can use a similar command to backup the startup configuration. I also recommend that you backup all files from your router, before starting any configuration (including the original firmware image that came with the router, given that these days it is nearly impossible to obtain another copy from Cisco). ! backup configuration file to TFTP server at 10.10.10.100 copy system:running-config tftp://10.10.10.100/running-config Copy and verify a new image file to the routerIf you beat the odds and obtain a newer version of the router firmware, you can copy it to the router with TFTP, which in my experience works more reliably than a USB stick. I discovered that many USB sticks are not compatible with Cisco routers, even though they work fine on other devices. You can use the router to verify the integrity of the file against checksums stored in the file. While this verification will detect a corrupted firmware image and prevent you from attempting to install it on the router, this check is not a foolproof way to prevent the use of a doctored version of the firmware that contains intentional security weaknesses. You should be especially wary of firmware image files downloaded from sources other than Cisco (I am of course aware that this may be your only way to upgrade the firmware of your router - the rest of this discussion concentrates on how to verify that such files have not been tampered with). ! copy and verify firmware file from TFTP copy /verify tftp://10.10.10.100/c900-universalk9-mz.SPA.159-3.M5.bin flash: At the end of the verification process, the router displays the MD5 checksum of your firmware file. Make a copy of this checksum. It is also possible to compute the MD5 checksum of a file that is already present on the router: verify /md5 <filesystem>:<filename> If you already know what the MD5 checksum should be, you can avoid manually comparing two long strings of digits and letters and let the router give you just a yes/no answer: verify /md5 <filesystem>:<filename> <expected-md5-value> While Cisco strongly restricts the access to firmware image files by non-paying customers, it still publishes their MD5 checksums, which you can compare with the MD5 of your file to detect any tampering with the file contents. 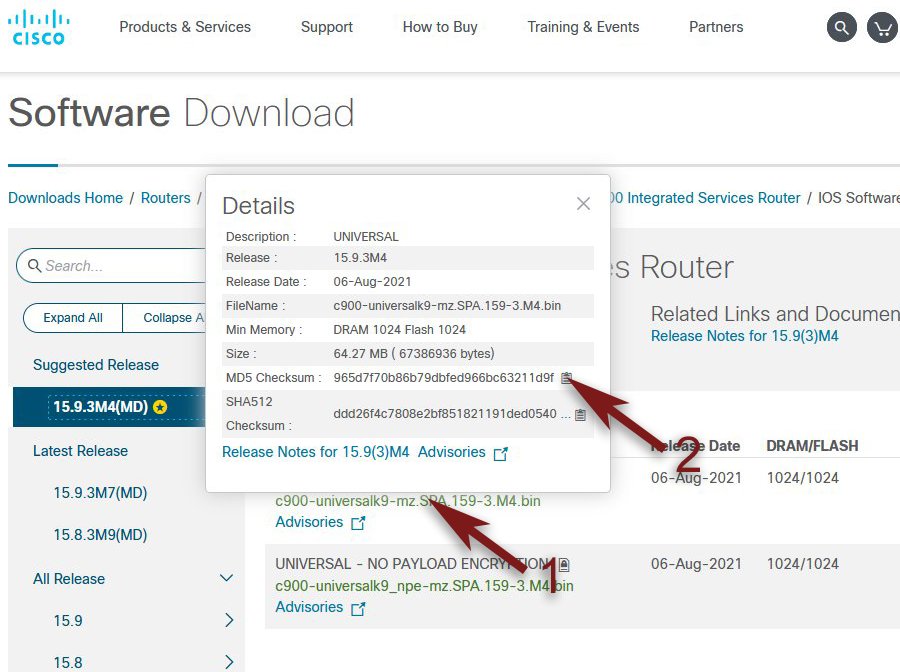
Go to the Cisco software download page for the C900 routers, and hover with the mouse over the file name. Make sure this is the very same version and type of firmware as the one you want to verify. In the pop-up displaying the file details, click the clipboard icon at the right of the MD5 checksum to copy it to the Windows clipboard. Compare this checksum with the one generated by the router. If the two checksums are different, so are the file contents. In the same popup you can download the release notes of this firmware version. Enter ROMMONTo enter ROMMON, you need to reload (i.e. reboot) the router. At the C931> prompt, issue the reload command and answer y to confirm. Wait while the router reboots. Eventually (after about 90 seconds) the console will display a banner similar to the following, and a series of dots gradually increasing in length. System Bootstrap, Version 15.8(3r)M0b, RELEASE SOFTWARE (fc1) Copyright (c) 2018 by cisco Systems, Inc. Compiled Mon 03-Sep-2018 9:01:14.57 C931-4P platform with 1048576 Kbytes of main memory System Integrity Status: 0x00000000 Current image running: Upgrade Last reset cause: Software initiated Rom image verified correctly ..... Press Ctrl + C while the dots are still increasing in number. This will display the rommon 1 > prompt. The number increases with each command you issue. To exit ROMMON and reboot, enter the reset command. Run a firmware image without installing itYou may wish to test a firmware image by loading it at boot time (i.e. running it) without actually installing it permanently. To do this, you need first to copy the image to test to flash: on the router, as described above. If this is not possible (e.g. the router fails to boot the current firmware), see the instructions here on how to copy the file to the router by TFTP from ROMMON. dir flash: This displays the contents of the flash file system, including any firmware image stored here. You can copy to the PC clipboard the file name of the image you want to boot. The following example assumes you wish to boot from the c900-universalk9-mz.SPA.159-3.M5.bin firmware image. Issue the command: boot flash:c900-universalk9-mz.SPA.159-3.M5.bin After a lengthy list of notices and information, the router displays: Press RETURN to get started! The router immediately displays the logon prompt. Log on and verify that you are running the chosen firmware version: enable sh ver
Then test whether the router configuration still behaves as expected. Once you reboot the router, the
previous firmware version will load. Install a firmware imageThis procedure assumes the new firmware image file is already present on flash:. Other variants of this procedure are available for files present, e.g., on a TFTP server. Backup the startup configuration to a TFTP server: copy nvram:startup-config tftp: Answer the prompts for IP address of TFTP server and file name, and confirm the action. Then issue the following commands: conf t no boot system boot system flash:<firmware file name>.bin exit You may repeat the boot system command with additional firmware image files. If the first file cannot be loaded, the router will attempt to load the subsequent ones, in the order they have been specified. Reboot the router: reload Confirm as required. After reboot, optionally display the new firmware version: sh ver FirewallThis router can be configured to provide a powerful zone-based firewall. Using this firewall in an effective way requires a relatively complex configuration, and many of the firewall capabilities involve a compromise among speed, convenience of use, and safety. More information is available e.g. here. AutoSecure (see above) automatically creates the following firewall rules (together with several other settings): ip inspect audit-trail ip inspect udp idle-time 1800 ip inspect dns-timeout 7 ip inspect tcp idle-time 14400 ip inspect name autosec_inspect ftp timeout 3600 ip inspect name autosec_inspect http timeout 3600 ip inspect name autosec_inspect rcmd timeout 3600 ip inspect name autosec_inspect realaudio timeout 3600 ip inspect name autosec_inspect smtp timeout 3600 ip inspect name autosec_inspect tftp timeout 30 ip inspect name autosec_inspect udp timeout 15 ip inspect name autosec_inspect tcp timeout 3600 The following basic CBACContext-Based Access Control firewall settings (non-zone-based) have been suggested as a simple general-purpose configuration: ip inspect name FW tcp router-traffic ip inspect name FW udp router-traffic ip inspect name FW icmp router-traffic ip inspect name FW dns ip inspect name FW ftp ip inspect name FW tftp The router-traffic keyword is required to examine traffic generated by the router. Without this keyword, only traffic passing through the router is examined. The above firewall settings prevent hosts on the LAN, as well as the router, from pinging hosts on the WAN and Internet. If you want to be able to do this (which is a reasonable need), you can remove the ICMP rule (or alternatively, use the rule without router-traffic, so that ICMP traffic generated by the router will be allowed): no ip inspect name FW icmp router-traffic Removing this rule in its entirety may potentially involve an increased vulnerability to DOS attacks that exploit ICMP Destination Unreachable floods (icmp.type == 3). Should you suspect an ongoing DOS attack exploiting ICMP, you can re-enable this rule. It seems that CBAC has not been actively developed for at least a decade (albeit it is still maintained), and that all development efforts go into the Cisco zone-based firewall. Nonetheless, it may still be a good idea to use also CBAC. Rebooting every nightSome home routers have a settings to reboot the router once a day (or, more appropriately, in the middle of the night when no one is using the Internet connection). I am not sure yet this is necessary with the C931. So far it never "hung" itself. Perhaps rebooting once a month is enough to clear any small memory leaks. Nonetheless, the kron command allows to schedule IOS commands, including reload. ! configure nighly reload kron policy-list DAILY-RELOAD cli reload exit kron occurrence NIGHTLY-RELOAD at 3:00 recurring policy-list DAILY-RELOAD exit exit write If you wish to make the reboot process faster, you can use the warm-reboot command, which tells the router to skip reloading the firmware image from NVRAM to RAM on future reloads. You only need to issue the warm-reboot command once in the configuration (i.e. not every time you want to warm-reboot), but keep in mind that the router needs to be reloaded before this setting enters effect. Moving the router to a different networkSome cleanup needs to be done if we decide to move the router to a different network. We assume that the router has been configured as discussed above, and that we unplug g5 from the 192.168.1.0 network and plug it directly into an ISP Ethernet port. g5 is already configured to receive its IP configuration via DHCP, and after being plugged into the ISP network it renews its DHCP lease, this time from the ISP. Since our LAN is the 10.10.10.0 network, we should make sure that this address range does not overlap the address range of the ISP connection. If it does, we must change all references in our LAN from 10.10.10.x to e.g. 192.168.1.x. It is actually possible to use NAT in order to avoid re-addressing IP devices located on networks with partly overlapping address ranges, see here. However, when the machines to re-address are few, to avoid confusion I strongly suggest to manually re-address them. If these machines use DHCP reserved IP addresses, the re-addressing only needs to be done in the router. If the IP addresses of these machines are statically configured in each machine, on the other hand, this will require manually re-configuring each machine. This is why I am a great fan of DHCP reserved addresses (as long as the router allows a sufficient number of them - some small routers like the RV series seem to be quite limited in this respect, or possibly their WEB GUIs are buggy and cannot display a table of more than a dozen or so reserved addresses, even when the router internally can handle more). If you earlier on chose to define a default static route ip route 0.0.0.0 0.0.0.0 192.168.1.1 1, most likely this route no longer works, so delete it. no ip route 0.0.0.0 0.0.0.0 192.168.1.1 1 In most cases, this is all that is needed for the C931 to route all external traffic to the gateway IP address it received on g5 via DHCP. One consequence of the static NAT we created for the printer is that sh ip route displays a directly connected route to its NAT-mapped IP address: L 192.168.1.50/32 is directly connected, GigabitEthernet5. We remove the static NAT for the printer, but we keep the DHCP pool for the printer because we still need it. no ip nat inside source static 10.10.10.50 192.168.1.50 SummaryThis page provides an example configuration for a Cisco C931-4P router. It sets up the router in a typical home or small-office configuration, but does not use all the router's capabilities. It is meant mainly as a starting point for further configuration. This router has limitations, and is not as configurable as e.g. an ISR G2 or 4000, but in a simple home or office network a C900 router may provide all the required configurability and throughput in a small footprint. |