Sekonic Flashmate L-308S flash meterVirtually all current speedlights are capable of TTL metering with modern cameras. A large number of current studio strobes are likewise capable of TTL metering with one or more camera brands. In the latter case, a camera-brand-specific flash controller must be used to relay commands and translate the communication protocols between camera and strobe. In spite of this, it is sometimes still necessary to use a dedicated external flash meter, in order to measure the correct exposure in certain situations. An external flash meter is also necessary whenever there are doubts about the actual light amount emitted by a speedlight or studio strobe, for example to verify whether the maker's specifications are realistic or artificially inflated, and/or whether the specific unit being tested is defective. Several less-than-reputable makers of studio strobes, for example, rate the emission of their own products in "effective Ws" or comparable terms, which mean absolutely nothing in objective terms. The emission energy of a speedlight is often rated in GN (Guide Number), or more precisely GN/m, which is the lens aperture that gives a correct exposure of a subject placed at 1 m of distance from the speedlight. Although the base sensitivity of most digital cameras is ISO 200, several manufacturers of speedlights conveniently "forget" to say that the GN they specify is measured at ISO 400. Naturally, a GN specification means absolutely nothing if the camera ISO is not specified. At least one manufacturer has even been caught cheating on the distance between speedlight and subject, by "forgetting" to say that they specify the GN at 1' instead of 1 m. Some silently specify the GN of their zoomable speedlights at a zoom setting that covers an 80 or 100 mm lens FL, instead of the 50 mm "standard FL" for full-frame. There are endless ways of cheating, when the values of one or more key parameters are arbitrarily changed without telling the customer, or the measurement conditions are written in technobabble and/or hidden in a small-print footnote unreadable without a magnifier. The only objective measurement of the emission of an electronic flash, with a given light modifier and in real-world studio conditions and camera settings, is a measurement of the emission power with a reliable flash meter. Many flash meters are capable of two types of measurement, i.e. incident illumination, by placing the meter's sensor at the subject's position, or reflected illumination (often called spot metering), by pointing the meter toward the illuminated subject, often with the help of a viewfinder/telescope built into the meter. Another practical use for a flash meter is verifying whether the speedlight/strobe emits a constant power, or a fluctuating power, during a succession of flashes. Several cheap studio strobes, for example, display an inconsistent emission when repeatedly flashed (sometimes fluctuating in excess of one stop of power between successive flashes, in spite of being set to emit a constant power). Some of these strobes emit less than their normal power when flashed in rapid succession (because these strobes are poorly designed and can be triggered even when not fully recycled), while others fluctuate in output power regardless of whether fully recycled, because their circuits are poorly designed or use inferior components. Some are simply underpowered and never live up to their official specifications.
The magnitude of emitted power and its uniformity across successive flashes are only two of the key
parameters that separate good speedlights/strobes from trashy ones. In particular, good electronic flash
units are also supposed to exhibit a constant emission spectrum at different levels of power. Failures to
do this result in an inconsistent color temperature during a photography session, which may force the
photographer to manually correct the color temperature of each image in post-processing. A flash meter is
not equipped for this type of testing, which requires instead a flash spectrometer. This type of
equipment, far more expensive than a flash meter, is not discussed on this page. High-end flash meters can be quite expensive, especially nowadays that these devices are used (and therefore manufactured) less often than in the past. In the past, a flash meter was essentially obligatory for a serious photographer frequently using studio strobes, especially when most strobes lacked TTL exposure control, and test exposures shot on film were not immediately visible. After the switch from film to digital (nowadays virtually complete), test exposures are immediately visible by the photographer, removing much of the reason to use a flash meter. However, without a flash meter one is often left to wonder why the equipment failed to perform as expected on some occasions. For this reason, a few years ago I decided to buy a flash meter good enough to give accurate readings of flash exposures, and at the same cheap enough not to become a major purchase. My choice was the Sekonic Flashmate L-308S, discussed on this page and quite popular until about a decade ago. This model appears to have been replaced by the quite similar L-308X, costing around 200-230 € and easily available in most countries. The L-308 family of models has been around for quite many years, and reviews of the slightly different models are overwhelmingly positive. In addition to flash metering, they also offer a continuous-illumination photo mode and often a cine mode, and in the more recent models an HD cine mode. In this review, I concentrate only on the flash mode because this is my main use of the meter. The next commonly used Sekonic model of light/flash meter is the L-478D, mounted in a different, larger case with a much larger color LCD screen that displays plenty of information at once. It provides better capabilities than the L-308X and refinements like an orientable light sensor, but still lacks a telescope/optical viewfinder for spot metering with precision, and sells for about 150-180 € more than the L-308X. Other L-478 models with additional capabilities are available, and cost significantly more. Sekonic Flashmate L-308S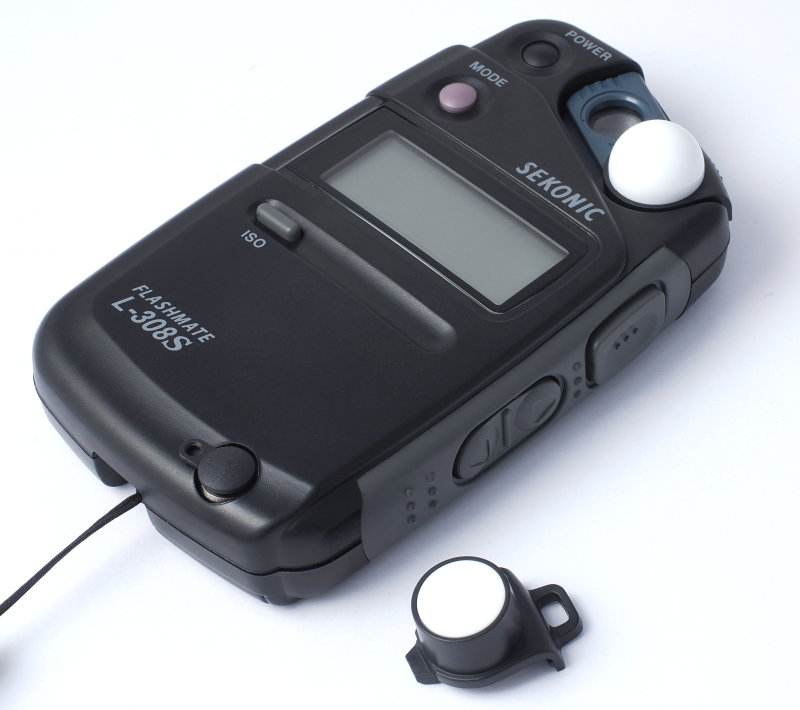
The body of the L-308S measures roughly 112 by 54 by 20 mm, with the hemispheric diffuser adding another 5 mm to the thickness. The hemispheric diffuser (called Lumisphere by Sekonic) is permanently attached to the casing, but slides sideways to reveal the sensor covered by a plastic lens. The latter position is used for reflected light measuring, by pointing the lens in the direction of the subject. According to the specifications on the Sekonic web site, the angle of view of the sensor in reflected light mode is 40°. In reflected light mode, the LCD display faces toward the subject and away from the photographer. With the hemispheric diffuser covering the sensor, the meter is ready for incident light illumination and is particularly suitable for measuring the illumination of three-dimensional subjects. In this mode, the meter must be placed as close as practical to the subject, with the hemispheric diffuser pointing toward the camera. By sliding the hemispheric diffuser away from the sensor, and covering the sensor with the flat diffuser (called Lumidisc by Sekonic), the meter is optimally configured for incident light measurements of flat subjects, like a document or a picture. I almost always use the hemispheric diffuser for incident illumination, and sometimes the naked sensor for reflected illumination. I rarely use the flat diffuser, since the hemispheric diffuser works just as well as the flat diffuser, except possibly with a strongly directional illumination. The meter comes with a tight-fitting soft faux-leather pouch with a belt eyelet on its back. The pouch is not padded, but seems to provide a reasonable protection for the meter when packed in a camera bag together with other small equipment. The flat diffuser is housed in a very small, stiff and difficult to open plastic pouch. In order not to lose this pouch, I tied its string to the belt eyelet at the back of the meter pouch.
The difficulty of opening the small pouch of the flat diffuser and the risk of losing this pouch have been
commented upon in several reviews. It would make far better sense to provide a small compartment for this
diffuser within the meter pouch. There is no provision for tripod-mounting the meter. The provided lanyard, long enough to hang the meter around your neck, attaches at the bottom of the meter. The rear of the meter only contains a label with serial number and the door of the battery compartment. A single AA battery is needed, and a rechargeable Panasonic Eneloop works fine. Controls and operationThe front panel has a slightly recessed press-on, press-off Power button near the sensor. The switch must be pressed for about one second to turn the meter on or off. The meter is designed to be held in your left hand. I guess the idea is that you may be simultaneously holding the camera in your right hand, or operating a tripod-mounted camera with your right hand. I find it natural to use the index finger to hold the meter securely, the tip of the thumb to operate the buttons on the front panel, the middle finger to press the large rectangular button with "..." label on the right side of the meter, and the middle or ring finger to press the smaller "Up" and "Down" buttons on the right side of the meter. It is entirely possible to operate the buttons of the meter with your right hand, but probably this is not the original intention of the designers, since this requires the use of both your hands. The Mode button is used to cycle between the following operating modes:
Readings resolutionThe exposure/sync time can be changed in full-stop equivalents (1/30, 1/60, 1/125 s etc.) by default. Only the denominator (30, 60, 125 etc.) is displayed on the LCD screen. Once you change the aperture resolution to 0.5 stops, or 0.3 stops, the exposure time changes correspondingly. By default, the aperture is displayed in full-stops resolution, but this can be changed:
When displaying full stops, a smaller digit appears at the right of the aperture reading, and indicates
tenths of a stop. The meaning of this digit is quite counterintuitive. It is wrong to add this digit to
the aperture value (e.g., if the meter displays 5.6 and a small
5, don't do 5.6 + 0.5), and it is likewise wrong to use it as the decimal part of a
multiplying factor (don't do 5.6 * 1.5 or, even worse, 5.6 * 0.5). The usefulness of this
type of reading is mainly with studio strobes, like most of the old R and Pro Bowens models, that can be
adjusted only in full stops and tenths of a stop (with two decade rotary switches instead of f/
values). 
Applying the above formula to f/8, for example, yields f/9.513656..., usually rounded to f/9.5. The ISO scale starts at 3 ISO and goes up to 80,000 ISO with a non-linear progression (200, 250, 320, 400 etc). Data loggingAs far as I know, there is no data logging in this meter, and no way to save the last reading to an external computer/mobile phone. Power managementIn wireless flash mode (lightning bolt icon), the meter continues to wait for further flashes after displaying the readings. Every new reading overwrites the preceding one. After about one minute of inactivity, the meter stops monitoring for flashes but remains on. The aperture reading is displayed in f/ stops (e.g. 5.6) accompanied by a smaller digit representing additional tenths of a stop (e.g. 7). The meter shuts off completely after a few minutes of inactivity. Precision and repeatabilityThis meter seems to be very precise, but an accurate test would need a comparison with an even more reliable meter, or a light source known to be more precise than this meter. Since I have neither, I can only state that the Godox AD200 and AD600 Pro studio strobes, which allow the emission power to be adjusted in intervals of 1/10 of a stop, are at least as precise and repeatable as this meter. Among my strobes, these Godox models are at least as repeatable as my old Bowens Gemini 500R and 1500 Pro. Repeated metering of flashes at the same intensity setting with these Godox strobes invariably result in exactly the same meter readings. If there is any fluctuation, it is less than the 1/10 of a stop precision of both the strobes and the meter. DocumentationThe meter comes with a Japanese/English printed manual (dated September, 2015) and a Quick Guide sheet printed on a heavier stock. This Quick Guide can be cut in half and, in my case, the Japanese half discarded. Even this half-card, however, is too big to fit in the meter pouch. It could fit if folded it in half, but its is not designed for this use. On the other hand, nothing prevents you from printing a copy of the Quick Guide at 75% of its original size, which makes it fit in the meter pouch, and laminate it for added durability. The User Guide and Quick Guide of the L-308S can still be found on a Sekonic site for the support of discontinued models. They can also be found on third-party web sites. SummaryThe Sekonic Flashmate L-308S is a relatively simple, but very precise for its price class, light meter for continuous and flash illumination. This particular model is discontinued, but physically similar Sekonic models with enhanced functionality are still available in the same price class. |