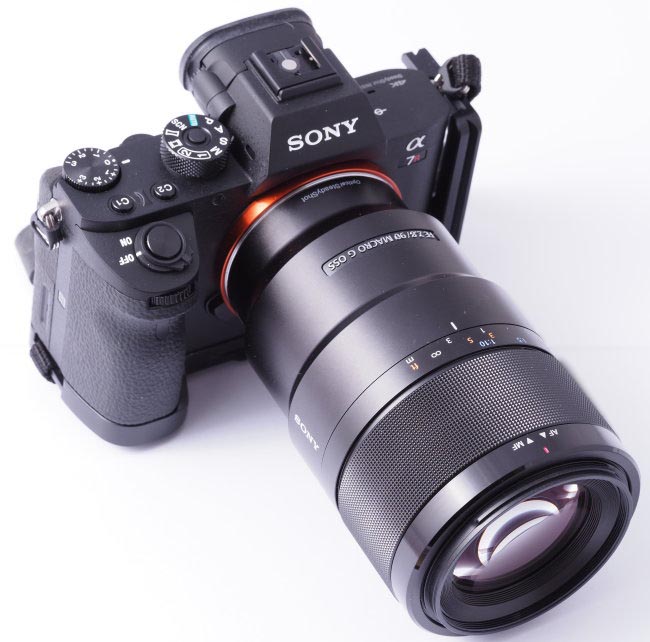
Sony Alpha 7R II
and Sony 90 mm f/2.8 G macro lens
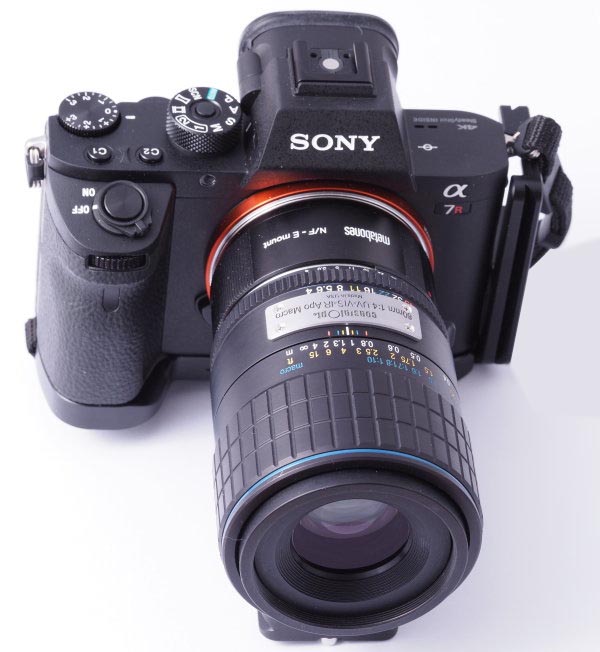
Sony Alpha 7R II with CoastalOpt (now Jenoptik) 60 mm Apo and Metabones Nikon to Sony E adapter.
The bracket mounted at the bottom of the camera is a third-party item made in China.
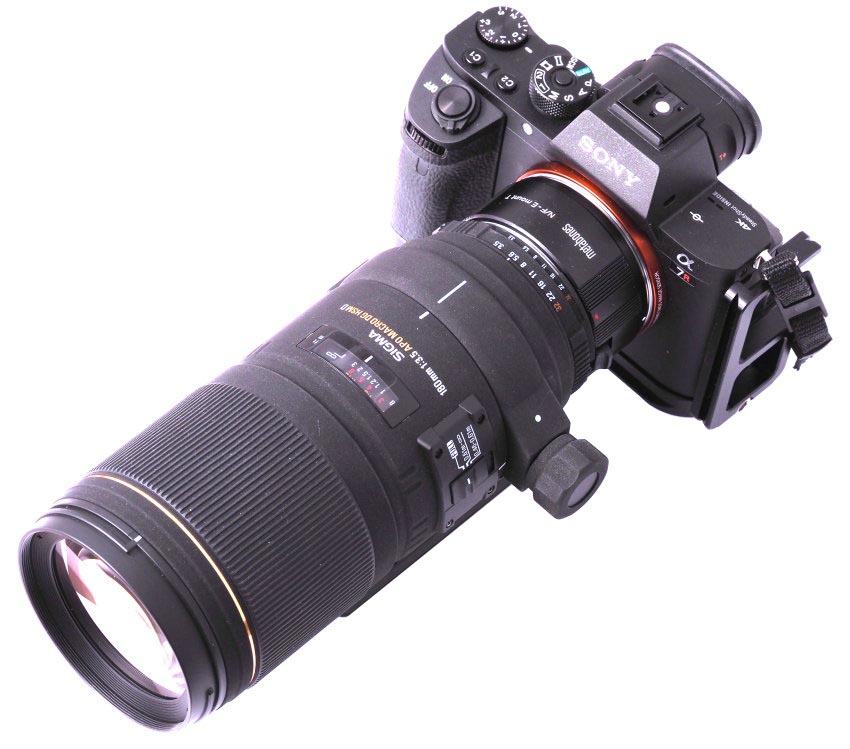
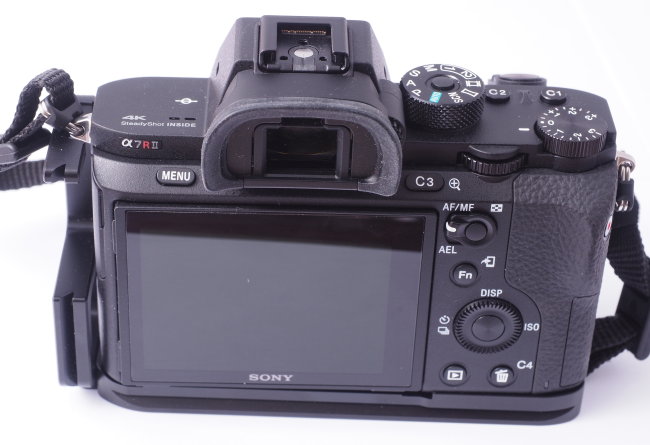
Sony Alpha 7R II with Sigma 180 mm f/3.5 macro and Metabones Nikon to Sony E adapter. Rear of Sony Alpha 7R II with third-party bracket.
After years of resistance, I acquired my first full-frame camera, a Sony Alpha 7R II, at the end of 2017.
This page is not a complete review of this camera, and does not contain a description of all features or a
detailed comparison with similar cameras. For this type of coverage, you can see the numerous reviews of
the 7R II on the web (e.g. at DPreview, an
additional
DPreview coverage,
and
SonyAlphaLab). For more detailed information, download the
user instruction and
help guide PDFs from Sony.
I find the help guide far more useful than the user instructions when I need to find how to carry out a
given task.
Additional online information
is also available on the Sony site. For even more detailed information and more efficient learning,
especially if you own this camera, I recommend the book by David Busch
Sony α a7R II/a7 II(dead link).
I am aware that the Sony Alpha 7R II has been replaced by the Sony Alpha 7R III. In fact, my decision to
buy the 7R II was largely motivated by its price cuts in the period leading up to the release of the 7R
III. Generally, I buy the current model of a given camera brand only if I am convinced that I do need the
functionality just introduced with this model. If this is not true, often I prefer to purchase an old
model on the verge of being replaced by a new iteration, rather than a completely new model.
In retrospect, I am quite happy that I waited long enough, before starting out with a full-frame camera,
to entirely avoid the klunkiness of full-frame DSLRs. Since I switched from APS-C Nikon DSLRs to Micro 4/3
in 2012, I have been convinced that the future (and present) is mirrorless. It has taken a few years for
top-of-the-line Micro 4/3 cameras and lenses to reach a sufficient performance to outclass consumer APS-C
DSLRs and start to compete with some full-frame DSLRs, but we are there now. Full-frame mirrorless cameras
are even more recent, but they are already competing with high-end full-frame DSLRs.
I am also happy that I waited long enough that I could buy the second iteration of the Sony Alpha 7R line.
By waiting, I was able to acquire some functionality that is important to me, especially full
magnesium-alloy body (partly plastic in the original Alpha 7R I), sensor-based image stabilization (only
in-lens available in Alpha 7R I), higher sensor resolution, firmware-implemented anti-aliasing, and
general improvements. While the Alpha 7R I is by no means a bad camera, its II iteration is significantly
better.
42 megapixel is probably not a useful resolution for most photographers. I still believe that 12 to 16
megapixel is enough in most cases, and that 20 megapixel allows significant cropping in post-processing.
However, I need this camera not only for "real" photography, but also as a higher-than-normal
resolution platform for lens testing.
Size and weight
The 7R II camera body is only slightly bigger and heavier (and moderately more expensive) than my Olympus
E-M1 Mark II.
Size and weight of Micro 4/3 equipment are, for me, a major advantage for travel and field photography. I
can pack substantially more Micro 4/3 equipment in the same volume and weight than its APS-C or full-frame
DSLR equivalent, and take a medium-large kit of lenses in my carry-on luggage on intercontinental flights
with a lesser chance of being intercepted while boarding by overzealous flight attendants hunting for
cabin luggage to divert to forced check in at the gate. Things are different, however, with full-frame
mirrorless cameras like the Alpha 7R II. While the Sony full-frame mirrorless bodies are not much bigger
than Micro 4/3 ones, lenses for full-frame mirrorless are as big and heavy as full-frame DSLR lenses. For
this reason, I plan to use the Alpha 7R II almost exclusively as a studio/lab camera for macrophotography
and photomacrography, and to take only Micro 4/3 equipment to the field. I might go as far as carrying the
Alpha 7R II with 90 mm macro lens on a day trip, if there is a clear need, but I am not going to switch to
a mirrorless full-frame for regular outdoors use with a full lens kit.
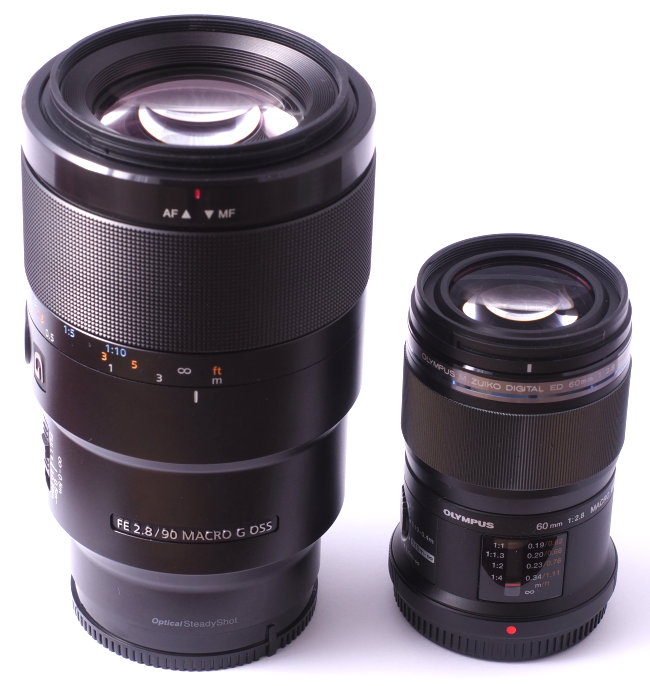
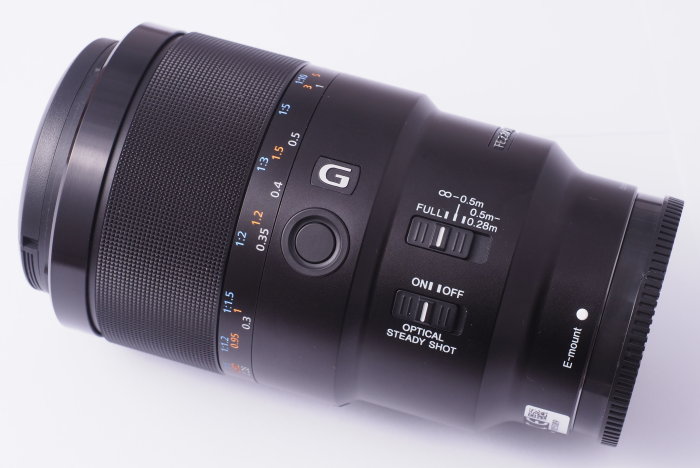
Sony 90 mm f/2.8 G macro lens
Sony A7R II with Sony 90 mm f/2.8 G macro lens. Sony 90 mm f/2.8 G macro lens and Olympus 60 mm f/2.8 macro lens.
The 90 mm f/2.8 macro lens is part of Sony's G lens series, which features high resolution to match this
and future cameras' sensors, special attention to proper bokeh during the design phases, environmental
seals of all joints and external moving parts, and very precise focus-by-wire. The last of these
characteristics is indispensable to take full advantage of the lens resolution (see also below). I have
used other focus-by-wire lenses where I could clearly see the focus change in discrete steps in magnified
live view, with no intermediate focus possible between a step that was a little too far and the next step
a little too close. This lens is different, with individual focus steps too small to detect.
This lens uses 15 elements, of which one aspherical, one ED and one Super ED, in 11 groups, and is rather
complex even for a modern macro lens. Another bit of information (not directly verified by me) is that
this lens uses multiple motors to move the different optical groups involved in focusing, instead of the
typically used single motor and multiple mechanical cams. Focusing is internal.
Switching between MF and AF is done by pushing or pulling the focus ring (much like the Olympus Pro
lenses, albeit the focus scale remains always exposed in this 90 mm). In manual focus mode, focusing from
infinity to 1:1 requires less than half a turn of the focus ring. In this mode, turning the focus ring
activates the live view magnification and displays an on-screen focus scale. Half-pressing the shutter
button returns live view to normal mode. In manual mode, the focus ring stops turning at either end of the
range. When the focus ring is pushed forward into AF mode, turning it has no effect, and the ring turns
forever, without end stops. Curiously, even in AF mode it is still possible to manually turn the distance
scale adjacent to the focus ring. The distance scale still stops at either end. Also this, however, has no
effect on the actual focus.
The above picture shows the size difference of two good macro lenses, one for full-frame and one for Micro
4/3. With some unavoidable differences, both lenses can be used for most subjects commonly found in macro
photography. Can you guess which of the two lenses (and therefore which of the two camera formats) is more
likely to be in my camera bag when I go out in the field? In the lab/studio, of course, size and weight
hardly matter.
For the above reasons, my only Sony native lens for the 7R II is the 90 mm macro, and I do not plan at
present any purchases of additional Sony FE lenses. Several legacy macro lenses with mechanical focus ring
and aperture ring can work on this camera (although not all are good enough for its 42 Mpixel sensor), but
I find having one autofocus macro lens nice for making close-up work much faster. With moving subjects, I
find close-up photography with manual focus bothersome at best, and all but impossible at worst.
This is a nice lens despite its large size, with a push-pull MF/AF clutch and a focus-lock round button,
in addition to the usual focus limiter and IS switch. It comes with a bayonet-mounted, reversible plastic
lens shade long enough to protect this lens from sun-caused flare. Also in spite of its size and weight,
this lens has no tripod collar. The magnesium-alloy body of the 7R II is strong enough, but this camera +
lens combination is quite front-heavy and unbalanced when the camera body is directly attached to a tripod
head. Nonetheless, as a whole, macro lenses up to 105 mm are normally devoid of tripod collar.
The push-pull AF/MF clutch and focus-lock button are unfortunately missing on the Olympus 60 mm macro
lens, and I do miss these features.
Left side of Sony 90 mm f/2.8 G macro lens, with focus lock, focus limiter and switch of in-lens
stabilization.
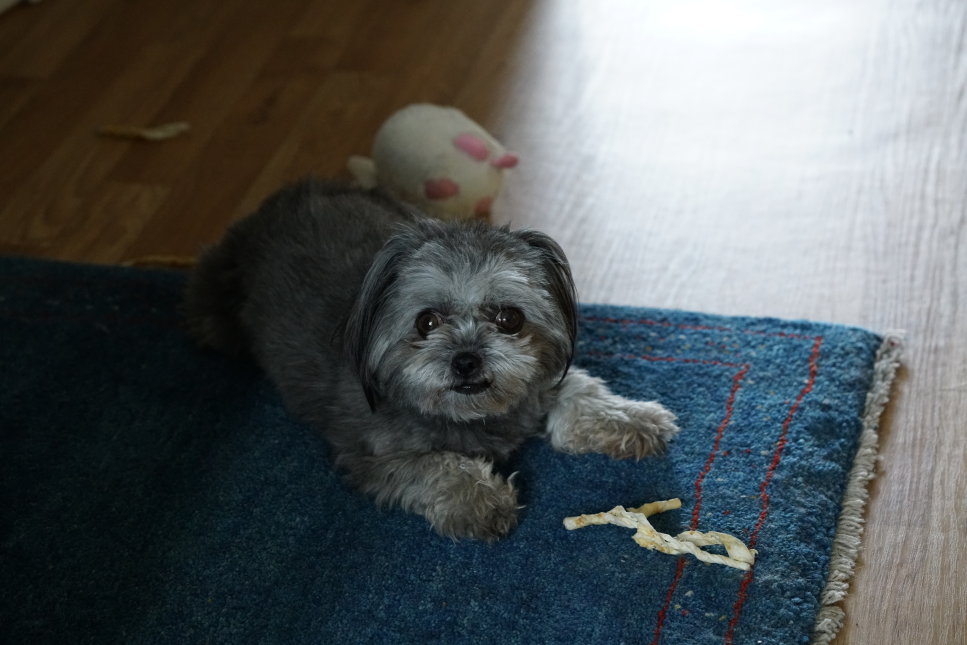
The following picture is an improvised dog portrait in rather poor indoors natural light with the 90 mm
macro in AF mode. In spite of the unfavorable conditions (1/45 s hand-held, f/5.6, auto ISO 6400, unevenly
bright and dark areas, unpredictably moving subject) results are quite acceptable, as shown also by the
center crop. In particular, the center crop does not show much noise, while on Micro 4/3 camera the noise
level at the same ISO would be horrendous. This is in part a result of the larger sensor (roughly four
times the area of Micro 4/3) and its back-illuminated structure, in part due to the lack of an optical
anti-aliasing filter and advanced anti-aliasing, demosaicking and de-noising algorithms, and probably in
part also due to the numerous parallel pipelines of on-chip analog-to-digital converters. Again, given the
shooting conditions, this is more a test of the image stabilization and noise reduction systems than a
resolution test of the lens.
Whole frame, reduced. Center crop, 1:1 pixels.
One thing to note is that the AF assist LED on the camera body is completely ineffective with the 90 mm
macro, even at this distance to the subject. The LED only illuminates the rightmost 1/3 of the frame. The
rest is in the shadow of the lens barrel. The camera firmware could perhaps be updated by Sony to
automatically switch off the AF assist LED when it detects a lens that prevents the use of this LED.
More technical reviews and tests of this lens are available, for example, on
DxOMark,
philipreeve.net
and
lensrentals.com. In particular, DxOMark reports that this lens is significantly sharper than corresponding macro lenses
from Canon and Zeiss.
Other macro lenses
The CoastalOpt 60 mm and Sigma 180 mm f/3.5 macro lenses shown above work very well with the 7R II, albeit
in manual focus and manual aperture. Both lenses are good enough to use the resolution of the 42 megapixel
sensor. Almost all of the other legacy full-frame lenses and special-purpose lenses I tried with this
camera do not pass this test. The Printing Nikkor 105 mm f/2.8 A, discussed below, is the only lens I
tested that clearly outresolves the sensor of the 7R II (as well as the smaller pixels of the Olympus E-M1
II).
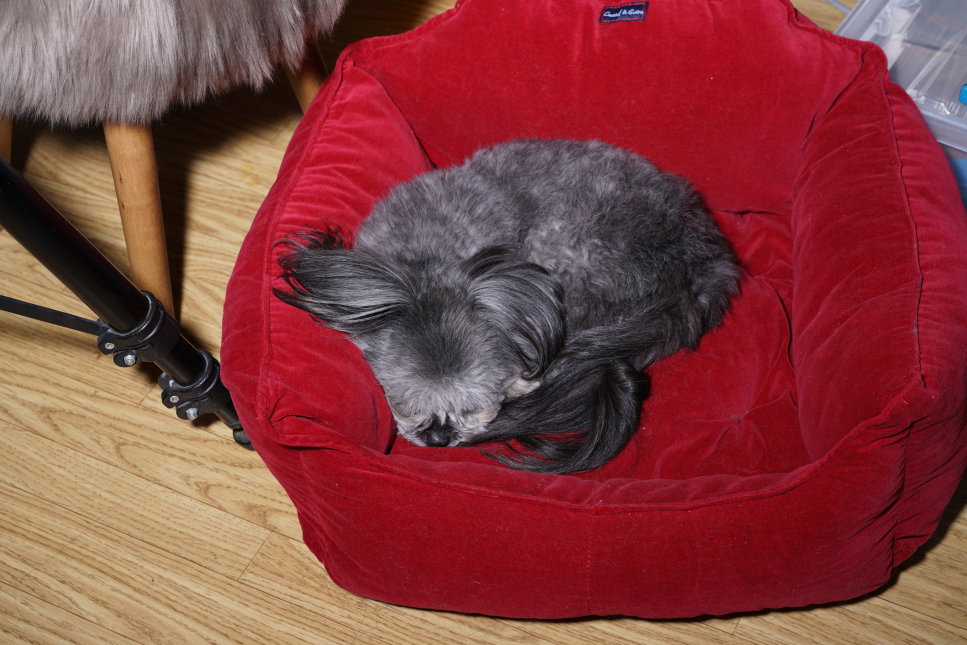
The following image of the same dog was taken with the CoastalOpt 60 mm at f/5.6, at 100 ISO with TTL
flash. The 1:1 crop clearly shows that this lens provides as much resolution and detail as the camera can
record in these conditions (and clearly better than the poorly illuminated scene of the preceding
example). The lack of an optical anti-aliasing filter in the 7R II (anti-aliasing is performed by the
firmware) contributes to the remarkable richness of detail. When focused with precision, the 90 mm macro
is capable of comparable resolution.
To obtain this level of detail, however, focusing must be very accurate. To achieve the required precision
in manual focus with third-party lenses, I programmed the C1 button to magnify the live view, in order to
quickly activate this function (automatic switching to magnified view by turning the focus ring is only
possible with Sony lenses). Manually started live view magnification is a three-step procedure: first
click displays the area that will be magnified, second click activates the lower magnification, third
click the higher magnification. Obviously, this is only feasible with a static or very slowly moving
subject.
The focus peaking function of the 7R II is sufficient to focus when depth of field is large enough to mask
small focusing errors, for example in subjects several meters away and apertures around f/8 or f/11. In
close-up and macro photography, and when very precise focusing is required, focus peaking is only good for
a relatively rough manual focusing, or as a preliminary step in precision manual focusing, but used alone
does not provide the highest precision. Focus peaking looks for sharp, high-contrast edges in the live
view image, i.e. at relatively low resolution, but cannot detect very fine detail and does not use the
phase AF detectors.
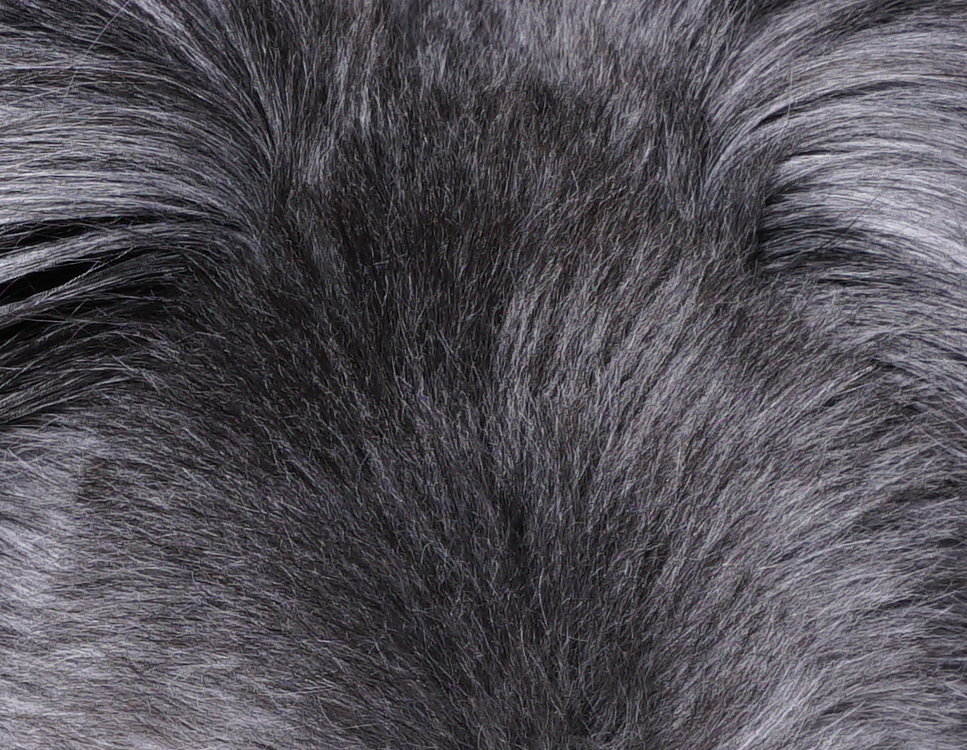
Image shot with CoastalOpt 60 mm at f/5.6, 100 ISO, TTL flash.
1:1 pixels center crop of preceding image. The fur hairs, individually visible in this crop, are much
finer than human hair.
Why full-frame?
When one must use ambient light, and lenses of the same speed are available regardless of format, a
full-frame sensor has only a slightly better dynamic range and a slightly lower noise level in dark areas.
The difference among sensors of different sizes used to be much more significant in the past. Today, this
is still true for very small sensors like those used in mobile phones, but full-frame sensors today are
only marginally better than APS-C and Micro 4/3 ones (if one compares the images recorded by the cameras,
which are subjected to considerable in-camera processing). As such, current full-frame cameras are only
slightly better than APS-C and Micro 4/3 cameras, regardless of what camera salesmen and some professional
photographers may tell you.
However, in-camera processing, including the processing before the raw image is stored on the memory card,
is not the same on different formats. Smaller format cameras apply a more aggressive processing to reduce
their intrinsically (but only moderately) higher noise, and also try to recover detail in very dark, very
light and deep-red areas by applying "heavier" algorithms. Thus, comparing the results of
cameras of different formats is not straigtforward. It becomes more a matter of evaluating which image
looks more natural, or "less visibly processed" in its likely problem areas, than simply looking
for the lowest noise and highest dynamic range.
In fact, the post-processing algorithms used on current smaller-format cameras are very good, and at least
95% of ordinary, well-illuminated subjects yield virtually indistinguishable results on full-frame, APS-C
and Micro 4/3. Obviously visible differences are likely to be seen in maybe 1% of the subjects. This is
the same reason why casual photographers today can get away with pictures shot with point-and-shoot
cameras, or even phone cameras, for perhaps 90% of ordinary, well-lit subjects, but the 10% of more
demanding subjects shows tell-tale differences. In conclusion, if a high image quality in difficult
subjects and lighting conditions is a requirement, the advantages of larger sensors cannot be
completely compensated for by more aggressive post-processing.
In the specific case of the 7R II versus the Olympus E-M1 Mark II, we are comparing a 42 Mpixel full-frame
sensor with a 20 Mpixel Micro 4/3 sensor. In spite of the higher resolution of the 7R II, the individual
pixels of the E-M1 Mark II are only half the area of 7R II pixels, so a little advantage of the full-frame
sensor still remains.
Before choosing the 7R II, I examined test pictures taken with this camera, and compared them in detail
with pictures of the same studio scene shot with the enhanced resolution mode of the E-M1 Mark II, which
produces 50 Mpixel images by combining multiple exposures shot while shifting the sensor by a fraction of
a pixel. I must say that I could detect only very subtle differences, irrelevant to my needs in real-world
shooting. The 7R II shows slight advantages in difficult subjects, and records images in a single
exposure, while the E-M1 Mark II in enhanced resolution mode requires a non-moving subject and a
tripod-fixed camera to combine multiple exposures. The 7R II shows fewer of the signs of excessive
in-camera processing that sometimes appear in E-M1 Mark II images shot in extreme conditions. The same
applies at really high ISO, where the 7R II gives slightly more natural-looking images with fewer obvious
artifacts than the E-M1 Mark II.
As a whole, I would dare to say that the advantages in image quality of the 7R II over the E-M1 Mark II
are not enough to justify choosing the former over the latter, especially considering the larger size,
weight and (to a lesser extent) cost of full-frame lenses. It is possible that a full-frame camera with
the same 20 MPixel native resolution as the E-M1 Mark II would show slightly more visible differences. In
fact, Sony also produces the 7S series, with full-frame sensor of relatively low resolution (currently 12
Mpixel) optimized for low-light still pictures and video. My main reasons for choosing a full-frame camera
are subtler, and not based on intrinsic differences between the image quality of this and Micro 4/3
cameras (see below).
Much has been written about the supposedly "too high" DOF (depth of field) of small-format
cameras and their lenses. Although f/1.2-f/1.4 lenses, and even a few sub-f/1 lenses, are now available
for Micro 4/3, good-quality ones are large and heavy, removing some of the advantages of this format. The
opposite side of the coin is that a high DOF is, virtually always, an advantage in macrophotography. A
shallow DOF seems to be mostly sought after by artistic photographers nostalgic about the
"cinematic" shallow DOF of old movies (which is originally a result of illumination and
sensitivity constraints rather than artistic choice).
Other differences among formats are evident in photography at 1x and above. To image the same subject
area, full-frame requires twice the on-sensor magnification as Micro 4/3 (and therefore full-frame
produces a lower DOF at the same lens aperture). On the other hand, the aperture on full-frame can be
stopped down farther than on Micro 4/3 (by two stops at the same Mpixel count) before image resolution is
degraded by diffraction. Ironically, doing so achieves the same DOF as Micro 4/3, but removes
three-quarters of the available light. In many cases, doubling the magnification also requires the use of
a different, often more expensive or hard-to-find lens (see also below).
In several respects, Micro 4/3 and full-frame should simply be regarded as different media with different
characteristics (see also below). Understand the differences, and choose the format that best fits your
needs, budget, and physical capability of carrying the equipment outdoors. In my case, I found that some
of my legacy lenses were not giving me fully satisfactory results on Micro 4/3 cameras. As discussed
above, they prove instead to be very good on the sensor with larger pixels of the 7R II. Given that a few
of these lenses are far more expensive than the 7R II, this is a reason for me to use the 7R II in
addition to my Micro 4/3 bodies.
Why the Alpha 7R II?
With the announcement of the Alpha 7R III, the price of the 7R II has become sufficiently low to be a
significant proposition. The price of the Alpha 7R III and Alpha 9 is too high for me, considering the
handful of features introduced by these cameras and their limited usefulness to me. The 7R II, in
particular, uses the same sensor of the 7R III. The Alpha 9 is more clearly a better camera than the 7R
II, but the price difference is too steep.
It will take time for me to learn the ins and outs of the 7R II. So far, the only feature missing in the
7R II that I am aware of, and that I would be able to use on a daily basis, is external flash triggering
while using the silent (electronic) shutter. If I will miss it enough, I might implement flash triggering,
separately timed from shutter release, in my programmable focus stacker. The idea is simple: trigger the
shutter, wait for the electronic shutter to "open", then trigger the flash before the electronic
shutter starts to "close". This may work only in a relatively dark environment. If it does not
work, I will use continuous illumination to shoot with the electronic shutter. Since I need the electronic
shutter only for photomacrography in the lab, strong continuous lighting with LEDs is not difficult to
implement.
One reason to use the electronic shutter is to avoid wearing out the mechanical shutter while taking long
sequences of shots with focus stacking. This is a real concern if focus stacking is done on a daily basis.
Another use for the electronic shutter is in ordinary macro-photography and photomacrography, as well as
photomicrography, in order not to introduce blurring by mechanical vibrations.
The opinions on the Sony Alpha menu organization are much varied. This is true of virtually any other
digital system camera as well. Since shooting styles and preferred workflow vary, some photographers will
always be forced to wade across menus to find frequently used settings. The menu organization is of course
different from the Olympus menus, to which I never really got used after so many years. After one month of
using the 7R II and configuring three of the custom buttons, I am quite satisfied with the workflow for
photomacrography in the lab. I must admit, however, that I am using the 7R II for only one application,
while I use the Olympus E-M1 Mark II for everything.
A list of my overall positive (+) and overall negative (-) findings so far in the A7R II, in no particular order:
+ Ample enough and flexible configurability, including four custom buttons.
+ Large number of physical controls: 8 buttons (plus the 4 button actions of the rear dial and the shutter button), 4 rotary dials (plus
the mode dial), and one two-position lever (plus the power lever).
+ 42 Mpixel native sensor resolution, which is more than enough to allow significant cropping if necessary.
+ 6-axis image stabilization
by shifting the sensor in real time. It works also with legacy lenses by manually entering the focal
length. Unlike Olympus cameras, which emit a slight hiss also when image stabilization is off, the 7R II
is completely silent (and vibration-free) in this case.
- USB 2.0 interface and USB Micro-B connector. Some recent cameras use USB 3.0 or 3.1, and USB-C connector. If the camera's CPU and memory card are
fast enough (which is not a given), USB 3.X makes it faster to transfer pictures from the camera.
- USB remote control. Although cheap third-party USB remotes are available (some of them even include a timer and interval
shooter at little extra cost), they tie up the only USB port, which is also used to recharge the battery
while in the camera, and to transfer images to a computer.
+ IR remote control. The relatively cheap Sony RMTDSLR2 IR remote, as well as cheaper third-party IR remotes from China,
work well and provide access to many functions and to the menu. Typical IR remotes have 19-20 buttons,
not just the shutter release. However, the IR remotes that I am aware of do not give access to custom
buttons, Fn button, dials, and shutter release half-press (which starts AF), which I regard as important
omissions. With the camera attached to a vertical copy stand and pointed downward, the rear LCD screen
and all controls are upside down and difficult to read. Using an IR remote and an external HD monitor
solves the problem, at least for the functions available on the remote. The IR remote also avoids
touching the camera when working at high magnification. For this use, I don't need to be far from the
camera. For other uses, the operating range of the IR remote may be a concern, especially in full
sunlight.
+ External HD monitor
can be used for focusing and framing, not just playback. However, the external monitor does not display
focus peaking, and the rear LCD screen is off when using an HD monitor (so no focus peaking here,
either).
- The Sony Remote Camera Control
software for Windows and OS X is fairly basic, and cannot access the Menu, Fn and custom buttons, which
I need all the time. It only gives access to a subset of settings chosen by Sony. Use the free Sony
Imaging Edge (first released in 2017) for slightly better control. It cannot access the Menu, Fn and
custom buttons either, but you can still use the camera controls and LCD screen (or external HD monitor)
to access the menu, while the computer monitor displays the live view. A couple of commercial
applications supposedly allow remote control of this camera, but I don't know to what extent. The free
Darktable 2.4.0 application does not recognize this camera on my Windows 10 64-bit computer, in spite of
being mentioned by some third-party sources as compatible.
- Short battery life, although the two following points improve the situation.
+ The
Sony AC PW-20 power
supply replaces the camera battery with a "fake" battery wired to an AC power supply, and
provides unlimited session length. The door of the battery compartment has a rubber pass-through for the
cable. I wish Olympus had something similar, but instead no OM-D camera has provisions for external
power unless a battery holder is attached under the camera. This makes the connection to a tripod or
stand flex more than I can tolerate. In addition, finding an Arca-compatible bracket that attaches at
the bottom of the battery holder is difficult or impossible.
+ The camera comes with
two batteries, not just one. There is no need to immediately buy an extra battery, like I had to do with all my
previous cameras. It also comes with an ordinary battery charger, and a small USB power supply that can
recharge the battery while in the camera (but only when the camera is powered off). In the field, you
can recharge the battery in the camera with a USB power bank of the type used to recharge mobile phones
(with the same limitation that the camera must be off).
+ The
magnesium alloy body
feels solid, with a sufficiently deep hand grip. This is a significant improvement over the toy-like
feel of the plastic bodies of earlier models. Third-party Arca-compatible L brackets are available, and
the cheapest no-brand bracket from China I found on eBay fits perfectly. Still, at 585 g, this camera
weighs only 2/3 of the lightest full-frame DSLR, and 1/3 of a pro-level DSLR.
+ Both
electronic first curtain
and
full electronic shutter
are available. The mechanical shutter is still preferable to freeze action with fast-moving subjects.
- Flash sync. Not available with electronic first curtain or full electronic shutter. This is a real bummer.
- Focus peaking. Available but not precise, as discussed above. Also, not available on an external HD monitor.
Several additional features are available on other cameras, but not on the 7R II. For example, this camera
has only one card slot, while two is now the norm on high-end cameras. This however, as well as a larger
battery, would increase the size and weight of the camera. As a whole, I found none of the missing
features to be a show-stopper for my planned use of the camera. Other photographers may not necessarily
agree. For example, the weather sealing of the battery compartment of this camera is said to be rather
poor, which is an obvious concern for outdoors use in bad weather.
The 7R II also provides other, highly desirable features of high interest to generic photographers. For
example, with native lenses the camera uses a combination of contrast AF and phase AF with 399 phase
detectors built into the sensor. Since the sensor is back-illuminated, its performance in low light and
with legacy lenses is also improved with respect to ordinary sensors (at the time of introduction, this
was the first full-frame camera with a back-illuminated sensor). The high processing power of the camera
allows a number of specialized still image recording options. For movie shooters, the camera offers 4K 30p
in two different formats, 1028p at 60 fps, and 720p at 120 fps, as well as S-Log2 (but no global shutter).
Dust shaker
The sensor-shifting IS (image stabilization) of the 7R II provides 6 axes (or more properly, 6 degrees of
freedom), much like IS on Olympus high-end cameras. The details of the mechanical implementation appear to
be different in the two camera brands. In the Olympus case, the sensor distinctly falls downward in its
suspension cradle when the camera is powered off, and the IS electromechanics emit a continous low hiss
when the camera is powered on, even when IS is switched off. In the Sony 7R II, movements of the sensor
when the camera is switched off seem to be damped, and IS is completely silent (both when switched on and
off).
When a lens with built-in image stabilization is used on the 7R II, the in-lens stabilization is used for
two of the IS axes (vertical and horizontal pan). The body continues to use the other four IS axes.
Both Olympus high-end cameras and recent full-frame Sony cameras, including the 7R II, use the IS
electromechanics to shake dust off the sensor by vibrating it. Other cameras typically use a piezoelectric
dust shaker implemented as an additional window, placed in front of the built-in UV- and NIR-cut filter. I
remember reading that Olympus had to overcome mechanical problems when implementing a dust-shaking
function using IS. In particular, the strength of the actuators had to be increased to provide a sensor
acceleration sufficient to shake off dust.
The larger sensor of the 7R II could well mean that the sensor package has a larger mass than Micro 4/3,
and therefore that the larger inertia could - potentially - make dust shaking less effective. On the other
hand, the UV- and NIR-cut filter in Micro 4/3 is much thicker than in the 7R II, so the mass of the 7R II
sensor package is probably less than four times the mass of the Micro 4/3 sensor package. I can feel the
whole camera body of the 7R II distinctly shaking in my hands when I operate the dust shaker function of
the 7R II, and the actuators seem to operate at a lower frequency than in Olympus cameras. Only time will
tell whether this dust shaker is effective.
Electronic flash
So far, I have not been able to make a Godox AD200 electronic flash work
properly with a Godox X1TS radio controller on the 7R II. The flash fires when expected, but TTL exposure
is way too dark. There may be a simple solution (other than setting +3 stops exposure compensation on
either the transmitter or the flash), but I just did not find it in the limited time I tried. The same
problem occurs with the Godox XProS transmitter. The same AD200 with X1TO transmitter works flawlessly
out-of-the-box on my Olympus E-M1 Mark II, with no exposure compensation required. Also, the Godox
software that is supposed to update the firmware of the X1TS freezes the two Windows 10 computers I tried
it on, and they must be restarted manually.
Lens mount
When Sony designed the Alpha 7, their first full-frame mirrorless, they decided to use the same E lens
mount used on their APS-C mirrorless cameras. From a point of view of backward compatibility, it did make
sense to do so, since the Alpha 7 and all subsequent full-frame bodies can use all existing APS-C lenses
by recognizing them and cropping the image. Compatibility also goes the opposite way, allowing the use of
the EF full-frame lenses on APS-C bodies with E mount, which is particularly appealing to photographers
owning cameras of both formats.
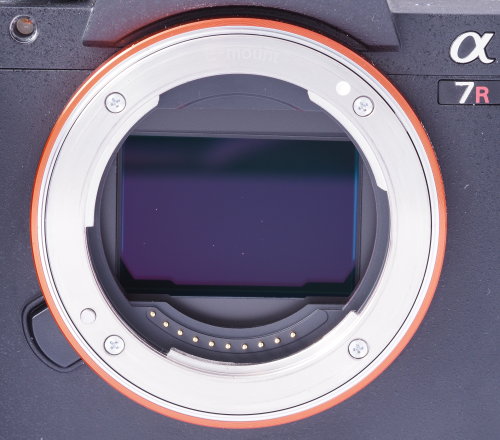
Lens mount and sensor of Sony Alpha 7R II.
The E lens mount, however, is not particularly wide. With a diameter of about 43.4 mm (excluding the
bayonet lugs) of the portion of a lens mount that fits into the camera mount, the clear opening at the
rear of a lens barrel cannot be wider than approximately 40-41 mm. The diagonal of the active area of the
sensor is instead over 43 mm, which causes the rear opening of the lens barrel to darken the image corners
if the rear lens element is wide and fairly distant from the sensor.
This is not a problem when the rear optical element of the lens is close to the lens mount, and has a
significantly lower diameter than 40 mm. In this case, the lens mount causes no visible corner vignetting.
The large majority of modern, general-purpose camera lenses fulfil these conditions. The vignetting
problem arises, instead, with legacy lenses that have wide rear elements located far from the focal plane.
This is the case, for example, of some repro, copy and enlarger lenses, and several legacy telephoto
lenses. In most legacy photomacrography lenses, the rear lens element is quite distant from the lens
mount, and vignetting in the corners can become a problem even with relatively small rear lens elements.
The simplest way to lessen this problem is using a lens adapter or extension tube with a sufficient
internal diameter (especially at its rear). For example, M42 extension tubes are generally not wide enough
at their rear end. Some of them even have a thick rim at the rear end, which makes the vignetting worse.
Cheap sets of extension rings are available with short front and rear sections equipped with E bayonets,
that screw onto 52 mm or 57 mm extension rings of different lengths. Once these extension rings are
properly flocked to prevent internal reflections (and the rear rim painted flat black instead of flocked,
since flocking reduces the diameter of the rear opening by 1 mm or more), they are sufficiently wide to
prevent most cases of vignetting.
Cropping is necessary to correct the worst cases of vignetting. For example, cropping both sides of the
image in post-processing to a 4:3 width to height ratio does eliminate vignetting in most cases. This
involves the loss of a strip 452 pixels wide along either side. The cropped image is slightly more than 37
Mpixels, and the loss of resolution with respect to the 42 Mpixel native image is hardly noticeable in
practice. Alternatively, the 7R II can be configured to crop in-camera to a 16:9 aspect ratio (the same
format as an HD or 4k TV), which is also effective to cut out the dark corners. Some of the lesser
darkening in the corners can be corrected in post-processing, thus reducing the needed amount of cropping.
Thus, although the vignetting in the image corners of the 7R II with some legacy lenses can be regarded as
a result of poor engineering choices by Sony, it is not a show-stopper even when one wants to use the
lenses affected by this problem.
Full-frame mirrorless alternatives to Sony
Until the introduction of the latest Nikon, Canon and Panasonic full-frame mirrorless models, there simply
were no such alternatives.
In my opinion, the scarcity of lenses available for mirrorless competitors of Sony and the simplistic,
often idiosyncratic functionality offered by their cameras still means that there are, in practice, no
alternatives as mature as the Sony cameras and lenses. Prices of these competitors' cameras are also too
high to be a realistic alternative. This is my opinion at present, and I may change it in the future.
Others are free to disagree.
Lens adapters
The flange distance of the E mount is 18 mm. This is only 1.5 mm less than Micro 4/3. Since I now use both
systems, it would make sense to use adapters to mount my numerous Micro 4/3-adapted extension tubes,
helicoids, bellows, legacy lenses, etc. on the 7R II (it is of course not feasible to use Micro 4/3 native
lenses on full-frame, because of the much smaller image circle). Adapters of this type do exist, but
because of the small difference in flange distance the metal is quite thin, and they look fragile,
especially if machined from aluminium alloy. The lens locking mechanism of these adapters also looks
questionable to me. I ordered one of these adapters from eBay for testing, but it was lost in the mail and
therefore, so far, I have nothing to report.
Mechanically stronger short adapters with a male Sony E bayonet and an M42 female thread exist, and I have
several. These adapters are not parfocal for M42 lenses, and increas the flange distance by only 2-3 mm.
Both blackened aluminium and chrome-plated brass models are available. As a result of the M42 threaded
part further reducing the open diameter near the focal plane, as described above, they increase the risk
of corner vignetting, so they are best used only with lenses that do not suffer from this problem.
Current Metabones lens adapters are available with Sony E male bayonet. These adapters have brass or steel
chrome-plated front and rear mounts and a good black internal flocking. They require no modification, and
reduce as much as possible the risk of vignetting on Sony full-frame. Most current Metabones lens adapters
also have a small, but solid, built-in Arca-compatible plate.
Although expensive, the mechanical quality of Metabones lens adapters is far better than the cheap
aluminium adapters from China sold by the boatload on eBay (but there are suitable uses also for the
best-made of these cheap adapters, especially when a tripod shoe on the adapter is not necessary). Lately,
however, it has become more difficult to find some Metabones adapters for legacy lenses, like Olympus OM.
It is possible that Metabones is shifting the emphasis of production from simple camera lens adapters to
speed boosters and lens adapters for professional videocameras, much more expensive and financially more
rewarding for the company.
Which lens is suitable for each sensor size for photomacrography?
This subject is far more complex than apparent at first sight. To simplify this discussion, I will only
discuss two of the most important aspects:
size of the image circle, and
lens resolution.
The size of the image circle must be sufficient to completely cover the sensor surface with an image of
acceptable quality. The size of the illumination circle is a different parameter, which specifies the area
illuminated by the lens, regardless of image quality. Since the image circle increases in size at higher
magnification, each lens has a minimum magnification on a given sensor size, dictated by the size of the
image circle that the lens produces. The periphery of the illumination circle is often fuzzy, and as a
result the image corners are often darker than the center. Within reasonable limits, this is acceptable,
and if desired it can be corrected in post-processing.
Lens resolution, in the best case, should be at least as high as the resolution that can be recorded by
the sensor. In this way, the lens is not the limiting factor of resolution. Some degradation in image
quality is often accepted in the corners, especially in very fast lenses and extreme wideangles.
A common (albeit oversimplified) way to measure lens resolution is in line pairs per inch (lppi) on the
sensor side. Dots per inch (dpi) is another measure of resolution, frequently used in scanners and
printers (where it is generally measured on the subject/paper size). However, a lens resolution in dpi can
be measured on the sensor size. In this case, converting from dpi to lppi is done by halving the dpi
value.
On a sensor totally without anti-aliasing, the distance between the centers of two lines imaged as
distinct from each other is at a minimum 2 pixels. The minimal case is two 1-pixel wide lines, either
vertical or horizontal, separated by a 1-pixel wide interval of different color (typically black lines on
a white background, or vice versa). The lppi/dpi measurement has the advantage of being easy to compare
with the intrinsic camera resolution, which is primarily limited by the discrete pixel raster.
About a decade ago, the resolution I measured in cameras with hardware anti-aliasing was somewhere between
3 and 5 pixels, depending on the camera. Possibly, this relatively poor resolution I observed was also
lowered by the lens, since at the time I did not have access to some of the very best lenses I have now.
At present, on current cameras devoid of a hardware anti-aliasing filters (and therefore with
anti-aliasing implemented in software), my observations suggest that the camera can record a line-pair as
two distinct lines, when the minimum spacing of the line centers, as projected onto the sensor, is as
little as 2.5 pixels.
The higher resolution of current cameras means that these cameras place high demands on lens resolution.
Micro 4/3 camera are particularly demanding: The E-M1 Mark II, with 20 Mpixel sensor and a pixel count of
5,208 x 3,916, has a distance between the centers of adjacent pixels of 3.32 μm. With a 2.5 pixels
distance between centers of lines in a pair, this is equivalent to 3,059 lppi or 6,117 dpi. In spite of
its higher pixel count (7,952 x 5,304), the 7R II has larger pixels (4.51 μm, which results in almost
twice the pixel surface area) and a lower absolute resolution of 2,251 lppi or 4,500 dpi. The 7R II is
therefore less demanding in terms of absolute lens resolution, but requires an image circle of roughly
twice the diameter of Micro 4/3.
Fortunately, the large majority of copy and repro lenses, including classics like the
Nikon Printing Nikkor 105 mm f/2.8, are designed to cover
relatively large image circles, and in many cases abundantly cover a full-frame sensor. It is unusual,
instead, for these lenses to outresolve a 20 Mpixel Micro 4/3 camera. In my tests, so far the
Nikon Printing Nikkor 105 mm f/2.8 A is one of very few lenses
that demonstrably do this. Therefore, this lens can be used on either camera type. Since this lens is
optimized for work at 1x and provides its performance within a narrow range of magnification, the 7R II is
best used with this lens for subjects of size roughly between 15 and 30 mm, while the Olympus E-M1 Mark II
is best with the same lens for subjects around 10-16 mm. Since this lens is quite expensive, switching
camera bodies (instead of lenses) for different subject sizes in this case is quite realistic also from an
economic point of view.
It is not equally feasible to switch camera bodies to extend the magnification range of the
Coastalopt 60 mm Apo. While this lens works very well on the full-frame
7R II, the pixels of a 20 Mpixel Micro 4/3 sensor are a bit too small for this lens, especially at 1x
which is outside the design parameters of the lens.
When it comes to microscope objectives, most microscopes are designed to require an image circle, at the
focal plane of the eyepiece, of roughly 20 to 25 mm. Infinity corrected objectives with a tube lens
directly projecting on the sensor normally use a tube lens of focal length around 180-200 mm. This can be
accommodated by Micro 4/3 (at most, with a little cropping), but not by full-frame. The latter requires
the use of a tube lens of longer focal length (300-400 mm, often impractical) to cover the whole sensor.
Alternatively, in an afocal setup with finite objectives, a "relay" lens of longer focal length
(typically 60 mm on a 10x eyepiece) must be used on full-frame. Direct projection with finite microscope
objectives is often possible on Micro 4/3 (and sometimes APS-C), but typically would require too much
cropping on full frame.
Anti-aliasing and high-resolution lenses
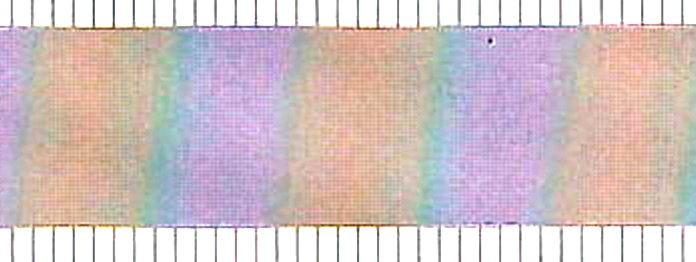
1:1 pixel crop of extra fine JPG image of ruler with 10 μm divisions shot at 1x,
Nikon Printing Nikkor 105 mm f/2.8 A at f/2.8 on Sony Alpha a7R II.
In my initial tests, the software-implemented anti-aliasing of the 7R II worked well with almost all
lenses. The Nikon Printing Nikkor 105 mm f/2.8 A is the only exception. As mentioned above, this lens
outresolves the 7R II sensor by a good margin.
2x magnified crop of part of the preceding picture, showing aliasing artifact.
The black spots are sensor dust, particularly visible with this lens because of its high distance from
the sensor plane.
When imaging with this lens a test subject containing a ruler with 10 μm divisions, an evident color
banding emerges in extra fine JPG images (two figures above). A cross-hatched aliasing artifact is also
clearly visible in some areas (magenta and orange, but not greenish) by magnifying the image above 1x
(above picture). The original ruler contains only vertical lines, but this particular subject fools the
camera's anti-aliasing algorithm into recognizing that there is a fine pattern at the limit of the
sensor's resolution, and trying to restore it as a cross-hatching.
The test pattern that produces color banding happens to have dark lines less than 1 pixel wide, spaced
roughly 2.5 pixels apart. This is near the limit of the resolution of modern cameras with software
anti-aliasing. The individual lines are resolved by the sensor before anti-aliasing if a lens of unusually
high resolution and contrast is used. This, and the fractional offset of the pattern lines with respect to
the pixel raster, causes an aliasing phenomenon resulting in the observed color moiré banding.
In addition, the above image shows a fine raster pattern in the densest part of the ruler. It seems that
the sharpening part of the anti-aliasing algorithm detected some sort of very fine geometric pattern in
this area (as opposite to a featureless expanse), but was not able to discern whether the lines were
horizontal or vertical, and generated a reticle instead of a pattern of parallel lines. This reticle might
be a manifestation of the Bayer arrangement of sensels carrying bandpass filters for each of the three
component colors, or an artefact created by the anti-aliasing algorithm.
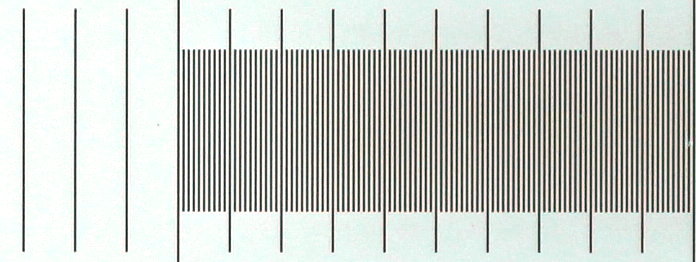
Significantly higher or lower line spacings (e.g., see the following picture) produce no color banding
(although a slight monochromatic moiré is still visible, especially if you squint your eyes).
1:1 pixel crop of extra fine JPG image of ruler with 25.4 μm divisions shot at 1x,
Nikon Printing Nikkor 105 mm f/2.8 A at f/2.8 on Sony Alpha a7R II.
The moiré/color banding problem is lessened by stopping down the lens, which effectively removes the
finest detail because of the resulting increase in diffraction, or by selecting a lower image quality in
the camera settings. We can simplify the results by saying that the Printing Nikkor 105 mm at f/2.8
provides "too much resolution" for the minimal amount of anti-aliasing and subsequent sharpening
that this camera is trying to perform in extra fine JPGs, at least with this specific test pattern.
I have not tested the results of storing images of this pattern in raw format and developing them to JPG
with external software.
The different performance of photomacrography lenses on full-frame versus Micro 4/3, and the different
suitability of many lenses for use on one or the other of these formats, mean that from now on I should
test my favorite lenses on both formats.
Conclusions
The
Sony Alpha 7R II is a competent full-frame body capable of producing top-notch results.
By choosing this model over the more recent Alpha 9 and Alpha 7R III, one gives up a few features (which
may be essential to some photographers, only bells and whistles to others), pays substantially less, and
gets the same image quality as the 7R III, and about 95% of the capabilities of the Alpha 9.