Adapting a Micro 4/3 camera to a Zeiss PhotomicroscopeThe Zeiss Photomicroscope I (see an external review here and the similar Photomicroscope III here) was part of the Zeiss Universal series (marketed approximately between 1950 and 1970), and shares with this series the general design of the stand and a very broad range of accessories (hence the "Universal" name). Like the subsequent models Photomicroscope II and III, the Photomicroscope I contains a dedicated 35 mm camera inside the stand. Because of its shape and position, it is essentially impossible to replace this camera body with a digital camera. In my specimen, I removed all the optical, mechanical and electrical components from the cavity of the microscope arm and, since this arm has a slight tendency to flex, I plan to fill it with concrete to make it stiffer. Luckily, the head usually provided with the Universal series has an additional, uppermost photo port that can be used for attaching an external camera. This requires the use of an additional photo tube, available in a few different models. These tubes, generally usable also on the Zeiss Standard microscope series, are becoming scarce and expensive on the second-hand market. Shorter tubes designed for use with subsequent series of Zeiss microscopes are usually not compatible without modification. There are two fundamental ways to couple a camera to a microscope. The afocal method requires the use of a camera equipped with a camera lens and mounted directly in front of an eyepiece (either one of the eyepieces used for visual observation or, more conveniently, a third eyepiece used only for photography on the camera port of a trinocular head). This eyepiece is usually identical to those used for visual observation, but eyepieces designed for high eyepoint (i.e., users wearing glasses) and camera lenses with front pupils not too deeply located within the lens tend to function better and are less likely to cause vignetting. It is usually best to place the lens and eyepiece as closely as possible to each other. When the camera lens is especially designed for use on a microscope, it is sometimes called relay lens, although this term is not specific and could mean several different things. The focal method, on the other hand, uses no camera lens but only a special eyepiece, often called photo eyepiece or projection eyepiece, to directly project the image onto film or sensor within the camera body. One of the types of Zeiss photo tubes designed for use with the Universal series carries a small internal lens with a focal length of 60 mm and a T mount, to which SLR and DSLR bodies can be mounted via adapters. An eyepiece must also be mounted within this photo tube. With 10x eyepieces for visual observation and a third 10x eyepiece in the photo tube, the built-in 60 mm lens produces an image suitable for 35 mm film. This tube can be used without modification on full-frame DSLRs, but is unfortunately rare and usually overpriced. A more common and much cheaper Zeiss photo tube for the Universal and Standard series has no built-in optics and must be used with a photo eyepiece (focal setup). Alternatively, an ordinary eyepiece must be mounted within the tube and a camera lens at the end of the tube (afocal setup). Zeiss optical adapters designed for use with C-mount videocameras or small-format movie cameras and meant to be mounted onto a photo tube in an afocal setup are not too rare. Both types of photo tubes are of adjustable lengths, in order to allow the use of different eyepieces and camera lenses or adapters. With film cameras, an additional device containing a beam splitter and eyepiece was often used for precision focusing. This is no longer necessary with digital cameras capable of magnified live view. A tiltable rear camera screen is very useful to observe the image in this case, since the Zeiss Universal is a big and tall microscope, and the camera sits about 65 cm above the table surface. My goal was using a Micro 4/3 camera on the Photomicroscope I. For this purpose, I tried the focal method first, since it appeared simpler. One problem with this choice is that the Micro 4/3 sensor is exactly half the linear size (i.e., one-quarter the area) of a full-frame sensor. Therefore, with projection eyepieces designed for 35 mm cameras (usually 2.5x to 3.2x) it records only the central portion of the field of view of the microscope. 0.5x projection eyepieces are often used for videocameras with relatively small sensor, but cause an excessive vignetting on Micro 4/3. 1x projection eyepieces are sometimes available, but produce vignetting in the corners, since the ideal eyepiece would need to be 1.25x-1.5x. A further problem with Zeiss Universal and Standard microscope is that their finite objectives and internal optics are designed to use compensating eyepieces to remove some of the optical aberrations. Therefore, only Zeiss compensating eyepieces should be used. These eyepieces usually have model names starting with K, and KPL (=compensating planar) eyepieces are usually the best choice. 
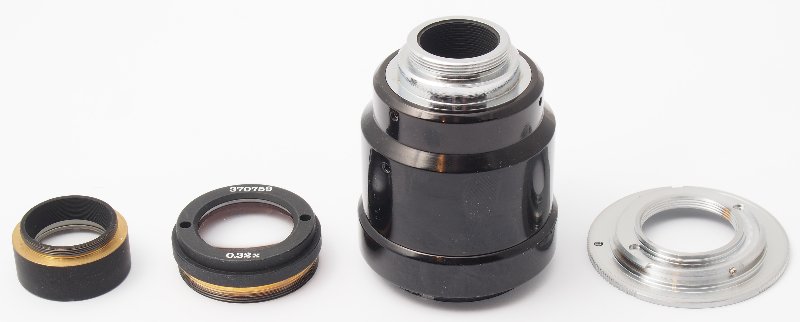
For this purpose, I was unable to obtain a Zeiss KPL 2.5x projection eyepiece, but I tested the projection eyepieces shown in the above figure, from left to right:
None of them provided an acceptable image. The 2.5x type displays evident chromatic and spherical aberration, and might not be designed for Zeiss microscopes. The 3.2x has too large an image circle and poor resolution, and the third produces evident vignetting and likewise poor image quality on most of the image circle. It might work better on a sensor smaller than Micro 4/3.
At this point, I decided to try the afocal method, and mounted in the photo tube an eyepiece identical to the pair I use for visual observation. I happened to have an original Zeiss 60 mm lens from another photo tube. It gave me a good, or at least acceptable, image quality (compound microscopes cannot produce the amount of detail that we are used to in macro photography and photomacrography). However, the problem with this lens is that it is designed for 35 mm film, and therefore the Micro 4/3 sensor only records the central area of the field of view. This intrinsically lowers the possible resolution. For this purpose, I instead needed a camera lens with a 30 mm focal length. Zeiss also made several movie/videocamera adapters. In total, I tried the following adapters for afocal setups:
The focal lengths of the above adapters were either too long (=only a small central area was recorded) or too short (=vignetting). 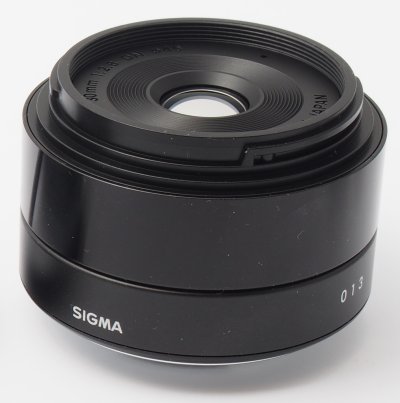
Sigma happens to make the only 30 mm prime lens for Micro 4/3 cameras (above picture). This lens is known for good image quality and reasonable price. A further characteristic of interest is that this lens has internal focusing, and its barrel is, mechanically, a single piece from front filter mount to camera mount. It is in fact much stiffer than other lenses with internal focusing, like the Olympus 12 mm f/2. This Olympus lens is optically very good, but it detectably flexes when the camera+lens assembly is supported by its front filter mount. The focusing ring of the current version of the Sigma 30mm is smooth metal. This is not ergonomic, but for the present application it does not matter, since the lens is supposed to remain focused at infinity. A disconcerting characteristic of the Sigma 30 mm is that it rattles when slightly shaken. It does not have internal image stabilization, so the rattling part must be the autofocus mechanism. However, this does not mean that the lens is defective, and poses no problem in practical use. Autofocus must be disabled and the lens manually focused at infinity when using it on a microscope. The lens aperture must also be fully opened. Metering can be manual or aperture-priority automatic (the A setting). 
The above figure shows the Sigma 30 mm in use as afocal lens. A set of three short adapters rigidly connects it to the photo tube. 
One of these adapters (Zeiss microscope bayonet to male T, leftmost above) has an internal hole slightly too narrow to accommodate the front of the eyepiece. 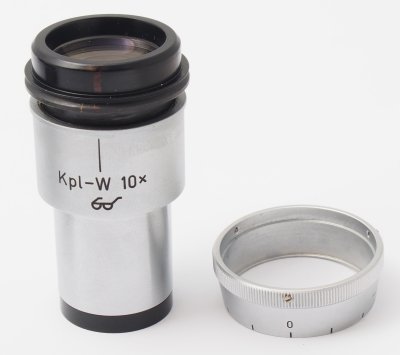
This problem was solved by removing the knurled ring used to operate the diopter adjustment of the eyepiece (above). Once this is done, the rim of the eyepiece directly sits on the front of the Sigma lens. It is a good idea to mark on the eyepiece, with a permanent marker, the zero position of the diopter adjustment. 
The resulting images shot through this setup show a good resolution and contrast (above). 
By mounting an Olympus 12 mm in place of the Sigma lens (above), I was able to verify that the 30 mm Sigma lens is just the right focal length and uses close to the maximum amount of the field of view without noticeable darkening in the corners (which is visible in the lower image). A 35mm or 40 mm lens could be used if the eyepiece proves to introduce poor quality in the image corners, but so far I am satisfied with the current setup. An APS-C digital camera in an afocal setup should require a lens with a focal length of approximately 45-50mm. A full-frame camera should work well with a lens of focal length around 60-70 mm. The lens does not need to be very fast, since the effective f/ratio of the microscope is much higher. However, f/ratios above f/4 or f/5.6 should be avoided, and the aperture should always be fully open. Retrofocus lens designs may have vignetting problems, which means that legacy 28 mm wideangles for the 35 mm format may not be the best choice for afocal setups with Micro 4/3 and smaller sensors (although this should be experimentally verified, since some of these lenses might work). Native Micro 4/3 lenses have a better potential. Prime lenses are less likely to vignette than zoom lenses. If the eyepiece in the photo tube is correctly set for zero diopters and the observation eyepieces are correctly calibrated for the eyes of the operator, the images in the camera and viewing eyepieces will be parfocal (i.e., in simultaneous focus). Normally, this requires a reticle to be mounted within one of the observation eyepieces. However, it is always a good idea to make the final focus adjustments while observing a magnified live view image in the camera eyepiece or on its rear screen. Concluding remarksThe problems encountered in the task of mounting a Micro 4/3 camera on a Zeiss Photomicroscope are typical of those found when adapting small-format digital cameras to legacy microscopes. A full-frame digital body may be easier to use in this context, given that its sensor size approximately equals a 35 mm film frame, and therefore legacy camera adapters may work with little or no modification. However, microscopes typically cannot take advantage of the large resolution possible with full-frame sensors, and these cameras are still quite expensive. Their capabilities are therefore under-utilized in this application. The significantly lower cost of camera bodies with smaller sensors encourages their use for this application. In these cases, however, suitable original adapters may not be available, and an afocal setup that uses an ordinary eyepiece and a general-purpose camera lens of appropriate focal length may be preferable. |
 I subsequently learned that the
Zeiss Projektiv f=125mm is designed to
I subsequently learned that the
Zeiss Projektiv f=125mm is designed to