Filter packs and replacement windows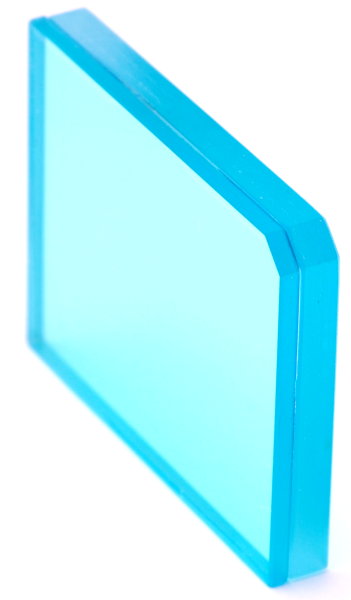
Conversion of a digital system camera for NUV, NIR or multispectral photography involves the removal of a filter pack (sometimes called sensor stack) originally mounted in front of the sensor. The filter pack (Figure 1) is a stack of cemented optical filters of different types. Normally, one or more layers have a light blue or cyan tint, which absorb NIR radiation and decrease the amount of red light reaching the sensor. This makes the spectral response of the sensor closer to linear in the VIS range. Multi-layer interference coatings on the front surface of the filter pack reduce reflections and glare in the VIS, and selectively reflect NIR and NUV. Simple filter packs have just two layers (in addition to surface coatings). Some filter packs appear to be composed of up to five or six cemented layers. Their transmission spectra are also rather variable. Anti-aliasing filterTraditionally, a filter pack includes two layers of birefringent material (usually lithium niobate) with optical axes perpendicular to each other. This sandwich of two layers is generally called anti-aliasing filter. The first layer splits light into two beams of different polarization, and each polarized beam follows a slightly different path through this material. By the time the two beams emerge from the rear of this layer, they are separated by a distance approximately equal to the distance between two adjacent sensels on the sensor. The two beams then resume their travel toward the sensor following parallel paths. The second layer of birefringent material does the same thing, but in a direction perpendicular to the first. The result is that each incoming beam of light is split into four parallel beams arranged in a two-by-two raster. For the anti-aliasing filter to function properly, it is necessary that the incoming light is not polarized. This is one of several reasons why polarizers used on a DSLR should always be of the circular type. Circular polarizers are made of two layers. The outermost one lets only light of a given polarization pass. The second layer randomizes this polarization (by twisting polarized light about its axis). In a Bayer sensor, each sensel is overlaid by a red, green or blue filter. In any group of two by two sensels on this type of sensor, one sensel is always overlaid by a red filter, two by green filters, and one by a blue filter. In this way, each incoming light beam, after being split fourfold by the anti-aliasing filter, reaches a red-sensitive sensel, two green-sensitive sensels and one blue-sensitive sensel. This process allows the sensor to record most of the original color information present in the scene, in spite of the fact that each sensel can only record one primary color. Without an anti-aliasing filter, tight patterns of parallel lines, or other fine repetitive detail, can be recorded incorrectly and give rise to an artifact called aliasing, which results (among other things) in false color, often arranged in parallel, alternating reddish and bluish bands. Anti-aliasing is done at the price of a loss of image resolution, since the anti-aliased image is slightly fuzzier. The digital processor of the camera subsequently interpolates the data from adjacent sensels (each of them only recording one color) and artificially re-creates (or "fakes", if you prefer) data for the two missing colors, based on data from adjacent sensels. This further degrades the amount of image detail, so the processor also sharpens the image and tries to interpolate the missing data by using sophisticated algorithms, so that, in the end, the visible detail looks sufficiently sharp and is, in practice, intermediate between detail averaged over four pixels and the detail that would be recorded if each pixel was capable to record all three primary colors. Occasionally, these algorithms are fooled into creating detail that was not originally there, e.g., a pattern of horizontal lines on the subject can be reconstructed as a pattern of vertical lines in the image. Usually, however, the process produces visually very good results. This complex process is called demosaicking. Modern cameras are increasingly doing away with the anti-aliasing filter in front of the sensor and replace it with complex post-processing of the sensor data, allowed by their more powerful digital processors. Rather surprisingly, removing the anti-aliasing filter from a camera, in most cases, produces no ill effects on image quality. On the contrary, images can become visibly sharper. Aliasing artifacts become more frequent. However, these artifacts are mainly caused by a minority of (usually) man-made subjects that contain very fine, regular patterns of parallel lines or dot rasters. Replacement filter or transparent window?The cyan-colored glass layer(s) of the original filter pack are designed to cut NIR transmission to negligible levels. Some of the interference coatings on the filter pack also cut NIR. NUV is strongly cut by the interference coatings, and absorbed by the lithium niobate of the anti-aliasing filter. Some of the glass types used as substrate for the filter pack also cut NUV. Removing the filter pack allows NIR, VIS and NUV radiation to reach the sensor. The sensor chip is still covered by a thin window, which allows the passage of varying extents of NUV, together with virtually all VIS and NIR. This window seals the sensor chip within its carrier package, and must not be removed. Often, an additional window of transparent piezoelectric material, with electrically conductive coatings, sits in front of the filter pack. This window functions as a "dust shaker" and periodically removes dust particles that settle on its surface (by making them fly somewhere else inside the camera). In most cases, and especially for NUV photography, this additional window must be removed as well during a conversion. If the converted camera is meant to be permanently converted for NIR photography, the filter pack is replaced with a NIR-pass filter. A permanent NUV conversion likewise requires the installation of an NUV-pass filter in place of the filter pack. This allows the optical viewfinder to be used for framing and focusing in the VIS range, while only the chosen radiation range reaches the sensor. The replacement filter must have the same optical thickness as the original filter pack. The physical thickness of the filter depends on the refraction index of the used glass. For most types of optical glass, the required physical thickness is approximately the same as the original filter pack. For multispectral conversions, which enable the camera to record, in principle, all wavelengths that can be recorded by the sensor chip, the filter pack is usually replaced by a window transparent to all wavelengths of interests. Fused silica is the best material for this purpose, but is also a bit expensive. It is unnecessary to use other UV-transparent materials, like sapphire and fluorides, because they tend to be more expensive than fused silica but provide no advantages to the latter. Other types of glass may also be suitable, although some cut a portion of the NUV spectrum that could be recorded by the sensor. Inadequate types of glass that substantially cut NUV should be avoided. Some of the less reputable conversion labs are known to use such a glass in order to save money, or out of sheer ignorance. A multispectral camera is very convenient also for NIR or NUV photography. With a multispectral camera, the filter of interest is mounted on the lens (usually at the front of the lens, for easy swapping of filters). In the early years of NIR and NUV digital photography, a fixed filter in front of the sensor was a more common choice because it allows the use of the optical viewfinder. Today, with so many filter types available and virtually all cameras supporting live view, it makes more sense to leave one's options open and to choose a multispectral conversion. Replace the filter pack, or just remove it?At this point, it can be asked whether it is really necessary to replace the original filter pack with a transparent window for multispectral photography. At least in principle, the same (or a better) transmission of radiation could be obtained by just removing the filter pack, without replacing it. In a DSLR, this results in two substantial problems:
If the camera was equipped with a thin filter pack (less than 1 mm), it is sometimes possible to recalibrate the viewfinder and the lens focus registration to avoid the above problems. With a thick filter pack (2-3 mm or more), infinity lens focus and correct viewfinder focus cannot be restored in this way. The camera is now limited to close-up and macro photography, unless the lens focus helicoid is recalibrated (which, in turn, makes its focusing scale incorrect if used on a non-converted camera). These consequences are usually too bothersome, so in practice all DSLRs are converted by replacing the filter pack with a transparent window. In a mirrorless camera, there is no optical viewfinder and no separate autofocus sensor. Live view allows perfect focus and framing even after removing the filter pack, but the problem with the lens not focusing to infinity remains. This problem is difficult to solve when using a native lens. Legacy lenses are usually mounted on mirrorless cameras via a lens adapter, and with these lenses the problem of infinity focus can be solved with a slightly shorter lens adapter than standard (by 1-2 mm, in most cases). Unless the modified adapter has precisely the required length, correct focus at infinity is achieved when the lens focusing scale displays a slightly closer distance, and zoom lenses may not remain exactly parfocal while zooming, but these problems are not show stoppers. No native lenses designed for UV photography are available for mirrorless cameras. Therefore, all lenses designed for UV imaging (as well as all legacy lenses that accidentally happen to be usable for UV imaging) require a lens adapter for use on a mirrorless camera. Therefore, it may be attractive to simply remove the filter pack from one of these cameras and get (or make) a suitable, non-standard adapter, compared to the traditional solution of replacing the filter adapter with a window of the correct thickness and spectral transmission. Suitable adapters can often be built by combining different adapters and extension rings commonly available on eBay. This also makes home-made conversions possible at zero cost, assuming one has the necessary technical experience and succeeds in finding precise instructions for disassembling the camera. Dust contaminationA practical consequence of removing the filter pack is that the window protecting the sensor chip is exposed to dust contamination. Since this window is very close to the sensor, even very small dust particles on the window become visible in images. Extremely fine scratches caused by cleaning this window also become visible. This window should only be cleaned with high-quality sensor cleaning pads and chemicals, or other safe methods for "cleaning sensors". Cleaning pads should only be used when a rubber air blower is not enough to dislodge dust. Other consequences of removing the filter packAs usual, the devil is in the details. The length of the optical path between lens and sensor is not the only optical property changed by removing the filter pack. One might instinctively think that a transparent, flat glass plate does not introduce optical aberrations. This is far from true. Microscopes are a very good example of this problem. Most microscope objectives are either designed for use with a cover glass (i.e., a flat glass plate covering the subject) of standard thickness (0.17 mm) or no cover glass. In objectives designed for high magnification and with high numerical aperture, even small changes in the thickness of the cover glass deteriorate the image quality. It is out of the question, for instance, to use a 100x 1.2 NA objective designed for use with cover glass without the latter. Low-magnification objectives of lower NA, instead, are more tolerant of changes in cover glass thickness. Some 2x, 5x and even 10x objectives may be used with or without cover glass. This greater tolerance is real, and not a byproduct of the lower magnification and of the fact that these objectives are principally used to locate areas of interest for observation at higher magnification, rather than to provide a high image quality. With Micro 4/3 cameras, a degradation of image quality was observed when using very fast lenses, or lenses mounted on a Speed Booster, without a standard filter pack. Here is a more quantitative discussion of the problem. One of the main conclusions is that, for on-axis image resolution and contrast, a thickness range of 0 to 4 mm in a sensor stack has no effects on image quality at apertures of f/2.8 and slower. Negative effects become apparent for smaller deviations from the optimal thickness of the sensor stack in faster lenses. A high distance between lens exit pupil and sensor is more tolerant of variations in sensor stack thickness. Many DSLR and mirrorless lenses are designed with such high distances (Olympus once used to describe these lenses as telecentric on the image side, although this is not strictly true), while shorter distances are common in legacy lenses from the film era. The filter pack thickness in Micro 4/3 cameras seems to be around 3 mm, which is thicker than in typical DSLRs. Practical experience with microscopes tells us that a high-NA objective is more likely to suffer from a change in thickness of a filter pack than a low-NA one. Optical theory also tells us that spherical aberration of an imaging system is affected by the thickness of a flat plate inserted in the optical path, and that the magnitude of spherical aberration is proportional to the fourth power of the lens diameter. In practice, close the lens aperture by two stops, and spherical aberration is reduced to one-sixteenth of its original value. Very fast lenses are rarely used in NUV and NIR photography, so the converted cameras tolerate a substantial change in the thickness of the filter pack, with little or no visible degradation of image quality. The CoastalOpt 60 mm f/4 Apo was designed for a filter pack thickness of 2 mm. After using one of these lenses without filter pack (on a converted Panasonic G3), with a 4 mm filter pack (on non-converted Olympus E-M1 and E-M5), or a thinner filter pack (on Nikon APS-C DSLRs), I can report that this lens always produces an extremely high image quality. Therefore, within this range of thickness and at the apertures I normally use (f/8 to f/16), filter pack thickness seems to be irrelevant to image quality with this lens. This does not necessarily hold true with lenses that possess a high spherical aberration to start with, or unusually large rear elements, or a very fast speed. A further fact to consider is that, with the exception of the CoastalOpt 60 mm and probably the CoastalOpt 105 mm multispectral lenses, virtually all UV lenses were designed in the film era, i.e., for a zero thickness of the filter pack. By removing the filter pack from a mirrorless camera, we make lenses designed in the film era work closer to their optimal design performance than with a non-converted camera. Chromatic aberrationA light ray that crosses a glass plate at any orientation is subjected to axial chromatic aberration. Modern lens designs for digital cameras take the thickness of the filter pack into consideration in this respect. This type of aberration is not affected by closing the lens aperture, but the resulting increase of DOF does mask its visibility. A light ray that crosses a glass plate at a non-normal angle is additionally subjected to lateral chromatic aberration. This is also accommodated for by good lens designs. All lens designs assume that the filter pack is exactly parallel to the sensor. A thick window inclined by a couple of degrees produces a very distinctive, and probably unacceptably high, amount of transversal chromatic aberration. This aberration is constant across the whole image, unlike the transversal chromatic aberration displayed by camera lenses, and cannot be automatically removed by software designed to remove the latter type of chromatic aberration. Position of the replacement windowThe nice thing with a flat glass plate in air is that a light ray that enters it at a given angle always leaves it at the same angle, i.e., it continues on a parallel path (not the same path, unless it strikes the plate in a normal orientation) after crossing the plate. This is also accounted for during lens design. The change of path remains the same, regardless of where, between lens and sensor, the plate is located. As a result, we don't need to mount a replacement optical window exactly where the original filter pack was located. Things are different if we consider light reflected between sensor and optical plate. In this case, changing the distance between sensor and replacement window does change the behavior of light being reflected between sensor and window. However, if things are really so bad that sufficient amounts of light are reflected between sensor and window to create flare and visible reflections, then probably we are not shooting in optimal conditions, or the dynamic range of the subject is too high. In these unfavorable conditions, even the original filter pack may cause flare problems, and it may be better not to use a replacement window at all. Window mounted in adapterThe interior of a lens adapter is an excellent location for mounting a replacement optical plate in a mirrorless camera. One practical reason to do this is that it may be impossible to find a pre-cut replacement window of the exact size necessary to replace a filter pack in its original position in the camera body. 
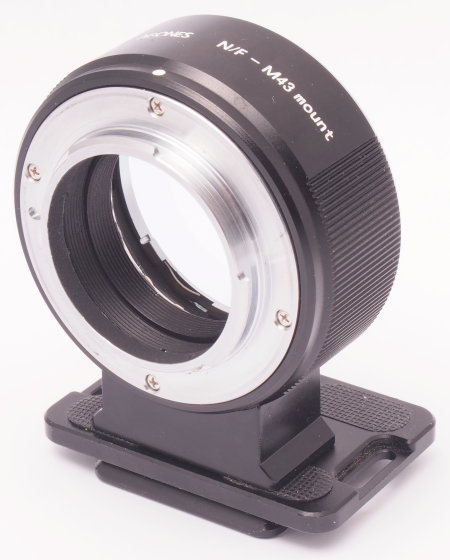
An additional Arca-compatible plate is attachet to the tripod shoe. Figure 2 shows a Metabones Nikon F to Micro 4/3 lens adapter, modified by epoxying a female 37 mm threaded ring (in practice, a 43-37 mm step-down filter adapter) in its base. A Thorlabs part # VPW42-UV fused silica plate, designed for use as a vacuum optical window, was used as replacement window. This is a round 1.5" plate, 4 mm thick. This particular type has anti-reflection coatings optimized for UV radiation between 290 and 370 nm, which I chose because my main interest is in NUV photography. Other types of anti-reflection coatings are available if the wavelengths of interest are in a different region of the spectrum. A few other standard thicknesses and diameters are also available. This plate was epoxied to a male 37 mm threaded ring, and an additional female 39-male 42 mm adapter was epoxied around the perimeter of the glass, allowing its use in different equipment and providing a "hand grip" that avoids directly handling the glass. The 37 mm male thread is screwed into the threaded ring of the adapter. The replacement window is easily removed, leaving an essentially unmodified adapter available, and a filter can be mounted in the same position for testing or special applications. The thickness of the original filter pack of the Panasonic G3 camera is very close to 3 mm. To this must be added about 0.5 mm for the "dust shaker". In practice, the replacement window mounted in the adapter is slightly too thick, and focusing at infinity with the CoastalOpt 60 mm is achieved with the focusing ring turned at 2-3 m. This causes no practical problems, as long as the lens is properly focused on the subject in live view. My tests with and without replacement window show no visible differences. The CoastalOpt 60 mm is sensitive to a flare hotspot caused by off-axis illumination, and for this reason it must be used with narrow lens shades. The replacement window in the adapter is a further reason for using a suitable lens shade. After purchasing this lens, I used it for over one year with a lens adapter assembled from two Nikon extension rings and a few odd parts. However, I now find the Metabones adapter with replacement window preferable for field work, since it is more solid and precise than a makeshift combination of parts, and has a very useful built-in tripod shoe. I use a second adapter, without window, on a macro photography stand. It provides a slightly higher maximum magnification than possible with the window in place, and for this use the inability to focus at infinity is not an issue. Modifying one of these Metabones adapters to slightly shorten it requires the use of precision metalworking machines, to avoid introducing slight misalignments between its front and rear mounts. Other advantages of window in adapterThe replacement window mounted in the adapter can serve an additional purpose: It prevents dust from contaminating the sensor if the lens is changed during field work in dusty or windy environments. Unlike the original filter pack, which is close enough to the sensor to make dust on the filter pack visible in photographs, the replacement window is farther from the sensor and, with most lenses and at most focusing distances, a small amount of dust on the window remains completely out of focus and invisible in pictures. SummaryA mirrorless camera can be converted to multispectral in two ways: replacing the filter pack with a window transparent to wavelengths of interest, or just removing the filter pack. There are good reasons to place the window inside a lens adapter, rather than in the position occupied by the original filter pack. |