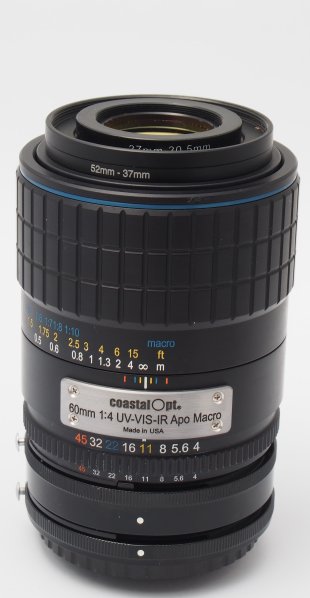
CoastalOpt 60 mm f/4 Apo:
the hotspot issue (with new solution)
I reviewed the Jenoptik CoastalOpt 60 mm f/4 Apo in general terms
on this page. The present page discusses the hotspot displayed by this
lens at magnifications from approximately 0.3x and above, which is a
problem acknowledged by Jenoptik.
Disclaimer: The tests and possible solutions of the hotspot issue I discuss on the
present page may not be applicable to all uses of this lens. In particular, I am unable to test the
CoastalOpt 60 mm with a full-frame sensor, and I don't know how it performs in this case. I can now
confirm that a lens shade properly chosen to avoid vignetting on a full-frame sensor is just as effective
to avoid the hotspot on this sensor as it is on smaller sensors. As a rule-of-thumb, the lens shade must
be a little wider and a little longer than appropriate for Micro 4/3. I
successfully use on full-frame a 40.5 mm cylindric
lens shade, about 20 mm long.
Posts by owners of other specimens of this lens also suggest that the hotspot may affect to different
extents certain specimens of the lens, or certain uses of the lens, and I don't know whether my specimen
of this lens and my testing conditions are representative of its normal performance and conditions of use,
respectively. The attempted workarounds that I discuss on this page may not be effective to reduce or
eliminate the hotspot in all cases, or be suitable for all applications. I am providing my findings
exclusively as information, with no guarantees on their applicability to specific cases.
I have no connections with CoastalOpt and Jenoptik other than by owning a specimen of this lens, and the
tests and techniques discussed on this page were not financed, sponsored or sanctioned by these (or any
other) companies.
On this page, I discuss solutions to the hotspot problem. By "solution", I mean any method or
workaround that is feasible in practical use of the lens and results in the hotspot being visually
undetectable. Practical ways to do this involve the use of additional items mounted at the front and/or
rear of the lens, or other modifications of the photographic setup. Redesigning or internally modifying
the lens could indeed be a way to truly solve the hotspot problem, but this may be difficult, and the
outcome uncertain, even with the resources available to optical companies. I did not consider solutions of
this last type because they are clearly not available to typical users of this lens.
The hotspot issue
A central, unfocused hotspot brighter than the rest of the image is said to become visible at
magnifications starting approximately at 0.3x and above. It gradually becomes more obvious as
magnification is increased and/or the aperture is stopped down at or beyond f/5.6.
To test for the occurrence of a hotspot, I mounted the CoastalOpt 60 mm on an
NUV- and NIR-enabled Panasonic G3 Micro 4/3 camera via a Nikon F to
Micro 4/3 adapter devoid of optics. This is the camera I currently use for multispectral photography. I
also tested the lens, to a lesser degree, on an
NUV- and NIR-enabled Nikon D70s, which has an APS-C sensor.
Illumination was by an NUV-enabled Bowens 1500Pro, located slightly
behind the camera and at an angle of approximately 45° from the optical axis of the lens. Light from
this source did not directly strike the front lens element, but a substantial amount of light was diffused
toward the lens by the background. This setup is conceptually similar to one I used in an earlier
test of contrast in a few lenses for macrophotography and photomacrography.
The official workaround
CoastalOpt
suggests using an extension ring
between lens and camera to prevent focusing the lens closer than 1:3 and thereby preventing the formation
of a hotspot in macrophotography. I did not attempt this workaround, and instead followed my own insights
as discussed below.
Hotspots and lens shades
During my use of other lenses, I encountered a pronounced hotspot problem with the Olympus 20 mm f/3.5 for
photomacrography. This lens exhibits a strong, unfocused central hotspot quite similar in appearance to
the one exhibited by the CoastalOpt 60mm.
In the Olympus 20 mm, the hotspot is particularly strong when placing a small dark subject onto a large
light background. This hotspot is evidently caused by off-axis illumination entering the lens and being
reflected among its elements and/or inner walls of the barrel. Mounting a lens shade in front of the lens
completely solves the hotspot problem with this lens. A severe problem with this solution is that the
Olympus 20 mm has a very short working distance, and therefore even a 5 mm long lens shade, which is the
minimum necessary to prevent the hotspot, comes very close to the subject. Based on this experience, I
decided to test whether a comparable solution could be used with the CoastalOpt 60mm.
An effective lens shade should prevent, as much as possible, off-axis light from striking the front lens
element. In order to do this, the lens shade should be both long and narrow. On the other hand, a lens
shade that is too long and narrow causes a vignetting to appear, with the image corners being darker than
the rest of the image or, in extreme case, with the peripheral image regions rendered as black and only a
central area showing a portion of the subject. Most lens shades are circular in outline, but with
wideangle lenses it is common to use rectangular or "flower-petal" lens shades that avoid dark
image corners. Zoom lenses are equipped with lens shades designed not to vignette at the lowest focal
length of the lens, which means that the lens shade becomes less effective (i.e., too wide) when the lens
is zoomed at higher focal lengths.
Round lens shades have either a cylindical or conical shape. Conical lens shades are generally used with
lenses of lower focal lengths, and typically have a front diameter much higher than the filter mount at
the front of the lens. Since the CoastalOpt 60 mm, on APS-C and Micro 4/3 cameras, behaves like a medium
telephoto lens, this discussion deals only with cylindrical lens shades. The length of a cylindrical lens
shade, as well as its diameter, affect its effectiveness. Too long a lens shade causes vignetting. As a
rule, a long and wide cylindrical lens shade is more effective than a narrower and shorter one in
eliminating stray illumination. However, in macrophotography, a narrow and short lens shade is preferable
because it is less likely to interfere with illumination of the subject. Therefore, the length and width
of an appropriate cylindrical lens shade in macrophotography is a compromise among these (and other)
factors.
In some cases, "reversed" conical lens shades, with a front end narrower than the base of the
shade attached to the lens, are used in macrophotography and photomacrography. This shape is slightly
better than a cylindical one in preventing light from striking the inner surfaces of the lens shade and
being diffused into the front lens element. Aside from this, a reversed conical lens shade often behaves
just like a cylindrical one.
The front edge of the lens shade is out of focus with respect to a properly focused subject, which almost
always will be placed further away from the lens than the edge of the lens shade. Therefore, in most cases
the edge of an excessively narrow lens shade does not cause a sharp vignetting but a gradual one, visible
as black image corners if the lens shade is much too long and narrow, or as slightly darker corners of the
image if the lens shade is slightly too long and narrow than its optimal size. This also means that it is
not possible for an optimal lens shade to completely prevent light from non-imaged areas from entering the
front lens element. Some light coming from directions that closely surround the imaged subject area will
always strike the front lens element. Therefore, with a lens known to have flare, contrast or hotspot
problems, it is important to make sure that these surrounding areas do not contain any bright lights or
specular reflections of the light sources.
Magnification affects the appropriate size of the lens shade. As magnification increases, a narrower cone
of light reaches the sensor, and a correspondingly narrower cone of light entering the front lens element
contributes to the image. Therefore, at higher magnification a narrower lens shade can (and should) be
used.
The physical size of the sensor also affects the appropriate size for a lens shade. With a given lens,
larger sensors require correspondingly wider lens shades in order to prevent vignetting. I don't have
full-frame cameras, and therefore I can say nothing about the appropriate size of a lens shade for use
with the CoastalOpt 60 mm on a full-frame body. My experience is restricted to APS-C and Micro 4/3
sensors.
The interior of lens shades is usually threaded or roughened to present an uneven surface that better
captures stray light, and painted matte black to absorb as much as possible of the incident radiation.
Black paint usually absorbs also NUV, and therefore ordinary lens shades generally work well also in this
wavelength band. Some black paints and black metal finishes, instead, reflect NIR radiation. In
particular, some of the black pigments used to blacken anodized aluminium are translucent to NIR. Black
plastics and cloth sometimes are translucent to NIR. Therefore, lens shades to be used in NIR imaging
should be tested, for instance by taking NIR pictures of them. Flocking designed for lining the interior
of telescope tubes (e.g., Protostar) can also be used to
build or line lens shades. While the Protostar flocking is adequate in the NUV and part of the NIR, I am
aware of other types of black flocking that reflect substantial amounts of NUV and/or NIR.
The CoastalOpt 60 mm has a 52 mm filter mount at the front of the lens, but its front element is not
deeply recessed and has a diameter of only approximately 30 mm. Thus, in principle, one could use a lens
shade much narrower than 52 mm. In my work in UV photography and
multispectral photography, I routinely use UV-pass filters and lens
shades of diameters much smaller than the filter mount of the lens, especially when the front lens element
is narrower than the filter mount. If the lens is significantly stopped down, the image-forming cone of
light that enters the lens is further narrowed, and it is even possible to use filters and lens shades
narrower than the front lens element without causing a detectable vignetting.
My tests
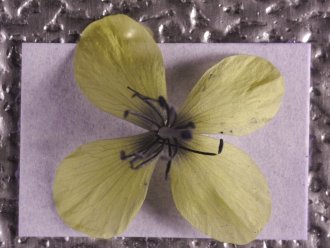
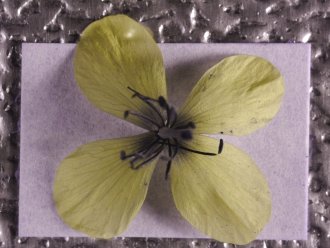
Figure 1. Subject used for first test of the Jenoptik CoastalOpt 60 mm f/4 Apo
For my first attempt to cause the hotspot problem in test images, I placed a 30 by 20 mm test subject
(white text on a blue background, cut out from a printed cardboard box) on a much larger yellow envelope
(Figure 1) and photographed the subject at a reproduction ratio of 1:2 (as indicated on the focusing
ring). Since I suspected that the hotspot is caused by off-axis light entering the lens, my expectation
was that the hotspot would be displayed as a yellow central area of the image, overlayed onto the
white-on-blue text. For this test, I used a 52 mm B+W 486 filter stacked on a Hoya NDX400. This
combination of filters excludes both NUV and NIR, and makes the camera sensitivity in the visible range
approximately equal to its sensitivity in the NUV. This technique and its advantages are discussed in the
following paper:
Savazzi, E. & Sasaki, T. 2013: Observations on land snail shells in near-ultraviolet, visible and
near-infrared radiation. Journal of Molluscan Studies. doi: 10.1093/mollus/eys039
f/5.6f/8f/11f/16f/22f/32
Figure 2. Results of first test.
Figure 2 shows the results, shot at apertures between f/5.6 and f/32. The hotspot has an undefined outline
but is clearly present. Its shape is roughly circular. Its intensity increases and its size decreases as
the aperture is closed down. On a larger sensor, the hotspot would appear proportionally smaller.
Lens shade used in the test.Results without lens shade at f/32.Results with lens shade at f/32.
Figure 3.
To test whether the use of a narrow lens shade reduces or eliminates the hotspot, I mounted the lens shade
shown at the top of Figure 3 onto the filter stack. This lens shade has an attachment thread of 30 mm and
a clear diameter at its outer end of 37 mm. A step-down 52 mm to 30 mm filter adapter was used to match
the lens shade to the filter stack. Only the images shot at f/32 without and with the lens shade are
shown, but images at other apertures are comparable. It is evident that the lens shade eliminates the
hotspot, or reduces it below a level where it would be visually detectable. In addition, contrast and
color rendition are clearly improved (the quality degradation shown in the image shot without lens shade,
however, is partly due to loss of contrast in the filter stack, not only in the lens). This lens shade
causes no detectable vignetting or dark corners at any aperture on the test camera. On a larger sensor,
this may not be the case, and a wider lens shade may need to be used. A further advantage of a narrow lens
shade is that it is less likely to cast a shadow on the subject or to interfere with the placement of
light sources and modifiers around the subject.
I carried out additional tests in the visible, NUV and NIR, substituting a brushed aluminium panel
(marketed as a reflector for light armatures) for the yellow envelope. The reflectance of aluminium is
almost constant throughout the NUV, VIS and NIR ranges, making this material an ideal choice for this use.
To make a long tale short, the use of a lens shade just wide enough to avoid vignetting always eliminated
the hotspot in my tests. I also tested a lens shade with an attachment thread of 40.5 mm, both longer and
wider than the lens shade used in the first test. The smaller 30 mm lens shade is slightly more effective
in extreme cases like the test subject above, but for practical use, with the large majority of real-world
subjects, the 40.5 mm lens shade is just as effective.
In connection with the use of a narrow lens shade, it is worth pointing out that a filter mounted between
lens and lens shade does not need to have a clear aperture of 52 mm. In fact, it can be as small as the
mount of the lens shade. As a matter of fact, even without a lens shade, a narrow filter partly acts as a
lens shade and blocks some of the off-axis light that would otherwise reach the front element of the lens.
To test this assumption, I took test pictures of the same subject as in the preceding tests, in the NUV
with Baader U filters of diameters 2" (mounted in a 52 mm filter frame) and 1.25" (mounted in a
30.5 mm filter frame and a 30.5 to 52 mm step-down adapter). No lens shade was used for this part of the
test.
Baader U 52 mm.Baader U 30.5 mm.Baader U 30.5 mm and 30 mm lens shade.
Figure 4. Effect of different filter sizes.
In the above samples, there is an improvement in the 30.5 mm Baader U, with respect to the larger 52 mm
Baader U. This indicates that the smaller filter, as expected, removes some of the off-axis illumination
that passes through the larger filter and reduces the lens contrast. There is a further slight improvement
with the addition of a lens shade, the use of which remains recommended.
Further thoughts
Some users have reported on bulletin boards that different specimens of the lens seem to display a
different propensity for the formation of the hotspot. However, side-by-side tests of different lens
specimens with the same subject and in the same conditions do not seem to have been carried out. While I
cannot exclude that the observed differences are real, I tend to believe that the observed differences may
be caused by different types of subjects, backgrounds and illumination. For instance, some users seem to
routinely use collapsible rubber lens shades, while others do not. The base of a rubber lens shade is
usually a 10-15 mm long rigid metal mount, which in itself is equivalent to a short cylindrical lens
shade. This by itself may reduce the susceptibility of the lens to the hotspot problem.
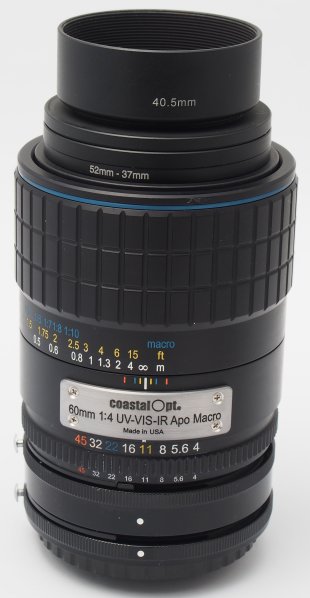
I recently used the CoastalOpt 60 mm for landscape photography with a 40.5 lens shade, and did not observe
any darkening in the image corners. At least on Micro 4/3 cameras, this size of lens shade seems to be a
good compromise usable throughout the focusing range of the lens. In practice, this lens shade can be left
permanently mounted on the lens.
Baader U 30.5 mm in filter adapter.40.5 mm lens shade on filter adapter.30 mm lens shade on filter adapter.
Figure 5. CoastalOpt 60 mm with different filters and lens shades.
The above figure shows a Baader U 30.5 mm filter mounted in a filter adapter (leftmost). The construction
and purpose of this filter adapter and additional, potentially useful combinations of components are
discussed here. The above figure also shows 40.5 and 30 mm lens shades
mounted on the filter adapter. The lens is mounted on a Nikon extension ring and a custom Micro 4/3
adapter. This combination of components is required by the fact that standard Nikon to Micro 4/3 adapters
do not allow focusing at infinity with the multispectral-enabled camera, as
discussed here.
Conclusions
My tests do show that
the CoastalOpt 60mm f/4 produces a hotspot when focused at magnifications at and above approximately 0.3
x, as acknowledged by CoastalOpt. The severity of the hotspot in my specimen of the lens seems to be
comparable to other published examples.
My tests further show that
using a suitably narrow lens shade of small diameter is an effective solution that
prevents the onset of a detectable hotspot, while not causing a visible vignetting. This suggests that
off-axis illumination is an important factor in the formation of the hotspot, as
initially hypothesized. The minimum width and maximum length of a suitable lens shade
depend on a number of factors, including magnification, lens aperture and sensor size. A
lens shade suitable for use at infinity
typically prevents hotspotting throughout the focusing range of the lens.