Sony Alpha 7 II
|

| Alpha 7 II | Alpha 7R II |
| Optical anti-aliasing filter | Software anti-aliasing, no optical filter |
| Electronic first shutter curtain | Electronic first shutter curtain + Full electronic shutter |
| 5-axis sensor-based IS | 6-axis sensor-based IS |
The behavior of image stabilization when the camera is switched off is another noticeable difference between the two camera models. In the 7 II, the sensor visibly drops down within its cradle under the influence of gravity as soon as power is switched off. This behavior is similar to the Olympus E-M1 and E-M1 II. In the 7R II, instead, the sensor does not move when power is switched off. I do not know whether this difference is somehow related to the conversion to full spectrum, or to the different image stabilization mechanisms used in the two Sony models.
Full-spectrum conversion
This specimen of the 7 II was converted to full-spectrum by infraredcameraconversions.com. This particular conversion involves the removal of anti-aliasing and UV/IR cut filter mounted in front of the sensor, and re-calibration of infinity focus. It also includes modifications to prevent image fogging at long exposure times by an internal NIR LED and light sensor used for diagnostics of the electromechanical shutter. In other camera models, the piezoelectric "dust shaker" typically is also removed if present.
The above figure shows that the reflection from the sensor windows has a different color in the two cameras. This is obviously due to removal of the built-in filters in the 7 II.
This type of conversion can be called, in short, remove-and-recalibrate. Recalibration of the lens-to-sensor distance is necessary because the refraction index of the removed windows is higher than air, and therefore, after removal of the built-in filters, the physical lens-to-sensor distance must be slightly shortened to restore focus at infinity.
Some of the companies offering camera conversions replace the built-in filters with an anti-reflection coated silica glass plate of similar thickness. This process is conveniently called remove-and-replace. A minor recalibration of the lens-to-sensor distance is sometimes performed to compensate for different window thickness and refraction index, but some conversion companies skip this step. Since many lenses can actually focus slightly beyond infinity, the latter companies can usually get away with it.
A common criticism of the remove-and-recalibrate method versus remove-and-replace is that, with the former method, the remaining window that protects the sensor is integral with the sensor chip package, and any damage to this window is permanent. On the other hand, the remove-and-replace method frequently traps dust particles between the sensor package and the replacement window, which cannot be cleaned out by the user.
Another criticism of the remove-and-recalibrate method is that modern camera lenses are designed to take into account a specific thickness of the built-in filters. The thickness of the filter, however, is critical only with fast lenses of short focal lengths. In fact, a thinner filter/window is slightly better for legacy lenses designed for film.
Some companies use "clean workstations" designed for use in the semiconductor industry to reduce the risk of trapped dust during remove-and-replace conversions. However, once a camera has been used, dust is present all over its interior and exterior, and impossible to completely remove before conversion, even in a clean workstation. Cameras in their original packaging are not immune from dust, either. Most new cameras are simply packaged in a non-sealed plastic bag, and the surrounding packaging materials are not dust-free. Changes in ambient temperature during transportation and storage of packaged cameras cause air to "breathe" in and out of the camera. Vibrations cause dust to be shaken around and re-distributed within the package and camera. While the original filters are mounted and sealed on top of the sensor in a clean-room environment, some dust unavoidably enters the camera while still on its assembly line and contaminates the outer filter surface. Some of this dust is likely to move to the sensor once the seal is broken and the built-in filter is being replaced.
I myself converted DSLR and mirrorless cameras to full-spectrum by both methods (without using a clean workstation), and used the converted cameras for years. Neither the cameras I converted myself with the remove-and-replace method, nor my cameras commercially converted with this method, were completely free from trapped dust. On the other hand, I never damaged the glass window of a camera converted by either method by inappropriately cleaning it, so I am willing to take the risk inherent in remove-and-recalibrate conversions.
Remove-and-recalibrate conversion in some cameras requires machining of the camera chassis to allow the sensor to sit at a closer distance from the lens. Other cameras, including Sony mirrorless models, allow the position of the sensor to be re-adjusted without permanent modifications to the camera chassis. The latter cameras are obviously better for this type of conversion.
I am also aware that the replacement windows used in remove-and-replace commercial conversions are sometimes roughly cut with irregular edges, have surface defects or, in the worst cases, are made from materials with an insufficient UV transmission or from plate glass not specified for use in optical instrumentation. I have read about major problems in remove-and-replace commercial conversions that include instances of faulty sealing between replacement window and sensor, inappropriate adhesives being used, and even plastic sheeting being used instead of a glass window. Considering the long list of risks in remove-and-replace conversions, and the higher cost of properly-performed conversions of this type, I tend to prefer the simpler risks and lower cost of remove-and-recalibrate conversion, especially when done in a camera type that requires no re-machining.
Why a full-frame converted camera?
I already own several lenses usable in UV photography. All the best ones are designed to cover full-frame or larger image circles, and focal lengths lower than 35 mm are uncommon, so there are very few choices of UV wide-angles for Micro 4/3. Therefore, a full-frame camera allows me to better use the majority of my UV lenses.
The multispectral CoastalOpt 60 mm Apo is a good example. This lens performs as a roughly "normal" focal length on full-frame (generally defined as a 50 to 55 mm lens), but as a medium telephoto on Micro 4/3 (where a 25 to 30 mm lens is a "normal" focal length). The numerous 35 mm legacy lenses branded Kyoei, Hanimex, Prinz Galaxy, Soligor etc. are moderate wide-angle on full-frame, and short telephoto on Micro 4/3. Only a handful of legacy lens types of shorter focal lengths than 35 mm are suitable for UV imaging and are available for Micro 4/3. Some have a not-so-exciting UV performance, while others are limited by their small image circles even on Micro 4/3.
Peculiarities of converted A7 II
Aliasing
The optical anti-aliasing filter was removed as part of the conversion. It is integral with the UV- and IR-cut filter, so this is unavoidable. The optical anti-aliasing filter is made from two layers of birefringent material with orthogonal optical axes, and "smears" light directed toward each pixel. In particular, it causes parts of the original light beam to reach the original pixel, as well as three of the adjacent pixels. This guarantees that light from each point of the subject is split and directed to four sensels of the Bayer array, i.e. one with red, one with blue and two with green filters. A de-mosaicking algorithm takes the raw image from the sensor (in which each pixel contains only the red, green or blue data) and, based on adjacent pixels, interpolates the values for the two missing color channels. This algorithm also removes some of the blur caused by the anti-aliasing filter by sharpening the image.
Removal of the anti-aliasing filter removes the pixel smearing that the demosaicking algorithm is expecting. This causes the demosaicked image to be sharpened slightly too much. If the lens being used is very sharp (the CoastalOpt 60 mm, which is extremely sharp, was used for the following example), focus is perfect and the subject contains very fine oblique lines, these lines appear to be broken into vertical or horizontal dotted or dashed lines. In particular, what is missing between the line segments is the "smear" caused by the now-absent anti-aliasing filter. Lines thicker than about two pixels do not display this type of aliasing.

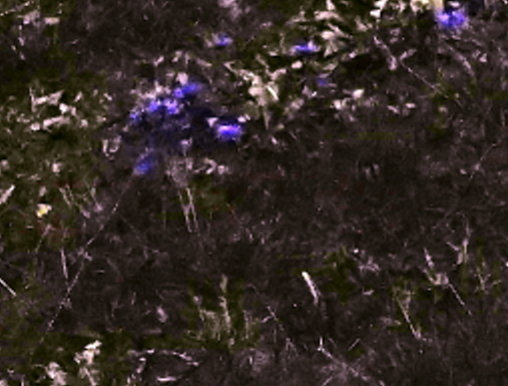
This, however, is visible only if the image is displayed at full resolution. Since the image is 6,000 by 4,000 pixels, no current monitor is capable of displaying the entire image at full resolution (short of an 8K monitor, where pixels are so small that no one can see the above problem from normal viewing distance in any case), and printing on paper at any reasonable size does not show this problem. This problem is therefore mainly of theoretical interest, and if desired can be reduced by software smoothing/blurring with kernels of small diameter.
Exposure compensation
Another peculiarity of this converted 7 II is that UV pictures tend to be underexposed. There are two ways to set an exposure compensation with this camera:
- In Menu -> Camera (leftmost tab) -> page 4 -> Exposure Comp. and choose the compensation factor (+1.5/+1.7 works for me). This compensation factor, by default, is reset to zero when the camera is switched off. To keep this compensation value also when the the power is cycled, go to Menu -> Gear (second tab from the left) -> Reset EV Comp. -> page 5 -> Maintain.
- With the compensation dial at the top right of the camera body. If you have an exposure compensation set in the menu as described above, as soon as you turn the compensation dial away from 0, it overrides the setting stored in the menu, and the value stored in the menu is lost (even if you cycle the power or return the compensation dial to 0).
Therefore, use only one of the above methods. Either use only the compensation in the menu, or the compensation dial. The first method does not protect you if you accidentally rotate the compensation dial, so it is probably safer to use the compensation dial and to remember to leave it at +1.7 unless it is necessary to change the value.
Initial tests
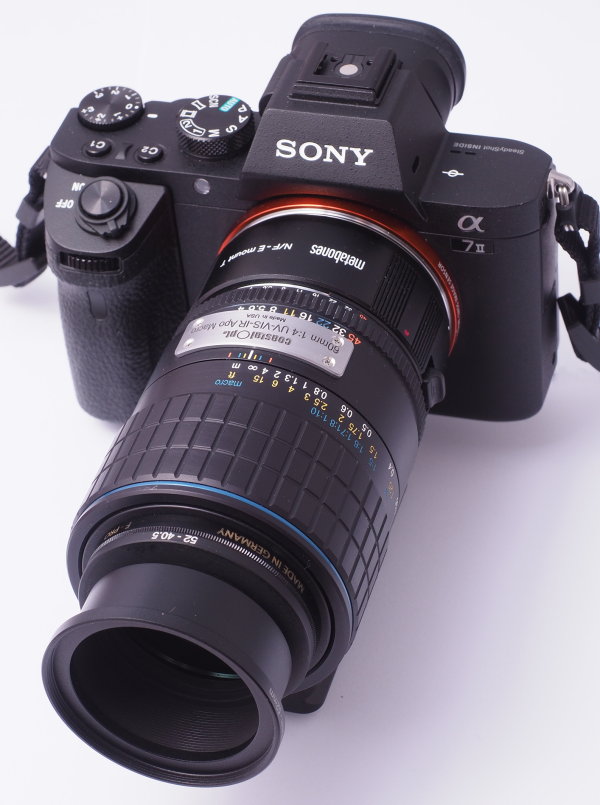
For this test, I used the camera in a typical configuration for UV imaging, shown above. From rear to front in the picture:
- Camera
- Metabones Sony E to Nikon F adapter
- CoastalOpt 60 mm Apo
- Baader U filter (re-mounted in a 52 mm filter ring)
- 52 mm to 40.5 mm step-down ring
- 40.5 mm metal lens shade. This lens shade avoids the occurrence of the central flare hotspot known to be produced by the CoastalOpt 60 mm and has been tested to avoid vignetting in the corners with this camera.
- 46 mm to 52 mm step-up ring. This screws into the front of the lens shade and is only for convenience of using a 52 mm lens cap, which is the same as the lens. It can be removed if desired.
I shot the following test images with the hand-held converted 7 II equipped as shown in the above figure and with the following main settings:
- Auto ISO (typical ISO value was around 6,400)
- Auto exposure, aperture priority (A dial position, with typical exposure time 1/60 s at f/8)
- In-camera image stabilization, lens focal length manually set to 60 mm
- Mechanical shutter
- Vivid image setting (this helps to emphasize the UV false color)
- Long exposure noise compensation switched on (although this exposure time probably does not use noise reduction)
- High ISO noise reduction set to normal
It was sunny but with strong wind, which caused some shots to be motion-blurred. In such a situation, I try to compensate by taking multiple shots and selecting the best at home. The following images are variously cropped and reduced in size, but not post-processed other than for adjustment in brightness.


My first impressions are that UV images recorded with this camera and settings have a nice color brilliance and contrast, but often are one or two stops too dark if no exposure compensation is used.
In full sunlight, it is difficult to use the viewfinder because the live view is too dark. Also in this case, exposure compensation helps.
As a whole, a high UV image quality is the most difficult to achieve in multispectral photography. Therefore, I did not bother yet with NIR images, which are the easiest to cope with. My initial test gave better results in UV than I am used to with other full-spectrum cameras, even when using the same filters and lenses.
Other settings that do not directly affect image quality, but that I find useful when working with this camera and legacy lenses:
- C1 button set to image magnification (for precision focusing)
- C2 button set to white balance (to switch among custom or standard modes, e.g. after swapping filters)
- C3 button set to IS lens focal length (must be used after swapping lenses)
- C4 button set to ISO
- Image type set to fine JPG + uncompressed raw
- Viewfinder brightness set to maximum
The camera provides three custom white balances. It can be useful to have a custom white balance for each frequently-used filter. Normally I set a custom white balance with a filter by using a white PTFE sheet as target. With UV filters like the Baader U, this camera reports an error while recording a custom white balance. I just go ahead and store the custom white balance anyway. The UV custom white balance set in this way is more neutral with this camera, than with my earlier full-spectrum cameras.
Uncompressed raw files are 48 MB, but today there is little excuse for not saving images in-camera in both JPG and raw file formats. Raw files can always be deleted once back at home, if not needed.
Conclusions
A full-spectrum Sony Alpha 7 II is a competent full-frame body capable of producing top-notch results.