Photomacrographic lenses, part 6
Like grandfather, like grandson?
Zeiss Luminar 63 mm f/4.5, version 1 versus version 3
The Carl Zeiss Luminar 63 mm f/4.5 is one of the best photomacrographic lenses, and my earlier tests (here, here, here,
here and here) confirmed this. Among
the photomacrographic lenses I reviewed on this site (by now, at least 22 different models, not including
some I tested but did not publish about), only the Macro-Nikkor 65 mm f/4.5 performs better, and by just a
tiny, and even questionable, margin. Exotic lenses like the
Micro-Nikkor 70 mm f/5 and
EL-Nikkor 68 mm f/3.5 also perform exceptionally well, but their problem
is that they simply are not available on the second-hand market.
The Carl Zeiss Luminar series was produced in at least
four successive versions, or generations. Among these models, the 40 mm
was obviously re-designed in the process (including its optical formula), while the others had their
mechanical parts updated, while their optical design may or may not have been updated (and Zeiss provided
no information on these matters). The lens coatings do look slightly different between the older and newer
versions, and likely were changed as well.
All my earlier tests involved a version 1 Luminar 63 mm (i.e., the first version produced after Zeiss
acquired Winkel, thoroughly incorporated it, and started producing Luminars marked only Zeiss instead of
the transitional Winkel-Zeiss or the pre-merger Winkel logo). It stands to reason to think that subsequent
versions may have been slightly improved. Therefore, when looking for a specimen of these lenses meant to
be used in photography, it should be desirable to try and obtain one from a later version. On the other
hand, in the 1980s and 1990s the production of many brands of camera lenses and microscope equipment
started concentrating on mass production at low costs, rather than durability and top quality. A worrying
sign that Zeiss may have been following this trend is seen in several of their microscope objectives,
which were marked with a silk-screen process instead of being engraved, and lost their markings after
prolonged use. This is also the case with version 3 Luminars, which have engraved aperture scales (which
would make a lens unusable if lost) but silk-screened specifications and model markings. Zeiss microscope
equipment of this period is also plagued by an inferior glue used to cement optical elements, which
separates easily and cannot be repaired (unlike elements cemented with the traditional Canada balsam).
Fortunately, most Luminar lenses, including the 63 mm, do not use cemented elements and therefore are
immune to this problem.
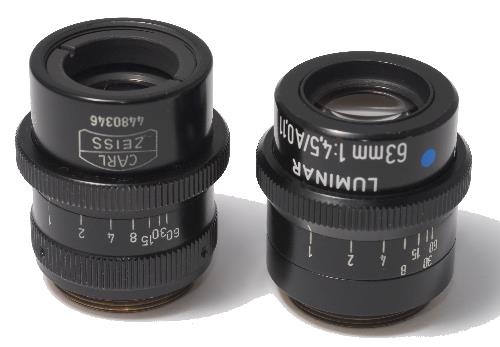
Version 1 (left) and version 3 (right) of the Luminar 63 mm f/4.5
Since I had a chance to add a version 3 Luminar 63 mm to my lens inventory, I was able to carry out a
direct comparison and answer the question of whether it is really better to choose an earlier or later
version of this lens - or if it just does not matter from the point of view of image quality. This is a
relevant question, since a version 3 Luminar 63 mm in like-new condition may cost twice as much as a
version 1. The 63 mm also seems to be the most sought-after Luminar model. While the 25 mm is frequently
available and the old 40 mm f/4.5 is fairly common, a version 3 of the 63 mm may not come up on eBay more
often than once or twice a year.
The two lenses look a bit different. A side-by-side comparison shows also that the barrel design is not
the only difference. In spite of its shorter barrel, the Version 3 has wider front and rear elements
located at a higher distance from each other than the Version 1. Both versions use a Cooke triplet formula
with the aperture diaphragm between the front and center elements.
In the case of the 40 mm, I still believe that a version 2 or 3 (with f/4 maximum aperture) is preferable
to a version 1 (with f/4.5 aperture), but I don't have first-hand data on this. I should expect that the
more expensive, redesigned optics were used in later versions for a good reason. The modern model is also
slightly easier to focus, because of its wider aperture. I am not going to test this assumption any time
soon, since I already have a Version 2 f/4 model.
Test setup
An initial round of tests showed very similar results of these two lenses. The main problem, in fact, was
to reliably distinguish between slight changes in illumination and focusing (caused by the setup) and real
differences between these lenses. Changes in illumination are relatively easy to take care of, by
attaching the SB-800 flash used for this test to a miniature Manfrotto Hydrostatic arm, so that it can be
oriented with precision and solidly locked afterward. The two lenses were mounted on a microscope
nosepiece attached at the front of Nikon PB-6 bellows. This allows the lenses to be switched quickly and
with a minimal risk of disturbing the subject and framing. With fully extended bellows, this setup yields
a 3.8x magnification, which is well within the optimal range for this lens (2x - 5x according to my
tests and calculations, or 2x-10x according to
Zeiss literature).
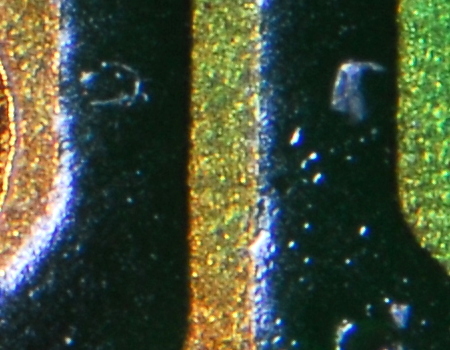
A further problem is that the two lenses are not exactly parfocal. The version 1 must be unscrewed by a
couple of mm in order to focus on the same subject as the version 3 specimen. This results in a slightly
lower magnification of the version 1 at the same bellows extension as the version 3, which is visible in
the corners of the test images (see below).
Because of the lack of parfocality, re-focusing after changing lenses would slightly change the
illumination angle, since the subject is placed on a precision focusing stage for this test but the light
source is instead attached to the base of the stand. Although not important in a real shooting situation,
the slight change in illumination angle alters the reflections from the subject, making the test pictures
taken with different lenses difficult to compare. This problem was solved by using a custom-built stand
with separate focusers for both the stage and bellows, and using the latter to refocus.
The continuous light sources (power LEDs) used for framing and focusing also had to be switched off during
the actual exposure, because they were mixing with the flash light and slightly changing its color
temperature to different amounts as the lens aperture was changed.
Focusing with precision was a much tougher problem. The custom-built photomacrographic stand used for this
test has a total of three focusing controls (not including those of the Nikon PB-6 bellows, which are far
too primitive to be useful in this context):
Coarse focus, moving the camera and bellows as a whole (from a Nikon stereomicroscope). This mechanism
proved too coarse for accurate focusing, and was used only for initial positioning.
Coarse focus, moving the subject stage (from a Zeiss Photomicroscope). Also this mechanism is too coarse
for precision adjustments.
Fine focus, built-in and coaxial with the preceding one. Paradoxically, this control is too fine. It is
designed to provide fine focusing for a high-magnification compound microscope with a precision of less
than a µm, and with a photomacrographic lens at about 5x it is necessary to move it close to one
whole turn in order to see any change in focusing in the viewfinder. This is too slow for visual
feedback, and ends up being distracting.
Finding a suitably coarse fine-focuser, or a suitably fine coarse-focuser, is going to take me some time.
In addition, the viewfinder of a DSLR is simply not designed to allow manual focusing with a lens with an
effective aperture of f/27 (given the magnification used in this test). In order to carry out this test, I
resorted to a brute-force approach. Starting from a slightly but visibly out-of-focus position, I took a
series of exposures at 20 µm focus intervals through the (apparently) in-focus zone and until the
image seen through the viewfinder begun again to go out of focus. This was also made easier by selecting a
very flat subject (an electronics circuit board), so that its entire surface is in focus at the same time.
From each set of pictures, the one with the best in-focus detail of the dust particles on the green
surface of the circuit board at the center of the frame was selected. Center and corner details were cut
out of this picture, and are displayed below.
The lens was used at aperture setting 2 (nominal f/6.3), because this aperture gives the
best depth-of-field and resolution, as allowed by diffraction.
Test results
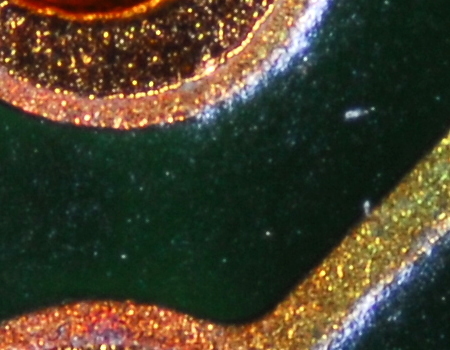
Version 1 Luminar 63 mm f/3.5, aperture setting 2, center of frame, 400 by 400 pixels crop.
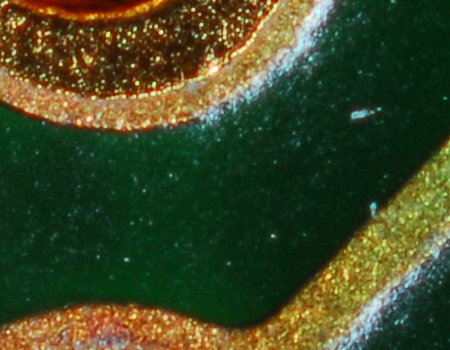
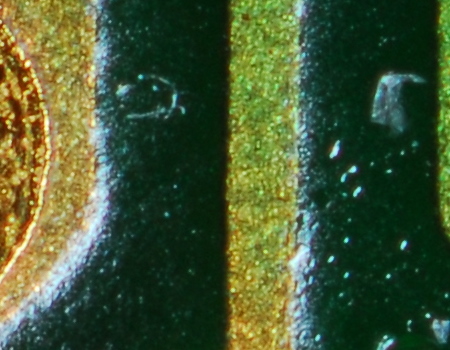
Version 3 Luminar 63 mm f/3.5, aperture setting 2, center of frame, 400 by 400 pixels crop.
Version 1 Luminar 63 mm f/3.5, aperture setting 2, corner of frame, 400 by 400 pixels crop.
Version 3 Luminar 63 mm f/3.5, aperture setting 2, corner of frame, 400 by 400 pixels crop.
Conclusions
To make it simple, I can see
very little significant difference between Version 1 and Version 3 of the Zeiss Luminar 63 mm
f/4.5. Assuming that you could focus with the necessary precision when using this lens in real-world
situations (which you can't), and spend the time to do some pixel-hunting (time that probably should be
spent for a better purpose), the newer version will give you a slightly "richer" picture when
seen at a large magnification. This effect is the result of several minor improvements. Resolution,
contrast, flatness of field, chromatic aberration near the picture edges and color fidelity have all been
improved from version 1 to version 3 of this lens. Together with the fact that the tested versions of this
lens are not parfocal and the differences noted in the introduction, these results confirm that the
optical formula of the Luminar 63 mm was indeed re-computed between Version 1 and version 3 (probably,
between version 1 and version 2, although lens coatings may have improved between Version 2 and Version
3). Thus, the differences among versions of this lens are more than a cosmetic redesign of the lens
barrel. In practical use, however, it is simply too difficult to focus these lenses with the precision
required to take full advantage of the resolution of which they are capable, and the improvements in
contrast and color fidelity are very hard to detect in practical photographs.
There might be other advantages in choosing a Version 2, 3 or 4 of this lens over a version 1. For instance, lubricants in a later version are newer and have had a lesser chance to stiffen and dry
out, and the lens may have been subjected to less use and abuse. However, this depends in large part on
the conditions and climate in which a particular lens specimen has been stored. The diaphragm blades in
Versions 3-4 are matte black, while in Versions 1-2 they are very shiny, literally mirror-like, and may
potentially create flare by reflecting incoming light back to the front lens elements. The contour of the
newer aperture ring is also slightly more comfortable to operate. The newer versions provide a slightly
higher working distance (in my opinion, this difference is not significant, but it might be if every
millimeter counts). Finally, sporting a "blue dot" Version 3 or 4 Luminar may win you some
status and envy among the couple of dozens of photomacrographers who really appreciate the scarcity of
these lenses.
In accurate tests, the Version 3 of this lens will give you a slightly better image quality than the
Version 1, but I doubt that the difference is significant in practical use of this lens. If you need this lens and have a chance of acquiring a Version 2, 3or 4 (and can afford the price), by
all means do, but Version 1 does not deserve to be frowned upon. The latter, however, is a slightly
different lens.
While the Macro-Nikkor 65 mm f/4.5
has a slight edge on the Version 1 Luminar 63 mm, any difference between the Version 3-4 Luminar 63 mm
and the Macro-Nikkor is probably too small to matter in practice.
Important update: After using
the above lenses, as well as other top-of-the-line photomacrographic lenses, for the photography of actual
subjects with a specially modified photomacroscope (which, among other things, makes the notorious
difficulty of focusing at high magnification a thing of the past, and guarantees that these lenses can
produce the best image quality of which they are capable), I found that this page needs a significant
update. While the above discussion remains fully valid and does not need to be corrected,
it does not tell the whole story.
It turned out that all photomacrographic lenses in my possession display variable but
significant amounts of axial (not radial) chromatic aberration. Radial chromatic aberration results in
colour fringes around part of the outline of small bright objects (typically, blue and magenta fringes on
opposite sides of the same object). This is the type of chromatic aberration commonly observed in general
photography, especially outdoors. Axial chromatic aberration, instead, causes light of different
wavelengths to be focused on different focal planes, rather than at different positions
on the same focal plane. Axial chromatic aberration is rarely seen in general photography, but becomes a
special problem in photomacrography, because of the extreme reduction in depth-of-field. All good
photomacrographic lenses correct both axial and radial chromatic aberrations in their plane of focus, and
normally you see little or nothing of these aberrations in the well-focused areas of photomacrographic
pictures. Things get out of control, instead, in areas that are substantially out of focus. In these
unfocused areas, bright points of light (e.g., reflections from pin-prick mirror surfaces) become
horrendous balls with multiple haloes of different colours, multiple refraction and diffraction fringes,
and an overall appearance like nothing you see in ordinary photography.
It is simply impossible to correct all types of chromatic aberration at all focal planes, at least in a
lens that contains a small number (3-6) of optical elements. This includes
all photomacrographic lenses. The correction of aberrations is always a compromise among
different aberrations, and correcting the axial and radial chromatic aberration in the focal plane
actually enhances it outside this plane. If you look carefully, you can actually see this in the above
test pictures, especially in the corners of the original image's field-of-view. The Version 1 Luminar
produces a visible radial chromatic aberration (one side of the white dust particles is blue). The Version
3 Luminar performs better in this respect, but the centre of the larger dust particles (which is
out of focus, i.e., above the plane of focus of the picture) with this lens takes a cyan tinge, caused by
axial chromatic aberration (with this particular lens, the tinge would be magenta for objects located out
of focus in the opposite direction, i.e., behind the plane of focus). On the other hand, the older Version
1 Luminar displays a lower amount of axial chromatic aberration, because it does not attempt an equally
extreme correction of radial chromatic aberration in the plane of focus.There is only so much you can do
to correct aberrations in a Cooke's triplet lens design, and the Zeiss designers had to choose what they
regarded as the best compromise.
In practice, this means that the Version 1 Luminar 63 mm may perform better, with certain real subjects
that are partly out of focus, than the re-calculated and better-corrected (in the focal plane) Version 3
Luminar of the same focal length. Whether, and to what extent, this is also true of other focal lengths
and versions of Zeiss Luminar lenses, remains to be seen. A further possibility that I did not test, but
is suggested by my practical results with these lenses, is that axial chromatic aberration is a lesser
concern if the lens aperture is closed 1-2 stops beyond the point at which diffraction begins to visibly
affect resolution. Probably, it is not by accident that Zeiss recommended a narrower lens aperture than I
would like to use, since film photography for scientific use was not expected to provide the same level of
detail that is possible with current digital-camera sensors. Therefore, a higher amount of diffraction was
tolerated, mainly as a trade-off against a higher depth-of-field and lesser chromatic aberration.
 Important update: After using
the above lenses, as well as other top-of-the-line photomacrographic lenses, for the photography of actual
subjects with a specially modified photomacroscope (which, among other things, makes the notorious
difficulty of focusing at high magnification a thing of the past, and guarantees that these lenses can
produce the best image quality of which they are capable), I found that this page needs a significant
update. While the above discussion remains fully valid and does not need to be corrected,
it does not tell the whole story.
Important update: After using
the above lenses, as well as other top-of-the-line photomacrographic lenses, for the photography of actual
subjects with a specially modified photomacroscope (which, among other things, makes the notorious
difficulty of focusing at high magnification a thing of the past, and guarantees that these lenses can
produce the best image quality of which they are capable), I found that this page needs a significant
update. While the above discussion remains fully valid and does not need to be corrected,
it does not tell the whole story.