Wisport Whistler II backpack with Peak Design large Camera Cube insertThis page is a review of the Wisport Whistler II as a camera backpack. It does not describe the use of this model as a generic trekking backpack. For reviews of the Whistler II as a trekking backpack, see for example Amazon (note that amazon.com, for example, lists reviews of this backpack separately for each color, and this means you must navigate across a dozen different patterns and colors to see a substantial number of reviews). The Wisport Whistler II is the largest generic backpack that I currently use as a camera backpack. I chose this model because it is the best match I could find, based on backpack specifications available online, to contain the Peak Design large Camera Cube insert for camera equipment. The latter has an internal volume of 18 Lliter / litre as specified by Peak Design. The Whistler II is specified as having a 35 L capacity. So why is a 35 L backpack necessary to contain an 18 L camera insert? To provide an internal capacity of 18 L, the camera insert, including its padded outer shell, has a total volume of 25 L. The Whistler II specified capacity includes a pocket for a hydration bladder facing toward the harness, and a secondary partition at the rear, accessible through its own external zipper. The rain cover stowed at the bottom of the pack further uses some of the backpack internal capacity. What is left available in the main compartment turns out to be just enough to contain the large Camera Cube without straining the zippers and seams of the backpack. A smaller backpack, like the Wisport Sparrow II (30 L) would probably be too tight, considering that this model has a larger secondary compartment than the Whistler II. The Wisport Whistler II is my third Wisport backpack model. I also own a Caracal (25 L) and a Sparrow 16 L. All my Wisport backpacks are a slightly blueish urban gray shade, which Wisport calls "graphite". Several other backpack brands have models available in similar, but not identical, shades and tones of gray. If you are looking for external PALS pouches and organizers and you want them to exactly match a graphite Wisport backpack, you are better off choosing those made by Wisport. Unfortunately, the current Wisport PALS pouches are available in only a restricted range of sizes and types. Their 9 L and 5 L non-padded pouches are very good for carrying extra clothing in the field. When attached to the sides of the Whistler II, these pouches add a lot of storage capacity and complement this backpack very well. All such external pouches, however, should be removed and stored in your checked-in luggage when using the backpack as carry-on during air travel. Like most Wisport tactical backpacks, the Whistler II is covered in PALS webbings, albeit to a larger extent than other Wisport backpacks. This model, in fact, has PALS webbings on five out of its six sides, including top and bottom. An additional 6 x 3 PALS webbing inside the main compartment is mounted on a sleeve instead of being directly sewn to the outer wall, so it is possible to insert e.g. a laptop between the webbed sleeve and the outer wall of the pack without losing the possibility of attaching pouches to the webbing. Fully usable 3 x 2 PALS webbings are also available on each side of the hip belt. The Caracal backpack has similar 3 x 2 webbings on each side of its hip belt, but two-thirds of them are not really usable because straps joining the belt to the body of the backpack either overlap an attached pouch or force it to jut out at an angle. The Whistler II has plenty of external and internal pockets, straps and tie points, too many to list here. The shoulder straps, backrest and hip belt are generously padded but not excessively soft. The padding is covered by a tough but breathable tight-mesh cloth that looks more durable than the loose mesh often used in other backpacks (including earlier Wisport models). This loose mesh has always been the first thing to show wear and pulled/broken threads in my previous backpacks (especially Lowepro ones), so it is good that Wisport has been looking for a more durable alternative. All these features add to the weight, so it is not surprising that the empty Whistler II weighs 1.6 Kg. A stiff fiberglass bar is inserted in a pocket in the channel along the middle of the backrest, and keeps the harness of the backpack straight. In case the straight fiberglass bar does not fit the shape of your back, an aluminium bar is available as a separate purchase, and can be bent into the desired shape. At the bottom of the backpack, a velcro-fastened compartment contains a rainproof cover for the backpack, large enough to cover the whole backpack but not to cover additional pouches attached to the external webbings. The cover is made from a very thin black synthetic cloth, and does feel like it will not resist wear and tear. It is definitely not durable enough as protection for a checked-in backpack. My backpack actually came with two identical rainproof covers stuffed into this compartment, a feature not described by Wisport as far as I can see. Wisport's thought about the double rain cover is perhaps thatt putting a rain cover on each side of the pack protects all its sides, including the harness, e.g. when the pack is transported on the back of a truck or on a car roof. For trekking in the wild, it may be a good idea to replace one of the original covers with an orange or yellow one, which can double as a visual signal in an emergency. I have been using for years an orange Paine D-3 rucksack cover, which is very sturdy and equipped with an elastic edge plus a removable elastic cord threaded through eyelets along the edge. This cord can be passed around the shoulder straps to prevent the cover from accidentally slipping off the pack. The 40 L nominal capacity of this cover is just right for the 35 L Whistler II. I can no longer find Paine rucksack covers online and it is possible they have been discontinued. Perhaps they were only marketed in Japan, which is where I bought mine. The Whistler II does not have a built-in external pocket or luggage tag for your name and address. You need to use a third-party one. There is the customary calling-card-sized patch of velcro-compatible felt at the rear of the pack, but it is not safe for attaching a name tag. 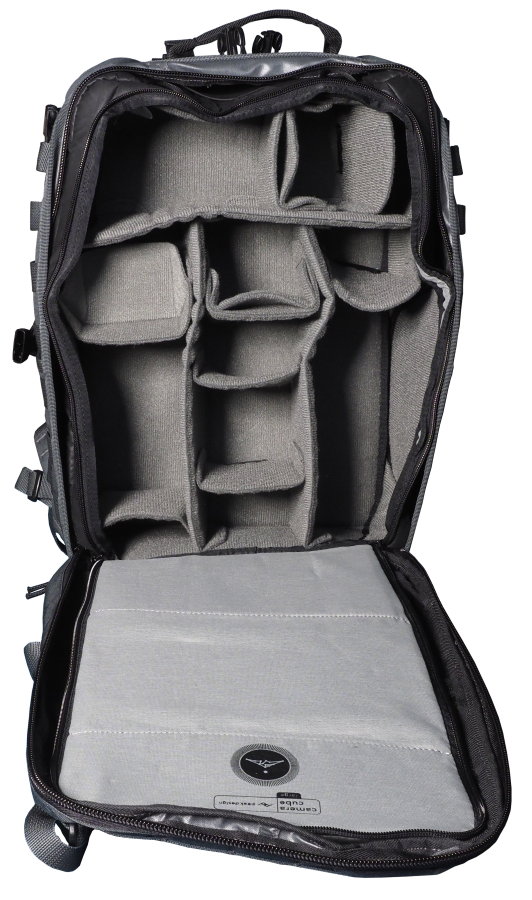
The main hatch opens to provide almost unrestricted access to the interior of the Camera Cube. When carrying the backpack in the field, I prefer to leave the main hatch of the Camera Cube closed but unzipped, to provide padding for the equipment. This hatch does not get in the way because it opens the same way as the main hatch of the backpack (above picture). Space in the backpack is just a little bit tight for the insert, which actually helps to keep the insert from sliding out. Once the insert is filled with equipment, it keeps its shape better than when empty like in the above picture. Using as many of the available velcro partitions as practical also helps to keep the insert in shape.
Note: the zipper of the main hatch of the Whistler II is fussier and slower to open than
the zipper of a dedicated camera backpack like the Tenba Axis series. It
does get better after a while with use and habit, but no general-purpose backpack can compete with a
well-designed, dedicated camera backpack in this respect. It is just a fact of life. I plan to zipper the insert shut before air travel with the backpack, so that I can quickly extract the insert if forced to check in the backpack at the plane door. If the weather is not uncomfortably hot, probably I will also remove the hip belt from the backpack and wear it under a jacket before boarding a plane, to reduce the apparent size of the backpack (unlike luggage size, there are no limits to passenger size - within reason). One or two small PALS pockets attached to the belt can be handy for storing travel toiletries, and wearing the belt will prevent these items from being literally snatched out of my hands if I am forced to check in my hand-carry luggage. 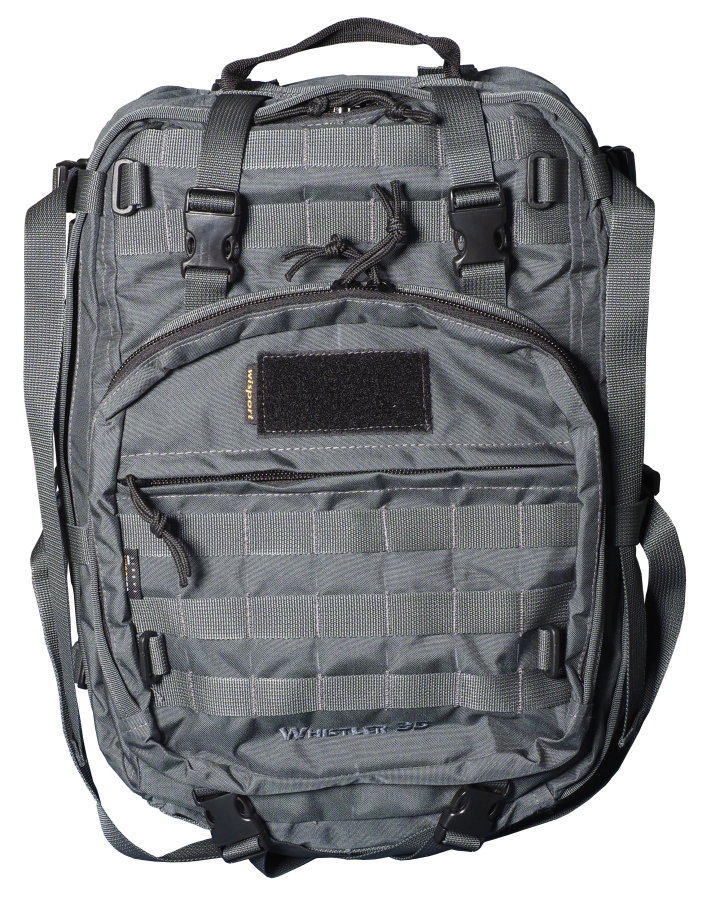
Six buckled straps help to keep the main hatch of the backpack closed, and can also be used to strap clothing and pouches to the outside of the pack. Opening only the four topmost straps gives access to the top one-third to one-half of the insert (the latter on condition that the external pockets are not stuffed), so this is where you should place your most-frequently used camera stuff. It is useful to open the main hatch only partially, for example while holding the pack uprigh. Two more buckled straps lower along the sides keep the rest of the main hatch closed. Two additional buckled straps under the bottom of the pack can be used to attach a rolled-up sleeping bag, and do not need to be opened to provide full access to the camera insert. 
The zipper along the left side in the picture opens a flat pocket between harness and main compartment. Four plastic rings and a PALS webbing panel are available inside the main compartment, and may be used to tie the insert to the interior of the backpack. So far I have not found it necessary, because it takes some effort to extract the insert from the main compartment, and it seems very unlikely that the insert will accidentally slide out of the backpack when the latter is opened, even when the backpack is held in a vertical orientation. The side doors of the Camera Cube, unfortunately, are not usable while the insert is contained in the backpack.The inner side of both doors is covered in velcro-compatible felt, and velcro partitions can be attached also here. For general advice on suitable backpacks for flight travel, how to increase your chances to carry them onboard, and what to do if forced to check them in, see for example here and here. They know what they are talking about, and I especially endorse their rule number 1: Always try taking it as a carry-on. This means, in practice, studying the requirements for carry-on luggage of the specific airline (which may change quite often and do differ substantially among airlines), and making sure your backpack and its contents follow these rules. As we all know, this is no guarantee that you will be allowed to take your carry-on onboard even if it satisfies all requirements, but it is a start. SummaryThe Peak Design large Camera Cube insert fits tightly in the Wisport Whistler II 35 L backpack, albeit without placing stress on the backpack zippers and seams. This backpack has a well-designed harness that makes trekking comfortable. Generous amounts of PALS webbings, buckles, ribbons and tie points make it highly configurable and expandable. The main hatch exposes virtually the whole main compartment for easy access to equipment in the camera insert, and can also be partially opened to give access to the top portion of the insert. |