This page discusses a basic configuration for the MikroTik CCR2004-16G-2S+PC router in a role as edge
router for an advanced home network, or a small-business LAN. It also discusses the basic principles of
RouterOS configuration. My review of the hardware of this router is available
here.
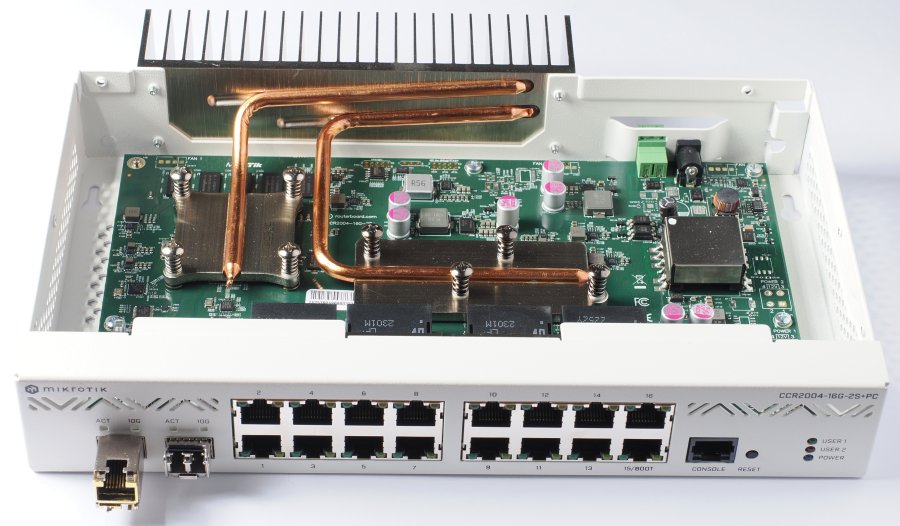
Figure 1. CCR2004-16G-2S+PC, front panel and interior.
Configuration
The CCR2004 series is currently upgradeable to RouterOS v7.12. MikroTik recommends upgrading to the latest
stable version during initial install. Note that this router cannot be downgraded to RouterOS v6 or
earlier.
This router can be configured in various ways:
WinBox. This is a Windows application (there are ways to run it on a Mac or Linux machine, but no native
version for these OSs is available). It displays a GUI on the local PC and configures a remote router
via an encrypted network link to the RouterOS API service running on the router. It typically connects
to the router via its IP address, but can discover the router and connect to it via the router's
hardware address. This is especially useful if the router does not have an IP address yet, or if you
accidentally lock yourself out of the router because your PC can no longer connect to the router via L3.
However, configuring the router via its hardware address is overall less reliable than via its IP
address (unless the PC running WinBox is directly connected to the router). I actually like WinBox,
because it feels much like using a web GUI, but without the inherent obsolescence risk and sensitivity
to browser vagaries of web GUIs.
Webfig. This is a web-based GUI that replicates almost all functionality of WinBox. It
works inside a web browser, so some of the functionality may not be available in some browsers or with
some combinations of browser settings (e.g. rearranging the ordering of firewall rules by
drag-and-drop).
I am somewhat suspicious about the long-term viability of a web-based GUI, because I have witnessed the
web GUIs of both Cisco and D-Link equipment no longer working after a few years, as a consequence of
frequent discoveries of security and privacy risks (e.g. in Adobe Flash and Java applets). On the other
hand, Webfig seems to use exclusively JavaScript on the client, which is a better long-term bet.
RouterOS CLI. This, in turn, is accessible in several ways:
telnet, enabled by default but not recommended for obvious security concerns.
SSH (e.g. with PuTTY), highly
recommended, but not enabled by default.
serial port (e.g. with PuTTY). This is
the most reliable way to access the CLI, and you are unlikely to lock yourself out of the console
port by by making a configuration mistake. Also, the console port works by default at 115,200 BAUD,
compared to the measly default of 9,600 BAUD on Cisco devices (it can be set at up to 115,200 also
on Cisco devices, however).
console window in MikroTik WinBox.
console window in MikroTik Webfig.
By default, Webfig is only accessible via HTTP. To enable Webfig over HTTPS (and there is every reason for
doing so), follow MikroTik's
one-time procedure.
I read that a mobile phone app is also available for configuring the router, but I did not test it.
As usual with network equipment, security requires that this router is not physically accessible to
unauthorized persons. Access to the configuration services via the network and serial port must also be
restricted to authorized computers only, and the number of user accounts (especially of the administrator
type) must be limited to the minimum indispensable (one for each administrator, and possibly a single one
as a spare). The default admin account should be renamed, and safe passwords used on each
account. A few ways to secure the router are discussed below.
A nice touch of the RouterOS CLI is that all keywords are color-coded in the terminal window (as long as
your terminal software allows this). Color-coding is active even while you type in the terminal window.
RouterOS basics
Like Cisco IOS, a RouterOS configuration is entered in the CLI as a series of one-line text commands. The
similarities between the two configuration languages, however, end here. While IOS is limited to just a
few hierarchical levels of configuration (e.g. in the interface command),
almost every RouterOS command has nested levels and sublevels. Nested RouterOS commands look like a nested
folder structure, with each level separated from the next by a forward slash like Linux folders.
"Root-level", or top-level, commands can be prefixed by a slash, just like root folders. If you
type just a slash and command name (e.g. /ip) and hit enter, you
enter the ip substructure, and can issue multiple commands at this level
(e.g. firewall) without needing to re-type
/ip. In the same way you can enter, and stay in, sublevels of this
command. On the other hand, if you type /ip/firewall followed by a
complete firewall command and/or parameters, the prompt remains at the "root" level after
executing the command.
Hitting enter always causes RouterOS to attempt evaluating the current command. This may fail if
some essential parameter is missing. Hitting the up arrow key displays the previous command, and
hitting it multiple times steps back into the command history. Down arrow moves through the
command history in the forward direction. Hitting backspace deletes the last typed character, and
hitting left arrow and right arrow moves the cursor in either direction along the
current line.
You can reach a command sublevel also by separating the level and sublevel with a space, as an alternative
to a slash. For example, /system/note and
/system note are equivalent. The latter notation seems to be preferred in
recent documentation.
To move up one level only, type .. (just like in Linux and MS-DOS CLI). To
move up two levels with a single command, type ../... To move all the way
up to root level, type /.
F1 displays the list of commands available at the present level. It also works while you are
typing a command. A second F1 displays a list of function keys and
Ctrl+key combinations. Tab while you are typing a command performs autocomplete (if the
CLI recognizes that there is only one possible alternative). If there are multiple alternatives, a second
Tab displays the list of alternatives. \ (backslash) allows you
to continue typing a command on the following line (but cannot be used in the middle of a keyword).
If the word you are typing is wrong for the present context or misspelled, it turns red. For example, if
you start typing "/ip interface", the second word turns red as soon as you
type "/ip in", because no command starting with "in" is available in the /ip command context.
Scripting
RouterOS v.7 comes with a very powerful scripting language that lets you implement complex dynamic
behaviors based on specific router settings and events. The
documentation of this
scripting language by MikroTik can be a good start, but is not quite sufficient in the long run. If you
want to use, or explore in depth, scripting with this router, I recommend the 2023 book by Nigel Bowden
"MikroTik Scripting". As far as I know, it is the only book dedicated to this subject available
at present.
The interpreted scripting language offers operators, flow control, scope delimiting blocks, built-in
variable types (including primitive types and arrays), and function calls with arguments. The syntax is
quite similar to those of C, C++, Java, Javascript, and C#. If you know one or more of these programming
languages, you will only need to learn a few syntax peculiarities required by the specialized execution
environment. RouterOS also makes non-standard additions to the list of operators, especially operators
that take IP addresses as operands. Provisions for issuing RouterOS commands within scripts are of course
available (so scripting is not a substitute for learning RouterOS). The scripting language is strictly
procedural and does not offer classes, objects or other high-level constructs available in modern
object-oriented languages. Mathematical operators only work on integers and other data types that can be
treated as integers (e.g. IP addresses, which opens up interesting possibilities ordinarily available only
in high-level programming languages).
Some users believe that the RouterOS scripting language is far too powerful, given that one can
easily write scripts potentially usable as hacking tools, and that RouterOS comes with a built-in
filter-based packet sniffer that can forward captured packets to a Wireshark instance running on a remote
PC for further analysis, which can be used by malicious hackers to further penetrate your network.
This is one more reason for learning how to properly secure these routers. They are definitely not
"fire and forget" tools to be left unattended after the initial configuration, since a malicious
hacker may use system vulnerabilities or a sloppy configuration to transform your router into a powerful
tool for criminal activities.
This has indeed happened in the past (see
here for more
details), and is especially likely to happen to users who neglect to install recommended updates to
vulnerable versions of RouterOS. Nine months after the problem described at the above link was fixed in a
new firmware release available for free from MikroTik, an estimated 35,000 Internet-connected MikroTik
routers remained vulnerable to this specific attack, while 500,000 were vulnerable via their
insufficiently secured web GUI, and 900,000 via insufficiently secured WinBox.
It is a good idea to check whether there are scripts scheduled for execution on the router (especially
those scheduled for periodic execution). If you don't recognize some of these scripts, it is probably time
to start reviewing the router security, beginning with (1) make an offline backup of all scripts and
router settings, (2) delete the suspicious scripts, (3) change to a new, more secure password, and (4)
reduce or (preferably) totally shut off access to the router's administrative services from the WAN side.
An in-depth inspection of all LAN clients that can use Remote Desktop (or other remote control software)
and at the same time have access to the router administrative services is also necessary, because this is
an important vulnerability.
Changing a setting
When it comes to e.g. changing a setting or removing a setting in a given interface, RouterOS requires a
rather counterintuitive procedure. Knowing the name of the interface is not enough. Instead, you need to
know the number that RouterOS has associated with the interface when the interface was
created. For example, before you can modify a setting of a bridge, you need to display the numbers of the
existing bridges, with the command:
/interface bridge print
An example of the output:
Flags: X - disabled, R - running 0 R name="bridgeLAN" mtu=auto actual-mtu=1500 l2mtu=1596 arp=enabled
arp-timeout=auto mac-address=78:9A:18:4D:9E:00 protocol-mode=rstp
fast-forward=yes igmp-snooping=no auto-mac=yes ageing-time=5m
priority=0x8000 max-message-age=20s forward-delay=15s
transmit-hold-count=6 vlan-filtering=no dhcp-snooping=no
add-dhcp-option82=no
The bridge number is formatted in bold in the above output. Once you know the number of
the bridge you want to change or remove, you can use it, e.g.:
/interface bridge set 1 dhcp-snooping=yes
Incidentally, changing this setting may cause all interfaces to shut down for a few seconds, which may
cause your PC to lose contact with the router (depending on how PC and router are connected).
The task can be made easier by using, instead of the number, the script
[find where name="bridgeLAN"], where the return value of the script (in
this case, the bridge number of whatever bridge matches the specified name) will replace the square
brackets and their content. This removes the need for the administrator to know the bridge number, and the
whole procedure only requires knowing the bridge name:
/interface bridge set [find where name="bridgeLAN"] dhcp-snooping=yes
When changing the configuration of a hardware interface, an added level of difficulty is that interfaces
have a default name, assigned by the system, but can be renamed by the administrator. However, the default
interface name remains available, and can be used to access the interface with the slightly different
script [find default-name=ether1].
Removing a setting
To remove an entity that was previously created with an add command, it is
generally possible to use the remove command in the same context. The
principle is the same as when changing a setting: you need to know the RouterOS internal number of the
entity to remove, or use the script discussed above. For example:
/interface bridge
add name="bridgeLAN2"
remove [find where name="bridgeLAN2"]
Should you need to delete all instances of a given type, you can do this with the syntax
remove [find] . Before using this syntax, make sure this is what you
really want, and that you downloaded to your PC all the configuration backups currently stored on the
router. For example, to delete all files from the router:
# WARNING!! download all files from the router to your PC first,
# because this command will delete also your configuration backups
# from the router.
/file remove [find]
Deleting an entity that is currently in use may not be allowed. The entity may need to first be
deactivated, and/or it may be necessary to remove all references to this entity from other parts of the
configuration.
Basic initialization and basic hardening
This section includes the initial configuration of the basic ruter functionality. As such, it is likely
that this will be your first task to carry out on a new MikroTik router. For this reason, I suggest that
you perform this configuration via WinBox or WebFig, rather than the RouterOS CLI.
For a detailed description of RouterOS hardening, I suggest the 2017 book by Hart:
MikroTik Security Guide. You could argue that the advice in this book is already available
somewhere or else on the web, but the book is very modestly priced, and collects the information in a
single place. Advice found on the web is of varying quality and reliability, and quite a bit of this
advice refers to early versions of RouterOS and is no longer applicable.
I will not discuss here the whole hardening procedure in detail, but I suggest carrying out at least the
following general tasks:
Set a reasonably secure password for the admin account. Preferably 8
characters or more in total, including at least one digit, at least one uppercase letter, at least one
lowercase letter, at least one non-alphanumeric character (e.g. #, &, % etc.).
Rename the admin account to something else not easy for a hacker to
guess. This adds a further layer of security because the hacker will not be able to tell whether he/she
is attempting to use the wrong password or the wrong user name.
Keep the number of user accounts to a minimum. However, in a company environment, if you have multiple
administrators, avoid the use of shared accounts (because they result in no individual accountability
for mistakes or intentional abuse). Keep a separate Excel sheet of users (not passwords) updated, and
immediately remove from the router the accounts of personnel who quit, are fired, or are no longer
responsible for the router. It is very easy to re-create a deleted user account afterwards, if a user
returns to his previous router administrator duties. Record the history of changes in the Excel sheet,
and add a timestamp to each change.
Rename the router from the default MikroTik to something else that does not openly declare what
make and model it is.
Ideally, before login just display the login: and password: prompts and nothing else.
If you really must, display also a router name that gives away nothing about the company, location, and
function of the router (e.g., you may need to identify the router if your company has several).
A pre-login notice that promises dire consequences for any hacker who will attempt to log in is largely
unenforceable, and may in fact have the opposite effect than intended (but some companies may require
displaying a notice for insurance and/or legal purposes). The less your router says before login, the
better. After login, the user already has access to everything, so at this time there is no point in
trying to scare off a hacker with a notice promising the fires of hell.
If you must have a pre-login notice, remove the brand and model of router, and the RouterOS version it
runs. The less information it gives away, the better.
Perhaps the following suggestion is slightly paranoid, but many makers of network equipment (e.g. Cisco)
use hardware addresses that follow a recognizable pattern. To prevent a hacker from identifying the make
and series of your router, change the hardware address of your router's WAN-facing interface to a random
hardware address. The chance this random address will collide with a pre-existing address on your
network is virtually nil, but if it does happen, just choose another random address. Note that some ISPs
expect your router to have a specific hardware address, and in this case you do not have a choice.
Disable all unused packages and services. The total list of services available on the router is long,
but on a CCR2004 router connected to an ISP by Ethernet you are only likely to need a couple of ways to
access the router configuration, and little else. You certainly don't need the PPP and hotspot packages,
for example. You may need only IPv4, and in this case there is no reason to leave IPv6 enabled. With
regard to services, you should only use the strict minimum. I recommend you disable Telnet, FTP, DNS,
Bandwidth Test, API, API-SSL, SMB, SNMP, WWW, and perhaps SOCKS (unless you need it as part of an
SSL-enabled proxy) and UPnP. This should leave only SSH and WinBox enabled to configure the router, and
possibly WWW-SSL (i.e. HTTPS). You are very likely to need also DHCP. The fewer, the better.
Restrict access to the remaining ways to configure the router. Unless you really, absolutely, need to
configure your router through the Internet, block all administrative access from WAN interfaces and
allow accessfrom only one or two LAN-facing interfaces. You may also want to restrict access to only one
or two LAN IP addresses. The fewer, the better.
Make a backup of the configuration after any change is made, and save a copy of all backups offline. I
suggest you use the file name RouterName-YY-MM-DD-ver, where
RouterName is the router name,YY-MM-DD
is the date and ver is a progressive version number for multiple backups
made the same day. The router adds the .backup file extension.
Backup files are stored in a non-human-readable format, so after making a backup I suggest you also
export the configuration with export file=RouterName-YY-MM-DD-ver.txt,
which saves the configuration in a text file with the name
RouterName-YY-MM-DD-ver.txt.rsc (that's right, notRouterName-YY-MM-DD-ver.txt) and save this file offline, together with
the respective configuration backup. You can use the text file as a script to re-enter part or all of
the configuration by copy-pasting from the file to the CLI, if necessary. You can also edit a copy of
this file before you paste the updated configuration into the CLI.
The section discussing firewall rules and mangle (below) contains an example of firewall configuration.
Shutdown, reboot and reset button
It seems that most users of MikroTik routers simply flick the power switch or cut down the power to their
routers when they wish to shut them down. The latter applies to the CCR2004, since it has no power switch.
Unless the router is writing to flash memory at the exact moment power is cut, this procedure seems to be
completely safe. Therefore, if you are configuring the router, allow for a few seconds of pause from the
last command before you shut down or reboot the router. Some operations, like making a backup of the
router configuration or file transfers, may require tens of seconds.
If physical access to the router is inconvenient (e.g. the router is located in a locked-up server room),
or if you need to make sure that it is safe to shut down, issue the CLI command
/system shutdown . Of course later you will need physical access to the
router to start it.
To reboot, the simplest procedure is probably to power down with the power switch, then power up. Also in
this case, if physical access to the router is inconvenient, you can issue the
/system reboot command in the CLI.
/system reset-configuration is used to reboot to the default router
configuration.
It is also possible to schedule a periodic reboot of the router, but this is generally useful only with
consumer-grade equipment that hangs frequently. A CCR2204 router that needs periodic reboots is defective,
poorly configured, or is using a corrupted or buggy RouterOS image.
The reset button has multiple functions:
A short press of the button during normal router operation does nothing. This is intentional, so you
don't need to worry about accidentally pressing the button while plugging or unplugging the Ethernet and
console cables.
During power-up, keeping the reset button pressed until the LED starts flashing, then
releasing the button, loads the router's default configuration.
During power-up, keeping the reset button pressed until the LED stops flashing tells
the router to look for Netinstall servers.
There may be more to the reset button, but the above functions are those documented by MikroTik.
Saving the settings
Normally, settings are immediately applied to the router and stored in the router configuration. A safe
mode is available, which reverses the latest settings changes and reboots if the router unexpectedly loses
contact with the administrator session. Safe mode is optional, because some changes of settings do cause
e.g. the interfaces to temporarily shut down as a normal behavior, interrupting the administrator session.
In these cases, you probably don't want the latest changes to be lost. Other than safe mode, RouterOS has
no equivalent to Cisco's running-config and
startup-config, so it is particularly important that you save frequent
configuration backups on the router while you are working.
Interfaces
The Ethernet interfaces default names are ether1 to
ether16. Each switch chip is connected to eight of these hardware ports,
and in addition the connection of a switch chip toward the CPU is regarded by RouterOS as an interface of
sorts (switch1cpu and switch2cpu).
However, normally you will not be directly configuring these two interfaces. Layer 3 hardware offloading
and layer 2 hardware offloading, as well as hardware-offloaded port mirroring, is available for each of
these 16 Ethernet ports.
The SFP+ cages are named sfp-sfpplus1 and
sfp-sfpplus2. If sfp-sfpplus1 is in use,
it appears to be designated as root port by default.
At this point, it is a good idea to define lists of interfaces. They will become useful later during the
configuration. A list of interfaces is a way to configure all the interfaces on the list with a single
command, instead of explicitly repeating the command for each individual interface. We will use
ether16 for a special purpose later, so we place it in its own list.
Interface lists can be used, for example, in firewall rules. However, there are many cases in RouterOS
configuration where interface lists would be useful but are not accepted, and interfaces must still be
configured, or listed in configuration commands, one-by-one.
By default, loop protection is off. It is a good idea to enable it on all Ethernet interfaces, just in
case later on you will start connecting external switches to these interfaces, and by mistake create a
loop. By default, the router tests for loops every 5 s and, upon detecting a suspected loop, disables the
interface for 5 minutes (these times are configurable, but I recommend not setting the disable time at 0,
which means forever or until the router is reloaded).
/interface ethernet
set ether1 loop-protect=on
set ether2 loop-protect=on
set ether3 loop-protect=on
set ether4 loop-protect=on
set ether5 loop-protect=on
set ether6 loop-protect=on
set ether7 loop-protect=on
set ether8 loop-protect=on
set ether9 loop-protect=on
set ether10 loop-protect=on
set ether11 loop-protect=on
set ether12 loop-protect=on
set ether13 loop-protect=on
set ether14 loop-protect=on
set ether15 loop-protect=on
set ether16 loop-protect=on
Note that we do not enable loop protection on the SFP+ cages. The reason is that, in the configuration
example discussed below, we will configure the cages in an unorthodox way that is detected by the router
as a loop. Ordinarily, you could enable loop protection also on the cages.
A characteristic of RouterOS is that it allows giving names to interfaces, as well as groups of
interfaces. The names can be chosen to be informative, and in this sense they work like comments (which
can also be attached to interfaces and interface groups). The difference is that the newly assigned
interface names can be used to configure these interfaces instead of
ether1 etc. (which also remain available), while comments do not have any
effect on router configuration.
For example, more informative names can be assigned to the serial (=console) interface(s):
/port
set 0 name=serial0
set 1 name=serial1
From now on, to address the serial port 0 you can refer to it by its name
serial0. Another example:
/port set 0 name=console0
/port set console0 baud-rate=115200 data-bits=8 parity=none stop-bits=1
At this point, console0 is the valid name for port
0. To remove a name, issue the command:
/system console disable 0
However, it is a good practice for each port to have one easily remembered name. Also, do not forget to
re-enable the console port if you plan on using it:
/system console enable 0
/port set 0 name=serial0
Incidentally, this router has only one serial port. Some of the unused soldering pads on the motherboard
may support a second serial port, but using it is not as simple as soldering a cable and connector to the
motherboard. All the components for the second serial port seem to be missing, including the UART. Other
router models may have an internal connector and electronics installed for a second serial port, but not
the model being discussed. My best guess is that RouterOS supports two serial ports by default and shows
both in the WinBox GUI, even when no corresponding hardware is present.
Ethernet bridges
Typically, a home or small-office router has only one or two L3 interfaces facing toward the Internet (or
toward the ISP's WAN when the ISP does not offer a public IP address for direct access to the Internet).
For the example configuration, however, I choose a different configuration. Each of the two groups of
Ethernet ports is configured as a switch. One of these logical switches is connected to the WAN, the other
to the LAN. This provides multiple Ethernet interfaces on both the WAN and the LAN side of the router, for
maximum flexibility.
Other routers and router-switches are equipped with a built-in group of Ethernet ports hardwired as a
switch. This is the case, for example, of the Cisco RV series and
C900 series of routers. In the CCR2004 routers, instead, each of
the 16 Ethernet interface of this router can be configured as a fully routed interface, or alternatively
as part of a switch. The latter is done by creating a bridge and adding to to it the desired Ethernet
interfaces.
Note that earlier versions of RouterOS had a different way to configure a set of ports as a switch. Since
the CCR2004 does not run earlier RouterOS version than 7, this is irrelevant to the present discussion. If
you use an older MikroTik router with an older version of RouterOS and for some reason cannot, or do not
want to, upgrade to the current version, you need to check which configuration procedure applies in your
case.
In the following example, we add each Ethernet port to a bridge one by one. For complex configurations, it
can be more efficient and less repetitive to define two ranges of interfaces, one for the WAN and one for
the LAN. We can subsequently re-use these ranges whenever necessary. Either way, each individual Ethernet
interface remains separately configurable by using its pre-defined name.
Note that we are not adding ether16 to
bridgeLAN. We will use this interface for a special purpose.
Creating a list of interfaces is not the same thing as adding the interfaces to a bridge. A list of
interfaces is only a shorthand notation for addressing multiple interfaces by a single name, but simply
adding interfaces to a list does not change their operation in any way. When interfaces are added to a
bridge, instead, their operation changes according to the bridge configuration.
DHCP client
The router will get an IP address with DHCP on the WAN-facing switch. Although we could configure one
Ethernet port to receive a dynamic IP address, it makes better sense to do this on
bridgeWAN. In this way, any of the Ethernet ports connected to this bridge
can be physically wired to the WAN. bridgeLAN is instead configured with a
static private IP address. This bridge becomes the gateway of our LAN.
Note that I use two public DNS servers from Google, in part because they are very reliable, and in part to
bypass the censorship mandated by many national governments onto the DNS servers located within their
respective national borders (not only in totalitarian dictatorships but also elsewhere, including in the
EU).
These are the DNS servers that the LAN clients will use. As configured earlier on, the router itself will
use whatever DNS server(s) it receives as part of the DHCP configuration of
bridgeWAN. In a typical configuration, these DNS servers are chosen by the
ISP. The router's DNS server(s) only matter when using the router's network utilities, and censorship on
these DNS servers does not prevent the LAN clients from reaching the censored Internet locations (except
in countries that additionally enforce censorship through the use of national firewalls, which can be
beaten by using open VPN servers or P2P proxies in non-censored countries).
If your only reason to use different DNS servers on your LAN clients is that your ISP blocks access to
certain web sites by de-listing them in their DNS servers, you could configure a different DNS server in
your web browser. Several modern web browsers, e.g. Firefox, can be configured to access a special DNS
server via HTTPS, instead of the DNS servers configured in your operating system. This may not work, of
course, if your ISP additionally blocks the IP addresses of the desired web sites and/or HTTPS DNS servers
via a firewall (you need to use a web proxy in this case).
There is no need to worry about DHCP messages from the WAN being relayed to the LAN and messing up the
LAN's client addresses, because we will implement NAT between the WAN and LAN. On a RouterOS machine, this
by default causes DHCP messages to be dropped by the NAT.
We reserve two DHCP addresses, one for the administrative PC and one for a printer.
Note that the client ID is the same as the hardware address (=mac-address)
prefixed with 1:, but the format is slightly different (all lowercase and
no leading zeroes for the client ID, all uppercase and leading zeroes present in hardware address).
Specifying both addresses has a better chance of success than using either address alone. Some hosts may
fail to acquire a reserved IP address if only the client ID is supplied, others may fail if only the
hardware address is supplied. This is a problem I encountered multiple times in Cisco IOS, for example.
The way RouterOS works when asked to renew a lease of a reserved IP address is slightly unexpected for me.
Assuming that the router has already leased a reserved address to a client, if the client asks to renew
the lease before it has expired on the server (e.g. by manually issuing ipconfig /renew on a
Windows PC), the server replies by sending once more the existing lease with its
original creation date/time and current expiry date/time, not a new
lease (to see all details of the lease, issue ipconfig /all). This means that the creation
date/time of the lease can be days or weeks ago if the client has been running 24/7, even though the lease
lifetime is only set to one hour on the server. Thus, it appears that the server
extends the existing lease whenever the latter expires, rather than issuing a new lease
with a new creation date/time. This behavior may help preventing a malfunctioning LAN host from obtaining
a new lease by frequently requesting new leases even though the current lease has not expired.
On the other hand, ipconfig /release followed by ipconfig /renew does cause the server
to delete the existing lease and issue a new lease with a new creation date/time.
It may be a good idea to harden the router againts DHCP address starvation attacks. This type of attack
consists of sending from one LAN host (e.g. by executing a script) a large number of DHCP requests, each
with a different, random made-up MAC address. This causes the router (within seconds if the attack is very
fast) to exhaust the pool of available IP addresses, and deny all subsequent DHCP requests (including
legitimate ones).
The following configuration creates a custom firewall chain named
dhcp1 (see also the firewall section). The first
filter action jumps from the input to the
dhcp1 chain whenever the action finds a broadcast packet marked
dhcp by the mangle. The second filter action then either returns to the
input chain or passes control to the third action, depending on whether
the specified limit=1,3 (1 packet in 1 s, not counting an initial burst of
3 packets that are always allowed) has been exceeded. The third filter action drops the packet.
The overall effect of this configuration is that the router drops all packets from UDP source port 68 to
UDP destination port 67 that arrive to the router, if these packet are more frequent than a given
threshold. To ensure a faster recovery from this type of attack, one can also configure a short duration
of DHCP leases. The default RouterOS lease-time is 10 minutes, after which
the client is supposed to renew the lease (but typically does not, in the case of an address starvation
attack). Lowering this setting to e.g. 5 minutes halves the recovery time for any lease secured by an
address starvation attack. In a small to medium LAN, the resulting increase in DHCP traffic is of no
practical consequence.
Unless the DHCP server receives more than 3 legitimate DHCP requests in 1 s, the
limit is unlikely to cause disturbances of the DHCP service. Therefore,
this configuration should be modified if the DHCP server is ordinarily very busy.
DHCP snooping
We likely want to implement DHCP snooping on the LAN, so that DHCP messages from a rogue DHCP server
(either accidentally or intentionally activated on one of the LAN clients) will not be relayed by the
router to other LAN clients. The router will drop any DHCP server messages coming from the Ethernet
interfaces attached to the bridge (DHCP client messages will still be forwarded to the DHCP server, of
course).
A practical problem is that bridgeLAN has already been created at an
earlier time.To gain access to bridgeLAN and change its configuration, we
can use the simple script [find where name="bridgeLAN"]discussed above.
/interface bridge set [find where name="bridgeLAN"] dhcp-snooping=yes
We cannot explicitly set a bridge as the trusted interface. The above setting is all we need to do if we
want to allow DHCP offers from the router itself, and block any DHCP offers from being forwarded from LAN
ports to other LAN ports. In particular, we should not set any router interface to
trusted.
Free software is available for running a DHCP server on a Windows PC without a need to install it (e.g.
see www.dhcpserver.de). Thus, it is entirely
possible for a non-administrator to run such software on a corporate PC, and in this way to bypass the
corporate software security policies. Therefore, it is really a good idea to activate DHCP snooping on the
router. In the lack of DHCP snooping, a single rogue DHCP server may largely disable a DHCP-configured
corporate LAN and prevent its clients from accessing the Internet.
DHCP option 82 can be configured on the router's DHCP server. We only need it if the router's DHCP server
messages need to be relayed to a different network than the router's DHCP server. This is not the case in
the present configuration example.
NAT
We will use port NAT between bridgeLAN ("inside" interface) and bridgeWAN ("outside"
interface). This type of NAT, called masquerade in RouterOS when the
outside IP address is dynamic, remaps both the inside source IP address and the inside source port. In
RouterOS, the NAT functionality is grouped under the IP firewall category.
Some additional configuration may be required if the bridgeWAN IP address
changes frequently, leaving some of the existing connections "hanging". Check the RouterOS
documentation. Under certain
conditions, the same problem may temporarily occur when the NAT is initially enabled. The result is that
some pre-existing connections from LAN clients may appear not to be NATed, but the problem will correct
itself as these connections gradually time out.
NTP client
It is necessary to start the NTP client on the router and to assign one or more NTP servers that the
router will query. The following commands assume that the DNS client on the router is active. If not, you
need to enter the IP addresses of the chosen NTP server(s) instead. You should choose at least one public
NTP server in your country, plus one public NTP server in the same continent. Also, set the right time
zone, because NTP does not handle time zones and only "knows" about UTC time.
/system ntp client
set enabled=yes
/system ntp client servers
add address=europe.pool.ntp.org
add address=se.pool.ntp.org
/system clock
set time-zone-name=Europe/Stockholm
Services
The following configuration commands disable all services except WinBox, HTTPS and SSH. These three
services are enabled but only accessible from IP address 10.10.10.100, which is the administrative PC.
This configuration is only an example. You will need to adapt it to your network. SSH is additionally set
to use strong cryptography.
/ip firewall service-port
set ftp disabled=yes
set tftp disabled=yes
set h323 disabled=yes
set sip disabled=yes
set pptp disabled=yes
/ip service
set telnet disabled=yes
set ftp disabled=yes
set www disabled=yes
set ssh address=10.10.10.100/32 disabled=no
set www-ssl address=10.10.10.100/32 certificate=Webfig \
disabled=no
set api disabled=yes
set winbox address=10.10.10.100/32 disabled=no
set api-ssl disabled=yes
/ip ssh
set strong-crypto=yes
Firewall filters and mangle
The main purpose of the following configuration is to deny certain TCP connections coming from the WAN and
directed to the router itself. This includes most of the TCP ports used by administrative interfaces. Most
of these services are already switched off, or open only to the administrative PC (see the preceding
section), but it is a good idea to block their TCP ports, too, just in case some of the services are
activated by mistake later on.
However, we do not want to block the same service protocols from passing through the router, because some
LAN clients may have legitimate uses for the same protocols. To achieve this goal, we need to use the
proper firewall chain.
In RouterOS, the firewall has multiple chains independent of each other. The
input chain processes all traffic from the WAN (as specified by
in-interface=bridgeWAN) to the router itself (not to the LAN). This is the
chain to use for the goal outlined above. The router goes through the firewall rules in the order they are
stored in the configuration (by default, this is the order in which the rules were entered). In the
following rule, some of the settings are default values and in most situations the rule would work without
specifying them, but it does not hurt to enter them explicitly, just to be sure that these settings have
not been changed by some earlier configuration.
It is interesting to note that switching off a service does not have the same consequences as dropping WAN
traffic to the service with a firewall rule. In the former case, the router sends back a message saying
that the requested TCP port is not open. A hacker will then know that "something" is listening
on that IP address. In the latter case, instead, the router is a black hole swallowing all connection
requests to that specific TCP port without replying. A hacker only sees her connection requests time out,
and has no evidence that there is something at the probed IP address and TCP port. See below for a
discussion on how to use mangle for an even better protection against hackers.
If you know you will not remotely access the router from the Internet, you can just as well completely
block all access to the router (not to the LAN) from the WAN. Instead of the firewall
filter discussed above, just use e.g.
/ip firewall filter add action=drop chain=input comment="drop all from bridgeWAN to router"
in-interface=bridgeWAN log=yes log-prefix=WAN_input_denied
. This does not include connections to the WAN originating from the LAN or router, and their replies from
the WAN to the LAN or router.
Some of the firewall rules shown below are created by the initial wizard, and can be identified by their
comment="defconf:..." description. I am adding them here,
because it is useful to see the order in which the rules are specified. The router stores the rules in the
order they are configured, and the firewall processes the list of rules from top to bottom. If the
ordering of the rules need to be manually changed, it is far easier to do this by drag-and-dropping them
in WinBox than through the CLI. Some users have reported that drag-and-dropping firewall rules does not
work in WebFig, probably because of specific combinations of web browser settings.
The forward chain is used for rules that control traffic entering one
router interface and directed to another interface. This is the chain to use for blocking traffic from WAN
to LAN, or vice versa (depending on which interface is defined as
in-interface).
We explicitly allow all traffic from bridgeLAN to be forwarded.
add action=accept chain=input comment="accept all input from bridgeLAN" \
in-interface=bridgeLAN
One more default rule, this one to drop invalid packets (it would serve no useful purpose to forward
them):
add action=drop chain=input comment="defconf: drop invalid" connection-state=\
invalid
Then we drop whatever has not been allowed onto the input chain by the
preceding rules. There is no implicit "block everything" rule at the end of a list of RouterOS
firewall rules, so you must enter this final rule explicitly for each chain, if required:
add action=drop chain=input comment="drop all else input" log-prefix=\
"drop_all_else(input)"
Now we continue with the forward chain rules, ending with a blocking rule
for this chain:
The mangle functionality attaches one or more flags to arriving packets, so that further processing can be
performed on them. We use this functionality to register (in the address list
drop_traffic) the WAN IP addresses that try to send traffic to any of the
administrative interfaces of the router. The firewall rule
"drop input from bridgeWAN to router services" (see above) then
blocks all traffic from this address for the following 10 minutes, at which point the address is removed
from the list and the temporary blockage ends. This should be enough to make the attempts of a hacker so
frustrating that she will eventually give up and choose an easier target.
There is a third pre-defined RouterOS firewall chain, i.e. output. It
controls the traffic originating by the router itself. This chain has no firewall rule in the present
configuration, which means that all traffic originating from the router is allowed. The router needs
access to the LAN and WAN for several reasons, e.g. neighbor discovery, and may need access to the
Internet for e.g. periodic checks of availability of new RouterOS versions.
Custom firewall chains can also be defined. One possible use for a custom chain, for example, is grouping
together all rules that apply to a specific protocol on a specific interface.
User LEDs
The CCR2004 has two user-configurable LEDs placed directly above the power LED (many other MikroTik
devices only have one customizable LED, i.e. user-led). These LEDs can be
configured to have a number of functions. I chose to have the two LEDs blink whenever data is transmitted
by the bridgeLAN and bridgeWAN interfaces.
I find this useful, since all traffic between LAN and WAN passes through these bridges, but the only
visual indications of this traffic are otherwise the LEDs on the individual interfaces associated with
either bridge.
The LEDs of the SFP+ cages can be customized in the same way, but not the LEDs of the RJ45 interfaces.
Testing the SFP+ cages at 10 G
With this router, I am beginning to add 10 Gbps links in my home network (better late than never, and
pricewise also better now than earlier on). This router and a MikroTik
CRS305 router-switch are so far the only 10 G capable devices
on my network. Therefore, I was not able to test them with real-life 10 G links carrying data at this
speed, and I was forced to set up an artificial way to use the 10 G interfaces.
The test LAN architecture is structured as follows:
Interfaces ether9 through ether15 are
grouped under bridgeLAN as previously configured.
A new bridge bridgeLAN1 is created, containing interfaces
ether15 and sfp-sfpplus1. Additionally,
sfp-sfpplus2 is added to bridgeLAN:
A firewall rule is added for allowing all traffic from bridgeLAN1to be
forwarded. All traffic from bridgeLAN1 to the WAN will pass through
bridgeLAN, where the firewall rules of the latter are applied to traffic
to the WAN. Therefore, we just allow everything from bridgeLAN1.
add action=accept chain=forward comment="accept all input from bridgeLAN1" \
in-interface=bridgeLAN1
10 G singlemode transceivers are inserted into sfp-sfpplus1 and
sfp-sfpplus2, and joined with a length of singlemode fiber.
A PC is connected with an Ethernet cable to ether16.
If we follow the network traffic originating from the PC and directed to the WAN, we see it
enter ether16,
be bridged by bridgeLAN1,
exit sfp-sfpplus1,
enter sfp-sfpplus2,
be bridged by bridgeLAN, and from there
be routed and NATed to the WAN.
This architecture has practical consequences on which interfaces can use hardware offloading. We can see
this by listing the ports of each bridge:
Hardware-offloaded ports are indicated by the H flag. The
I flag means inactive, usually meaning that nothing is physically
connected to the port.
This router is equipped with two switch LSIs. Each of them can perform hardware offloading for one bridge
only. Because of the way I chose the ports associated to each bridge, each of the two bridges only
contains ports connected to the same switch LSI. By default, the first bridge created on a given switch
LSI contains hardware-offloaded ports whenever possible. As a result, ports
ether0 to ether15 are hardware-offloaded.
Port ether16, on the other hand, belongs to the second bridge created on
one of the switch LSIs, so this port cannot be hardware-offloaded (even if you configure it as
hardware-offloaded, it does not display as such in the above list). In the above list it is inactive
because, when I generated the above list, the test PC was connected to
ether15, thus bypassing the path of the traffic through the two SFP+
transceivers and going directly to bridgeLAN.
The SFP+ cages cannot be hardware-offloaded, either, because they are not connected to a switch LSI but to
the CPU.
To make the traffic circuit longer, we can replace the fiber patch cord with the CRS305 configured as a
switch and equipped with two 10G fiber transceivers, one of them connected by a patch cord to
sfp-sfpplus1, the other with a second patch cord to
sfp-sfpplus2. In this way, the traffic is additionally switched through
the CRS305. Naturally, the throughput speed of the test circuit is capped to 1 Gbps by
ether16, and to 250 Mbps by the ISP if the PC connection is to the
Internet.
RouterOS books and training
If you need one or more certifications on RouterOS and MikroTik network devices, MikroTik offers quite a
variety of official certifications. Some
of the books and video courses discussed below are targeted to MikroTik certifications, but in-person
training, in spite of its much higher cost, is usually a better bet when a certification is the objective.
If you are looking for formal or informal training not leading to a certification, the range of choices is
broader. RouterOS and MikroTik routers are not as common as Cisco IOS and Cisco routers. Therefore, the
number of available books and courses on RouterOS is much smaller than training materials about Cisco IOS.
Much of the literature on Cisco IOS is published by Cisco, and is often available for free in electronic
format. MikroTik, on the other hand, maintains a reasonably well updated web site documenting RouterOS,
but does not make the contents available in PDF format for off-line use, nor publishes any books. Some
additional documentation is available on MikroTik bulletin boards, but its extent is not comparable with
the abundance of free information on Cisco IOS provided by Cisco, third-party companies, and individuals.
The quality of free RouterOS videos on YouTube, and the web in general, is extremely variable. I find
YouTube videos time-consuming, compared with printed materials of good quality. I can easily read four
times the amount of information from a book, in the time it takes for one of these videos to run in its
entirety.
Most individuals wishing to learn RouterOS in their own free time must rely on books, freely available
materials on the web, or pre-recorded video courses. Udemy seems to offer the large majority of video
courses specific to MikroTik and
RouterOS, and their prices are reasonable among this type of training materials. I am not impressed,
however, with the quality of a few of the introductory courses I had a chance to access. You can get the
same knowledge, quite possibly faster and cheaper, from a couple of good books, the MikroTik
documentation, and hands-on practice with a MikroTik router.
Another, and more important, criticism I have is that one or two video courses on RouterOS security
dedicate an entire lesson to port knocking as a secure way to access the router.
Port knocking is not secure, and should not be recommended as a way to access MikroTik routers, or any Internet-facing interface. Security-wise, this is just a "hack" that may give a false
feeling of security to inexperienced systems administrators, but does not stand up to the scrutiny of even
a moderately skilled security professional.
In the context of MikroTik routers, port knocking was described in a 2019 open-access paper by Mursyidah
et al. (IOP Conf. Ser.: Mater. Sci. Eng. 536 012129) and a subsequent 2020 paper by Idhom et al (J. Phys.:
Conf. Ser. 1569 022046). In spite of well-justified criticism of the method (e.g.
Linux.com, 2004), port
knocking on MikroTik routers has been re-hashed in multiple web discussions as well as the above-mentioned
video courses (perhaps as an easy way to "pad" these courses with open-source materials).
Until 2018, the web site portknocking.org collected information on this technique. The
web site is now dead and the URL seems to be occupied by Indonesian cybersquatters, but the original web
site is accessible on
Wayback Machine.
A few other techniques taught in some video courses on MikroTik routers can also be regarded as
problematic or obsolete.
I own, or have used, the following books. Some of these books are fairly old as RouterOS goes (RouterOS
version 7 was released in 2021, and introduced significant syntax changes). Today, some of these older
books would not be my first recomendation for learning from the ground up, but nonetheless they contain
some useful information for a discerning reader. The books I find especially useful are in
bold, but your mileage may vary.
Bowden 2023 - MikroTik Scripting.
Burgess 2009 - Learn RouterOS, 2nd ed.
Discher 2011 - RouterOS by Example.
Hart 2017 - MikroTik security guide.
Hart 2017 - Networking with MikroTik. MTCNA Study Guide.
Haddad 2021 - MikroTik switching with labs.
Haddad 2021 - Multicast on MikroTik with labs.
Zen 2019 - Theory, laboratories and exercises for MikroTik RouterOS, Routing.
Zen 2021 - Theory, Laboratories and Exercises for MikroTik RouterOS.
Because of the smaller installed base of MikroTik routers, compared to Cisco's, in-depth knowledge of
RouterOS is less common than Cisco IOS. This can be a problem or a boon in different circumstances. The
bulk of router admin jobs may be for a Cisco or other mainstream brand specialist. However, ads for
positions that require a MikroTik specialist are likely to attract a far lesser number of competent
applicants.
For self-learning on a budget, in addition to books and perhaps video courses, I would recommend to stick
with the MikroTik user forum, because the
quality of RouterOS information on YouTube, Quora and the like tends to be a bit spotty, and some of the
information that comes up all the time in web searches is several years old and outdated.
A company planning to install MikroTik routers in their network for the first time should do at least one
or two of the following things:
Send one or more of their sysadmins to paid RouterOS courses and/or certifications.
Hire a certified MikroTik sysadmin with proven work experience. If you decide to go with a
newly-graduated, newly-certified systems engineer with no experience of corporate work because of the
lower salary level, you must factor-in the cost of on-the-job training and the disadvantages of the
initial adjustment period.
Hire a proven MikroTik consultant.
The third option may be the most expensive up-front, but it is very likely to save time, money and
aggravation by getting things working on the first try, even when combined with one or two of the other
points.
Summary
RouterOS provides virtually all the capabilities expected of a modern multi-role router.
MikroTik offers free and acceptably timely updates to RouterOS for a minimum of 5 years,
and often for the lifetime of the equipment unless prevented by hardware limitations. This router also
provides reasonably sophisticated firewall capabilities, but
MikroTik does not provide a subscription service to keep the firewall automatically
updated against new threats.
Possible drawbacks of MikroTik routers are (1) RouterOS differs from Cisco IOS and
related OSs like IOS-NX, so a knowledge of these is not directly transferable to MikroTik routers, and
(2) the installed base of MikroTik routers is smaller than Cisco's. Consequently, there
is less published information on RouterOS (by both MikroTik and third-parties)
than on the Cisco IOS family. Nonetheless,
all the information really necessary for self-learning RouterOS is available, and
a sufficient number of user bulletin boards, paid courses, books, and MikroTik professional
certifications is available.