Peek into my camera bag
(and a strategy for air travel)
I sometimes enjoy a quick online peek into other photographers' camera bags, to see how they pack their
gear. I do realize that shooting styles, and therefore the choices of lenses and accessories, are highly
individual, and therefore there is no such thing as a general, one-size-fits-all formula. Therefore, I do
not read these discussions for copying someone else's packing strategy, but for getting ideas to
incorporate into my personal choice of gear and camera bag. Since others may have the same interest in a
photographer's choice of gear and bag, here I briefly discuss my own choices. I also discuss my current
strategy for safely carrying photographic gear on a plane, since this is a related piece of information of
high potential interest.
I wrote this
page in 2013. Since then, I have used about half a dozen different camera bags, and I no longer have the
Lowepro Primus All-Weather, which was already a few years old at the time I wrote this page. I still think
it was a rather good bag, but I am also convinced that there is no perfect camera bag, and not even a
perfect camera bag for my current needs. One thing I did find to slow me down in the Primus was the double
hatch at the back. The pieces of kit I needed to put together in the field were often spread across both
compartments and require me to open and close two hatches instead of one. To be fair, this bag was never
meant by its designers to be filled up with camera gear in both compartments.
The side door of the Primus was in my experience too small, and useless in practice even with a Micro 4/3
camera with battery grip. I no longer use battery grips, which slightly changes my requirements today.
A third gripe is that the sternum strap of the Primus could be slid out from the ends of its attachments
to the shoulder straps. I lost half of the sternum strap in this way while it was tightly packed in an
overhead bin together with other hand luggage on an intercontinental flight, and discovered it only after
I stepped off the plane. I am aware that it is a good idea to place one's backpack in a canvas sack before
boarding a plane, among other things to avoid this type of accident, but an additional sack takes space on
its own and is time-consuming to put on and take off.
This page discusses the gear I recently took on a three-week trip to parts of New Mexico, Arizona, Ohio
and Texas. With the addition of a laptop in a separate laptop bag and an empty modular lens pouch that can
attach to the pack's belt (handy for swapping two lenses without removing the pack), the camera backpack
was also my carry-on luggage on my flights to and from the US. At the end of this trip I machine-washed
the backpack for the very first time to remove the sweat, sun lotion and desert dust, and it now looks
like new. It also smells good, which it never did before. This may have removed some of the
weatherproofing, which I will spray on next.
With the exception of multispectral camera and related equipment, the kit I carried on this trip is
identical to what I carry around on any outing where I expect a wide variety of subjects, while at the
same time keeping weight and bulk down to a manageable level. To some photographers, the gear discussed
below may seem severely limiting. To others, it may look like twice as much as is actually needed. Both
categories of photographers are probably right, in their own ways.
My backpack
I prefer backpacks to other types of camera bags. I have used both dedicated camera backpacks and generic
backpacks with added internal padded dividers. Occasionally I use a modular belt and pouches, or a
shoulder harness with modular pouches, or a backpack with modular pouches attached to its belt. None of
these solutions is as easy to carry on a plane as a simple backpack with nothing hanging on the outside.
In the distant past, I used a variety of shoulder bags, but haven't for several years.
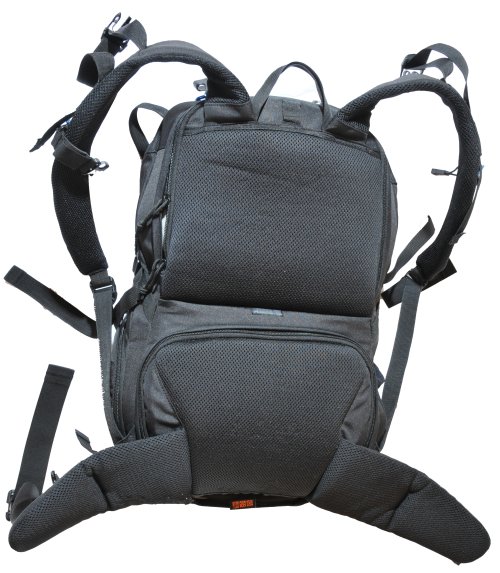
My current camera backpack is a 4 year old Lowepro Primus All-Weather backpack, a model no longer
available, made largely with recycled plastic (above). Its main feature is that the contents are accessed
through two zippered doors on the padded surface that presses against my back while wearing the pack, so I
can wear it safely in crowded areas without having to move it to my front to keep an eye on its zippers. A
large pocket in the back, which unfortunately has no zipper but is tightened with two side straps and two
more top straps, can store a light jacket or raincoat. I have occasionally used this pocket for a small
laptop in its padded bag, but it is very tight and not really meant for this use. Straps to carry a
monopod or light tripod are also on the back (most of them tucked away in a pocket). A rain cover for the
pack is stored at its bottom.
With ordinary camera backpacks that open at their rear (i.e., the surface facing away from your back), the
backpack must sit with its back padding and shoulder straps against muddy/wet/snow-covered/dusty/sandy
ground while you access the contents (and your back and shoulders will then get muddy, wet and/or dirty).
This type of backpack, instead, is put down on its rear surface (above picture), and your back stays dry
and clean afterwards. If the backpack is not very heavy, it is also possible to free your shoulders from
the straps while keeping the pack's belt closed, and then to rotate the pack to your front to access the
contents while standing. This works when gear is only stored in the bottom compartment. When sitting on a
train or bus, it is possible to rotate the pack to your front with the belt closed, so that it sits on
your legs, and the belt keeps it safe against bag snatchers.
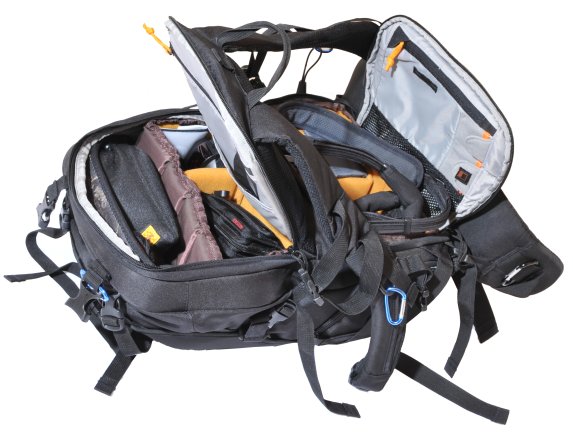
The backpack is internally divided into a higher and a lower compartment, originally meant for general
stuff and camera gear, respectively. The middle partition can be removed if desired. The backpack also has
a smallish side door originally meant to quickly extract a DSLR, but far too small for this function (it
is too small even for a Micro 4/3 camera). I changed the original padded insert in the lower compartment
to a cheap one bought on eBay, because I switched from APS-C to Micro 4/3 format for my travel/field kit.
The original insert had far too few, far too large compartments for a kit of this format. Opening the side
door of the backpack now only gives a view to the outer surface of the padded insert, and the contents
stay protected. A flattish, non-fragile item could be stored between the rear of the padded insert and the
wall of the backpack (there is an allowance for a thickness of 2-3 cm there) and accessed through the side
door.
I place a second, slightly smaller insert into the top compartment (as shown in the picture) when I need
to take a second camera and additional equipment, like I did on this trip. Opening the top compartment
also requires two connecting straps to the shoulder straps to be unbuckled. The backpack can be worn
without fastening back these buckles, but feels a lot heavier and uncomfortable. Incidentally, I would
never be able to fit an equivalent APS-C kit within the "normal" (i.e., pitifully small) weight
and size allowance of international flights in Europe.
My air travel strategy
The carry-on luggage policy on commercial flights is "flexible", meaning that there is no
guarantee you will be allowed to carry your carry-on onto the plane, regardless of whether its size and
weight fit within the allowed limits.
Already while passengers are sitting at the terminal, attendants roam around and randomly place colored
tags on some of the carry-ons. You will later discover that the tag (regardless of what it says on the
tag) means that you must leave your carry on, to be checked in out of your sight, when you show your
boarding pass or enter the plane. More rarely, the attendants will directly take your carry-on away at the
terminal. Either way, you will get back your luggage (hopefully) at the end of the flight.
A lot can still happen if your carry-on has managed not to be tagged in the terminal. On flights within
the US, the first half of the passengers usually get onto the plane with two carry-on pieces each, while
the rest are forced to check-in one or both of their carry-ons at the plane's door. On flights in Europe,
it generally works with passengers singled out for forced check-in of their carry-on at random and for no
apparent reason by a flight attendant standing near the plane's door. It generally looks like this
attendant has a fixed quota of passengers to harass in this way, and is free to choose which ones.
While even a small carry-on suitcase on wheels is often singled out at the gate for forced check-in at the
last moment (my wife's was, three times on the last two international trips), a backpack is more likely to
be left alone. I travel by air with all my kit stored in the padded inserts in the backpack, including the
small knick-knacks that ordinarily would sit in a zippered internal pocket. You will understand why
shortly. I also wear a travel or fishing vest, with pockets mostly empty.
On long trips with plane switches along the way, I sometimes place my backpack, and nothing else of value,
into a wheeled carry-on suitcase, for convenience of carrying it through airports. If asked to check in
this carry-on case, my first line of defense is to say "OK, but I need to take out one thing",
step out of the line, take out the backpack and leave the empty suitcase to be checked in. The flight
attendants got what they wanted, I got what I wanted, and we are all happy.
As a second line of defense, one of the padded inserts in my bag is already placed in a lightweight cloth
bag ahead of the trip. If asked to check in my backpack, I quickly place the second padded insert into the
cloth bag and pull the bag out of the pack. I then check in the backpack (now empty of everything
valuable), and take the cloth bag with me as a smaller and lighter (but still reasonably well protected)
hand carry piece.
My third line of defense is stuffing all the kit pieces one by one in my vest pockets (but I never had to
go that far).
Should airlines get wise about photography/fishing vests, there are special jackets and vests with
concealed pockets that look like normal clothing on the outside (e.g., from
Scottevest, Ayegear,
Rufus Roo and Stuffa), and
more will certainly become available should airlines start charging for vest contents.
My kit
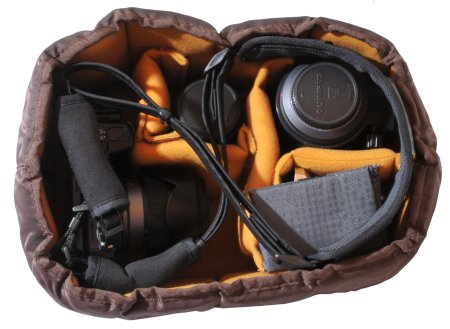
My ordinary kit (above pictures) includes the following items. These items are stored in the bottom padded
insert of my backpack, here shown packed as well as empty.
Olympus E-M5 with battery grip, Arca-compatible plate, hand strap and neck
strap.
Panasonic 14-42 mm f/3.5-5.6. This is a very cheap walk-around lens, but quite
good enough. I will likely replace it with something better in the future, but it does not have a high
priority.
Olympus 12 mm f/2. There is a big difference in perspective between 12 mm and
14 mm, and the 12 mm has a much better image quality, so this lens and the preceding one are not
actually overlapping.
Samyang 7.5 mm f/3.5. This is a fisheye, but I don't regard it as an
"extreme" or "trick" lens. I am always taking it with me because I can never be sure
of how wide a wideangle I am going to need. In some cases, fisheye images look just fine as they are (as
long as you know how to use this lens), in other cases they can be defished in a variety of ways to get
the equivalent of a 5 mm super-wideangle (which does not yet exist). During the last trip, I ended up
using this lens for almost all shooting in places like Carlsbad Caverns, Meteor Crater, Rio Grande Gorge
Bridge and the cliff dwellings of Mesa Verde.
Olympus 60 mm f/2.8 macro. I do mostly macrophotography, so this is a
must-have item for me. It is also a nice medium telephoto.
Panasonic 100-300 mm f/4.5-5.6 with
Rösch Feinmechanik tripod shoe. This lens stays at home if I know
that no birds, wildlife, zoo animals or architectural details will be of interest where I am going. The
tripod shoe is a must for using this lens on a monopod or tripod, and also helps steadying the lens on
an improvised support.
An extra rear lens cap, to use while switching lenses in the field.
The second insert (above pictures) includes the following items. There is some flexibility as to the
contents of this insert, dictated by the needs of the specific outing.
Filters and lens shades for
multispectral photography (in plastic boxes stored in the padded black bag, which fits on top of the
camera in the insert). These are always needed with the above item, but their types and number change
according to what I am planning to shoot.
Metz 58 AF2 flash and the miniature Olympus flash that comes with the E-M5.
I use the latter as a wireless TTL commander for the Metz flash, which is either mounted on a macro
flash bracket or hand-held in my left hand. The Olympus flash is both lighter and more versatile than a
flash cord. Alternatively, this compartment can house a
35 mm f/3.5 lens for use with the multispectral camera.
A small flash diffuser to attach to the Metz flash head (makes a big difference in macrophotography).
Camera batteries (for both cameras) and SD cards, in a padded wallet.
When I am using the backpack, the free space above the second insert usually houses SD cards and spare
batteries, a blower to remove dust from lenses, a microfiber towel, a cloth bag (folded in its own pouch,
or already placed around the bottom dividers) and occasionally other small items (above picture). However,
I place critical items (SD cards and camera batteries) in one of the padded dividers ahead of trips, so
they will not be left in the backpack if I am forced to check it in. An empty plastic water bottle sits in
the mesh pocket on the left side of the backpack ahead of flights. It is empty so that I can fill it at
the first water faucet after passing the airport security checks (the alternative being the ritual
purchase of a bottle of "mineral" water once inside). A sandwich can sit in the top space on
flights with airlines that charge for food and drinks.
Any tripod or monopod travels in my checked-in suitcase. The same applies to macro flash bracket and any
other heavy, not easily damaged and not very costly item. So far, nothing has been stolen from our
ordinary checked-in suitcases (not even when they were delayed while changing flights and delivered after
a few days), but over the years small items have disappeared at least twice from carry-on luggage we were
forced to check in at the gate.
Cases of in-flight theft and pillaging of valuable items from carry-on luggage by other passengers have
recently been discussed in the media, and appear not to be unusual. It may be a good idea to lock one's
carry-on before placing it in the overhead compartment, especially on long flights where most passengers
are busy watching movies or trying to sleep, the plane interior is darkened for hours, and a lone
passenger rummaging in an overhead compartment is unlikely to attract attention.
As an alternative, you may place a camera bag or other valuable item under the seat in front of you, and
slide in one foot on each side of this bag. The discomfort caused by a reduced legroom is balanced by the
almost impossibility for a thief to access this bag's contents without you noticing (unless you are a very
deep sleeper). Avoid the first row of seats in each aircraft section, because they have no seat in front
of yours and consequently no space for luggage in this position. If placed in one of these seats, you can
always complain with an attendant that you have a bad back or weak arm and cannot operate the emergency
door handle - usually the attendant will place another, less fortunate passenger in this seat and move you
back a few rows to a seat where you can place your bag under the seat in front of you.
Weight and size
The complete kit shown in the above pictures, packed in the backpack, weighs in at slightly under 7 kg. It
has room for a few extra items before reaching the 8 kg generally allowed for carry-on at European
airports (although 5 kg and 6 kg limits are applied in some cases), but the backpack tends to look smaller
and lighter than it actually is. It fits with room to spare in the "cage" used to check the size
of carry-ons. The black cloth bag containing the inserts weighs about 5 kg, and is much smaller than the
backpack (above picture, right).
Should my camera backpack not fit within somebody's arbitrary limits, this is where the vest comes to the
rescue. It is surprising how much spare batteries, battery chargers, coin purse, mobile phone and a few
other small items add to the weight, and these items can travel in my vest pockets at least as safely as
in a camera bag. It is easy to make your camera backpack a couple of kg lighter in this way. I just lay
the vest in a tray at the X-ray machine before passing the metal detector.
A minimalist kit
When I need to reduce my kit to the bare minimum but a mobile phone or compact camera is not enough, I can
think of these alternatives:
Olympus E-M5 with 14-45 mm zoom. This alternative gives the most compact kit while still allowing a
range of focal lengths, and is good when there is no time to change lenses, or the place is too crowded.
Olympus E-M5 with Olympus 12 mm f/2 and 60 mm f/2.8 macro. This alternative gives better image quality,
faster lens speeds and a wider range of focal lengths than the above zoom, and also allows
macrophotograpy. In practice, as long as I can change lenses and use my legs, I rarely miss the focal
lengths between these two extremes.
Olympus E-M5 with Olympus 12 mm f/2. This is all I really need in outdoors walk-around situations. The
Samyang 7.5 mm can be added if I know I will need an extreme wideangle.
Olympus E-M5 with Olympus 60 mm f/2.8 macro. This is the logical choice if I will only do
macrophotography.
Olympus E-M5 with Panasonic 100-300 mm. This and a monopod are all I need for a day at the zoo.
I can add a flash to the minimal kit for interiors or macrophotography.