White balance in UV imagingIn UV imaging with digital system cameras converted to "full spectrum", white balance is relevant in two different respects:
UV images record the amount of near UV reflected (or, more rarely, transmitted) by the subject. If the lens and UV-pass filter transmit across a sufficient range of UV (roughly 365 to 400 nm), UV images also record a couple of different UV false colors. To record the whole gamut of UV false color of which a typical full-spectrum converted digital camera with Bayer sensor is capable, both lens and filter must pass a sufficient amount of UV in a band from roughly 320 to 400 nm. It is commonly necessary to record a UV image and a VIS image of the same subject, without changes in point of view and image magnification. This is best done by using the same, tripod-mounted camera and lens for both images, and just swapping filters. Recording VIS images with a full-spectrum converted camera requires, at a minimum, the use of a UV-cut and IR-cut filter. However, UV- and IR-cut filters like the B+W 486 and Baader UV/IR Cut filter (as well as L filters for astronomy use), in spite of cutting radiation above 750 and below 400 nm, do not restore the original, native white balance of the camera. The reason is that, in virtually all system cameras, the built-in IR-cut filter does not have a sharp cutoff at 750 nm, but a more gradual one that also reduces the amount of red radiation that reaches the sensor. This gives the built-in filter a distinctive cyan color, which is absent in the filters mentioned above. A gradual cutoff in the red region is necessary to compensate the higher sensitivity of silicon sensors in the red region, compared with shorter wavelengths. Without this gradual filtration, with typical photography subjects the red channel would become saturated long before a sufficient amount of light has been collected in the green and blue channels. In fact, the sensitivity of typical silicon junction light detectors peaks at around 980-1,000 nm, and reduces roughly linearly from 950 to 380 nm. It decreases more slowly below 380 nm, but this effect is largely hidden by the steep absorption of UV by the Bayer color filters built on top of the sensor surface. The native sensitivity of silicon junction light detectors also decreases very steeply at wavelengths above 1,000 nm. Experiments on white balanceFor these experiments, I used a Sony A7 II converted to full spectrum, with CoastalOpt 60 mm Apo and, for UV images, and Baader U 2" filter mounted in front of the lens. I used as light source for both UV and VIS a Bowens 1500 Pro studio strobe with non-coated original Bowens xenon tube and tube shield. For UV images, I set a custom white balance in sunlight with the above lens and filter, and used it for flash photography. For most VIS images, I used the camera's built-in flash white balance. Unless indicated otherwise in the text, all images are JPGs straight out of the camera, cropped but not post-processed in other ways. The subject is a Malva cf. sylvestris flower, about 12 mm wide. This flower is magenta/violet with a whitish central area when seen in sunlight. A common problem in shooting series of pictures of the same flower is that plants never stay imobile, and instead keep moving and turning around. These movements are too slow to be directly noticed, but evident in images shot across an interval of 10-20 minutes. In the following images, I shot a subject area larger than necessary, refocused before each picture, and cropped the pictures in post-processing to center the flower. The background of the flower, as a result, changes somewhat among pictures. The lens aperture also changed a couple of times during the session. The results of these experiments, while valid for the camera, lens and filters used, are only indicative of what one should expect with different equipment. For example, the lens used for the experiments is most likely to affect the results. While the CoastalOpt 60 mm Apo can image the whole range of UV recorded by ordinary cameras converted to full spectrum, the large majority of other lenses used for UV imaging, including several models designed for this specific purpose, are more limited in the UV spectrum they transmit. Camera models vary widely in the range of custom white balance that they can generate and store. Several camera models, for example, fail to generate a "neutral" UV CWB like the one shown below, and produce UV images with a dominant color cast. UV image
The UV image displays the characteristic UV signature of this flower, i.e. UV-bright petals with UV-dark center and veins. Note that the overall image tonality is relatively neutral. This white balance also renders UV-yellow and UV-blue flowers with a well-saturated yellow and blue color, respectively (see examples here). 
Using the built-in flash white balance produces an overwhelmingly red/pink image that is far from pleasant on the eyes. This dominant color cast also makes it impossible to detect any of the subtle false color present in the image shot with a neutral CWB. Thus, although it remains true that there is no "correct" white balance to represent UV images by converting them to VIS images, the choice of color balance does strongly affect the amount of visual information carried by these images. VIS image
To obtain a VIS-only image, I started by replacing the Baader U with a Baader UV/IR Cut filter. This is an astronomy filter with sharp cutoffs at both ends of the VIS spectrum. As expected, it does not selectively reduce the amount of red. The UV signature of the flower is now absent, replaced by a smaller bright area at the center of the flower. The CWB is obviously inappropriate for use in VIS images. My attempts at manually color-balancing this image in post-processing were not successful. It would have been nice to use the same WB in UV and VIS images, but this is just not feasible. 
Switching to the built-in flash WB produces an overwhelmingly reddish image, also unacceptable as a rendering of the visual appearance of the subject. 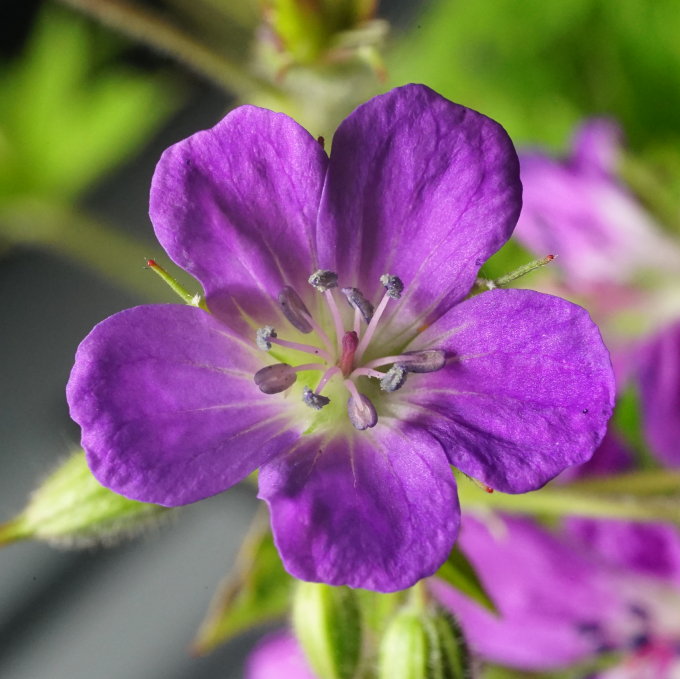
To try and restore a more natural VIS WB, I added a 2 mm thick BG40 filter from UVIROptics. This is a cyan-colored filter roughly similar in its VIS properties to the built-in filter of the camera (which was removed as part of the conversion process to full-spectrum). I also added a Hoya NDX8 neutral filter to compensate for the much higher sensitivity of the camera to VIS, compared to UV. Without the Bader UV/IR Cut filter, the BG40 transmits too much NIR (as well as NUV down to about 320 nm, which is a lesser problem for VIS imaging), so the Bader UV/IR Cut filter must still be used, stacked with the BG40. Other filters, e.g. the BG38 and BG39, have slightly different properties that in my opinion make them less suitable for this purpose. Without the NDX8 filter, I was forced to use four layers of white nylon cloth in front of the flash to reduce its power, even after turning the flash power to minimum. Doing this every time I need to alternate between UV and VIS imaging would be too bothersome. A problem with using ND filters on a full-spectrum camera is that consumer-quality ND filters like those from Hoya and B+W have a massive NIR leak. This is especially true of very strong ND filters (e.g. the B+W ND 3.0, which absorbs 10 stops of VIS but much less NIR). In this particular case, the BG40 blocks NIR to a sufficient extent to hide this problem. Extended-spectrum ND filters, usable in both VIS and NIR, are available but unnecessarly expensive in this particular case. The result is quite close to my perception of the subject's color in sunlight. My only complaint is that the general tone should be slightly warmer. This small difference may be due to a different color-temperature between sunlight and the studio strobe with non-coated tube, or to my preference for the warmer colors produced by Olympus cameras. 
A minor adjustment in post-processing gives me an image I can be satisfied with. The main difference is that the green parts of the plant now have a slightly warmer tone that better reflects what I see in sunlight. In fact, this image is more realistic than what I often get with non-converted cameras, which tend to render violet/mauve flowers as mostly blue. The improvement in the above image with respect to non-modified cameras is probably due to the Baader UV/IR Cut filter having a sharp shoulder located at the true end of the VIS spectrum (which includes the violet color), while many unmodified cameras and/or VIS lenses tend to cut off the shortest VIS wavelengths, thus making some violet flowers turn blue in the recorded images. I tried to record a custom white balance that enables me to use only the Baader UV/IR Cut filter for VIS pictures, but the results were not as convincing as using the stack of two filters (or three, including the ND filter) discussed above. SummaryA neutral CWB is likely to preserve more false-color information in UV pictures, compared with a CWB that produces a dominant color cast. Achieving a correct WB for VIS pictures on a full-spectrum converted camera is not trivial, and may require experimentation with filter stacks and/or the creation of a suitable custom white balance. Camera models differ in the range of custom white balance they can store, and some cameras cannot store the extreme CWB required for special applications like this one. In this particular case, a stack of filters is the solution that gives the best results in VIS images. |