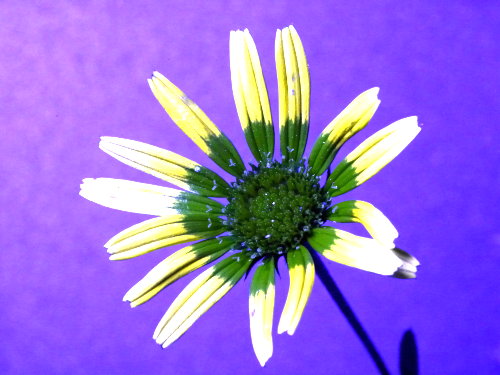
Quite a few web
sites on UV photography seem to link to this page. They are welcome to do so, but this page contains only
partly updated materials since I created it. Other pages of my site contain more recent information, as
well as information on special topics in UV photography not mentioned on this page. If you want to make
sure that you did not miss any subsequent additions on UV photography I made to this site, always check
the main index of the photography section, or use the search function on the
home page of this site.
What is UV
In addition to visible light (i.e., wavelengths ranging from 400 to 750 nm) and infrared,
sunlight at ground level contains UV-A ( 400-320 nm), UV-B (320-280 nm) and small
amounts of UV-C (280-200 nm) light. Above the atmosphere, UV-D, or vacuum UV, is an
important part of the solar spectrum. Virtually no UV-D passes through the atmosphere. At even shorter
wavelengths, the UV range grades into the soft-X-ray range.
UV-B is absorbed by most materials normally used to manufacture lenses, and ordinary digital camera
sensors also possess low sensitivities in these ranges. UV-C is rapidly absorbed by atmospheric oxygen,
and at ground level solar UV-C is irrelevant to photography. UV-D is very rapidly absorbed by atmospheric
gases, including nitrogen.
How I arrived to UV photography
My early trials with near-UV photography, almost a decade ago, were not much successful, because of
very large technical problems that stack up to make the odds almost impossible. Few photographers
dealt with this - at the time - very exotic branch of photography, and reliable information was much more
difficult to come by than now.
NIR photography, for initial experimentation, may require only a cheap, easy-to-find
filter and a long exposure time (albeit modern digital cameras are much better than older ones at reducing
the amount of NIR passing through their built-in filters to uselessly low levels). Getting even
entry-level equipment for UV photography, instead, is both expensive and time-consuming. Essentially,
cameras, digital sensors, lenses and ordinary filters are all designed to cut out UV radiation, and you
have to swim upstream in order to obtain odd bits and pieces that, by accident or design, work in the
opposite way of what is normally desired.
It is now much easier to start out in UV photography than a few years ago, thanks to current bulletin
boards like ultravioletphotography.com and, before the
latter, www.fotozones.com (link removed because no longer freely accessible) that freely
distribute and discuss technical information. Nonetheless, UV photography requires a considerable
determination, time and money to obtain the necessary equipment, and additional determination and time to
learn how to properly use this equipment. At the risk of repeating myself:
UV photography is not an occasional pursuit that you can start practicing in an afternoon. Nor can you
do so in a week. You might be ready to start after a few weeks or (more likely) months of preparations,
if you have enough financial resources, luck, and the right sources of information. Initial mistakes in
purchasing the right equipment can be very costly.
UV photography cannot be done with simple, cheap and easily procured equipment. The financial cost of
good equipment for UV photography is significantly higher than for general-purpose photographic
equipment.
The equipment for UV photography is largely not dual-purpose equipment. It can be used mostly,
or only, for a single purpose: UV photography (or sometimes, also for IR photography and multispectral
photography). Most items for UV photography are of no practical use, or too expensive, for more common
types of photography.
The reward is that we can document and study a world otherwise invisible to us. In addition to its visual
appeal, UV photography has numerous uses in science, technology and forensics. However, not too many
scientists have used UV photography to document macroscopic objects (aside for flowers and birds plumage,
which have been the subject of hundreds, or possibly thousands of papers). As an example, when I decided
to look at the shells of land snails in UV (and IR) and did not quite understand what I was looking at, I
found out that apparently no other scientist had thought of doing the same thing, and I was able to put to
good use what I learned about UV photography in the following paper:
Savazzi, E. & Sasaki, T. 2013: Observations on land snail shells in near-ultraviolet,
visible and near-infrared radiation. Journal of Molluscan Studies 79: 95-111. doi: 10.1093/mollus/eys039
A realistic time- and action plan goes as follows:
Start slowly and read a lot in the initial phase, before you buy anything. Ask questions on bulletin
boards. Do make your best to understand the technical aspects. Published opinions on equipment and
methods in UV photography vary, and in a relatively short time (weeks or months) you will be able to
distinguish knowledgeable sources from unreliable ones and/or sources with vested commercial interests.
Do not become dependent on a single source of information, and especially on a source that may have a
commercial interest in "locking you in" with specific equipment they sell. Some web sites on
UV photography are openly commercial, and only market a small subset of the equipment usable for this
type of photography. Other web sites appear at first sight to freely communicate information on UV
photography, but are less than forthcoming in clearly identifying the filters, lenses and techniques
used to produce the published images, thus making it impossible for other photographers to use the same
methods or building on them. Good criteria to apply in this evaluation are:
How open is a specific information source in providing actual, usable information (including
information on competitor's products or other sellers)?
Are they trying to sell you a "black box" filter/lens/camera with no information on which
company actually made it? For example, use of "fantasy names" for UV-pass filters or UV
lenses is an early giveaway. Google the names of anything they propose to sell you. If you find
nothing, or just the same single web site mentioning the specific item, ask them why. If they are
not forthcoming with real, verifiable information, let them go and turn somewhere else. Reputable
companies like Tochigi Nikon, CoastalOpt, Thorlabs, Edmund Optics, Asahi Spectra etc. can be trusted
even when they are the exclusive maker or distributor of a specific product, and typically provide
extremely detailed technical information on their products. A one-person company, on the other hand,
is certainly not manufacturing UV-pass filters and lenses in a basement, but only marketing products
made by larger companies and potentially available directly from these companies to any interested
buyer. In this case, you might be able to avoid a price mark-up if only you manage to identify the
actual source, which is therefore worth investigating.
Does a specific information source recommend equipment that is well documented, tested and reviewed
by multiple web sources but only available for purchase from a single source? This could be a
warning flag, although not necessarily a sign to avoid them. Many of the filters most useful in UV
photography are only made by one company. However, these filters are often available from multiple
distributors, in addition to the maker itself. Other companies may be making slightly different but
largely equivalent filters. Among the few currently produced lenses designed for UV and
multispectral photography, the CoastalOpt 60 mm Apo Macro and
Tochigi Nikon 105 mm UV Nikkor may be available through a few large distributors of photographic
equipment, but individual buyers can directly order these items from the respective factories and
usually save a substantial amount of money in the process. Window-shop before you take out your
credit card.
Does the information from a commercial source agree with information available from open sources
like bulletin boards and web sites that do not sell equipment? If the latter sources are verifiably
independent from the commercial one, this is an encouraging sign. If they are only parroting the
information given out by the commercial source, be cautious, In this case, in reality you only have
one information source, no matter how often the information has been copied and re-published.
Continue to keep yourself updated. The more you learn, the more you will become capable of separating
wheat from chaff. A lot has changed in UV photography during the last five years, and a lot more can
change in the next few years. Much of the generally accepted wisdom of a few years ago is still known to
be true, but some of it is no longer regarded as valid. I recommend to start at
ultravioletphotography.com, but do search for other sources of information - there are many, of greatly variable usability and
helpfulness.
Build up your initial kit gradually in six months to one year, and spread your purchases over this time.
"Deals of a lifetime" sometimes do occur, but often they turn out to be a good deal only for
the seller. Good deals are sometimes available on eBay, but a deal that is too good to be true is an
obvious giveaway. An eBay ad for a UV Nikkor 105 mm at 2,000 US $ stinks like July's prawn leftovers in
August, especially if coming from a seller who registered on eBay only last week, has a user feedback of
two, or until now has been selling old postcards and used kitchenware from the same eBay account
(hijacked eBay accounts are commonly used by fraudsters).
Do not skimp on the camera. Start with a good UV camera because you will likely use it
for many years. If the camera is not suitable for UV photography, you will never know what else, if
anything, you are doing wrong.
Do start with relatively cheap UV lenses, but only one or two of them. There are enough
pretty good ones to choose from. Do not start with very expensive ones, unless you already have them
available for other reasons. Do not buy old lenses at random, hoping to chance on one that is good for
UV photography but has remained undiscovered until now. The large majority of lenses, old and new alike,
are no good for UV photography, and you might need to buy a hundred before you find a usable one. For
your initial lens purchases, follow instead the advice of more experienced UV photographers.
Do not skimp on the filter. Start with just a single proven one, the
Baader U. It is not cheap, but it will work (or rather: If you cannot get
good results, the fault is somewhere else, not in the filter). Only after some time and practice (and
enough investigation) try more exotic ones. Buy a filter that you can use on your UV lens(es) and
camera. In many cases, with the right adapters on lenses of medium-long focal lengths, you can use a
25mm/28mm/1.25" filter without causing any vignetting. You can use a 52mm/48mm/2"
filter, but in most cases this large diameter is not really necessary, especially on small sensors, and
more expensive. You can test a given filter size for vignetting in the visible range (e.g. with a
circular hole cut in a black cardboard sheet mounted in your filter holder) on a given camera and lens,
before ordering a UV filter. Find out which filter size gives no vignetting with the lens
aperture fully open, and buy this or a larger size.
Begin your trials of UV photography on subjects in full sunlight and use a tripod. Once you have
debugged the initial problems, get a not-too-expensive, suitable electronic flash with uncoated tube
(see
www.ultravioletphotography.com, or some of the links below), or if you already have a studio flash and are interested in indoors
subjects, consider investing in an uncoated tube and dome. You will eventually need an artificial UV
source, but it is best to start with direct sunlight, unless you already have a studio strobe with
easily-replaced tube and/or live in a place where sunlight is a rare or unreliable commodity (like I
do).
Cameras and camera sensors
Camera sensors are moderately sensitive to UV-A, albeit to a lesser degree than to the visible range
(400-750 nm). At shorter wavelengths than UV-A, the sensitivity of ordinary camera sensors quickly
decreases with decreasing wavelength. This is due to a combination of factors, of which the most important
is probably absorption by the Bayer color filters and microlenses built on top of the sensor chip.
Depending on its thickness and composition, the glass window covering the chip and sealing it within its
ceramic package can be an obstacle to transmission or UV-B and UV-C, but usually it is fairly well to very
transparent to UV-A. Anti-reflection coatings of this window are typically designed to be most effective
in the visible range, and some of them may reflect UV to varying degrees.
Videocamera sensors without microlenses and Bayer filters can be used in the UV-A and UV-B ranges. The
window protecting the sensor is sometimes devoid of coatings, or treated with coatings optimized for UV
transmission. The same type of videocamera sensor is sometimes completely devoid of a protective window,
and completely exposed to whatever radiation passes through the lens. In this case, the sensor is
extremely vulnerable to damage (e.g., atmospheric humidity may corrode the vacuum-deposited aluminium
electrical pathways, thus requiring the use of gold for this purpose, and any dust particles are
impossible to remove without damaging the sensor), and the lens should never be removed from the camera.
This equipment is expensive and has specific technical uses, but it is simply the wrong type of equipment
to start out in UV photography.
Fujifilm used to make DSLR models for UV (officially, only down to 380 nm) and multispectral photography.
They are no longer available, and it is much more practical to modify a general-purpose DSLR or mirrorless
camera that to try and get one of these special cameras.
UV and multispectral conversion
Virtually all sensors in general-purpose digital cameras are covered with a separate UV- and IR-blocking
filter. In the large majority of cases, and especially in modern cameras, this filter is very effective
for its intended purpose, and must be removed to allow imaging in the UV (and IR) range. Often, this
filter also carries two thin layers of birefringent material, which provide anti-aliasing. Increasingly
often, this anti-aliasing filter is absent, and aliasing and the related color moiré artifacts are
corrected by the camera software.
In DSLRs, this filter is usually replaced with a window of optical glass transparent to the wavelengths of
interest. This is necessary because simply removing the filter changes the optical distance between lens
mount and sensor, while the optical distance between lens mount and the ground glass of the optical
viewfinder is unchanged. Removing the filter without replacing it results in two separate problems:
The camera can no longer focus at infinity with ordinary lenses.
An image correctly focused in the viewfinder is out of focus on the sensor, and vice versa. It is still
possible to use a DSLR modified in this way, if one uses only live view to focus.
In so-called multispectral conversions, a window transparent to most or all wavelengths that can
be recorded by the sensor replaces the built-in filter. In UV conversions, a UV-pass filter is instead
used as replacement. A variety of IR-pass filters are also used as replacements to allow IR photography.
This modification is essentially permanent. Therefore, the most versatile conversion is the multispectral
type, which requires a filter to be mounted in front (or at the rear) of the camera lens to isolate a
subset of the light spectrum.
Most DSLRs allow the distance between ground glass and lens mount to be adjusted, and in some camera
models the adjustment range may be large enough to allow viewfinder focus to be recalibrated after removal
of the UV and IR filter, without needing a replacement window. The thickness of the original UV- and
IR-cut filter is very variable among camera makes and models, and this also plays a role in the
availability of this solution. This type of recalibration does not correct the problem of lenses no longer
focusing at infinity. For this reason, DSLR conversions usually replace the built-in filter with a
transparent window or filter. On the other hand, when using a mirrorless camera and lenses mounted on an
adapter, it is possible to simply remove the built-in filter without replacing it, and to use a slightly
shorter adapter to restore infinity focus with lenses that can be mounted on an adapter (native lenses
designed for direct mounting on the specific mirrorless cameras, without an adapter, remain unable of
focusing at infinity).
The infinity focusing position of many lenses can be recalibrated, and in some cases the adjustment range
is large enough to allow focusing at infinity on cameras where the built-in filter has been removed but
not replaced. This is the case, for instance, of the
Novoflex Noflexar 35 mm.
Among Nikon DSLRs, the old D70 and D70s are frequently reported to be
particularly suitable for UV photography.
Many other models are also suitable, albeit not all. Several Micro 4/3 cameras also work well.
I discuss here a Panasonic G3 that I modified for multispectral (including UV) photography with very
good results. In the past, it was often stated that Canon DSLRs were unsuitable. It was also stated in the past that
CCD sensors were more suitable that CMOS sensors, but this is not supported by the current knowledge. Very
capable UV cameras like the Panasonic G3 and GH series have CMOS
sensors. It is stated on some sites that some of these cameras are suitable for UV photography even
without modification. I prefer to qualify this statement by saying that some of these unmodified cameras
allow imaging in the (very) near UV range at the price of extremely long exposure times, even in the
presence of abundant UV radiation, but certainly cannot be called optimal for this application.
A further factor to consider is that live view is very convenient for framing and focusing with a UV-pass
filter mounted on the lens (provided that a sufficiently strong continuous UV illumination is available).
Live view also allows a precise focusing (by electronically magnifying a portion of the live view image),
although this requires a stronger UV source than necessary for viewing the whole frame. Older cameras like
the Nikon D70 lack live view, and focusing and framing must be carried out without a UV-pass filter. UV
focus shift (see below) and, at high magnification, the thickness of the filter can slightly alter the
plane of focus, and with these older cameras this problem becomes evident only after examining the
pictures.
Technical aspects of UV photography
UV images record radiation outside the human visible range. Therefore, there is no "correct"
white balance to display these images, and if you only want to experiment with the visual impression of
false-color images, you are free to try the most outrageous white balancing and color remapping
techniques.
With cameras, lenses and UV-pass filters that allow the recording of a relatively wide UV spectrum, Bayer
sensors most often provide a range of false colors, which include red, magenta, yellow, green and shades
of blue and violet. They are called false colors because they have no relationship to the actual colors of
the subject as displayed in the visible range. Images of flowers generally provide the widest gamut of UV
false color. However, most flowers display just one or two UV false colors, and to experience the full
gamut you need to experiment with a rather broad range of flowers.
If your lens only transmits the longest UV wavelengths (i.e., those closest to the VIS range), your UV
images will be a monochromatic violet (if you use the built-in sunlight white balance of the camera), and
regardless of the subject you will get no other false color. Also, if you use a largely monochromatic
illumination source (e.g., a UV LED torch), you will get little or no false color, even if potentially
present in the subject.
There seems to be a relationship between UV false colors and the approximate UV wavelengths reflected by
the subject. However, this relationship may be somewhat different in different camera models, and is
strongly affected by the color balance being used, as well as other factors that include the subject and
the illumination source.
"Bee vision" and all that
Sometimes, UV false color is combined with VIS colors, and the color channels of the image are remapped
and remixed in post-processing to give an impression of how insects, birds and other animals capable of
vision in the UV spectrum see a given subject.
I strongly object to these images being called "bee vision", "butterfly vision",
"bird vision" and the like. Animal (and human) vision involves large amounts of data
post-processing in the retina as well as the brain. Recording the way this species visually perceives a
given subject and translating it to a human perception experience is way outside our present capabilities,
and may well be impossible. The visual perception neural signals of another species might very well be
completely alien to our brain.
For example, some animals can perceive four or more component colors. Our brains are wired to process only
three component colors, so they are incapable of processing a fourth color channel in the same way as done
by these species, just as they are incapable of processing the perception of a four-dimensional solid (we
can at best visualize the data by using a number of diagrams and formulas, but communicating the actual
perception is a whole different thing). Therefore, these "bee vision" etc. images are, at best,
only a curiosity useful in science fairs and exhibits for the general non-scientific public, and should
always be labelled with the above warnings.
Good science can indeed be done on bee vision etc. It is done within an experimental scientific framework
and with well-designed experiments, for example by observing bee behavior and responses to natural and
artificially altered flowers and illumination spectrum under controlled settings, and by measuring neural
activity related to the vision system while the bee is presented with different radiation wavelengths. See
for example:
Horridge A. 2019 - The discovery of a visual system: The honeybee. 296 pp, CABI.
Horridge A. 2011 - What does the honeybee see? And how do we know? A critique of scientific reason. 360
pp, ANU E Press.
My point is that good science cannot be done by shooting images of flowers with UV and VIS filters,
remapping their color channels in Photoshop and calling it "bee vision".
Special lenses can be designed for UV-A and UV-B photography. This includes, for instance, the Nikon UV
Nikkor 105 mm (and the optically identical Tochigi Nikon UV Nikkor 105 mm),
CoastalOpt Apo Macro 60 mm and
UV Rodagon 60 mm. None of these lenses are cheap, and most of them are no
longer manufactured. Several of these lenses also have relatively long focal lengths that limit their
usefulness for landscape photography.
At least some of the general-purpose photographic lenses also transmit rather low amounts of these
wavelengths (see links below).Therefore, it is possible to use modified general-purpose digital cameras
and general-purpose lenses to take sunlit pictures in the near UV range, at least for static subjects that
allow relatively long exposures.
Nikon EL-Nikkor enlarger lenses are often used for UV photography (see links below). Once regarded as the
best general-purpose lenses for UV photography, they transmit less deeply into the UV than the lenses
mentioned above. Nonetheless, they provide good alternatives for wavelengths down to approximately 365
-380 nm. The EL-Nikkor 63 mm f/3.5 was once regarded as singularly good for this purpose, but several
other models (especially the older series in metal barrels) are just as suitable.
Lenses of short focal length, commonly called wideangles, suitable for UV imaging are a special problem.
These lenses typically use a large number of optical elements, which
makes them intrinsically poor for UV imaging. There are several cheap
and easily available models of
legacy 35 mm lenses suitable for UV imaging (their availability on eBay seems to
have shrunk since the UV properties these lenses became known, but that's life). Lenses of shorter focal
lengths usable in UV imaging are much scarcer. My current favorites are the
Enna Lithagon 28 mm f/3.5 (and its Porst 28 mm f/3.5 "clone"),
and the
Nikon AI-S Nikkor 24 mm f/2.8. All these lenses are designed to cover a full-frame film/sensor, and therefore, to fully use their
image circle, one should use them on a full-frame camera. They still can be used for UV imaging on APS-C
or Micro 4/3 cameras, but on these cameras they behave as medium-focal length "normal" lenses.
There are a few legacy lenses usable in UV that behave as "proper" wideangles even on Micro 4/3,
for example the Pentax-110 18 mm f/2.8. Even some modern autofocus
lenses, like the Sigma 19 mm f/2.8 and 30 mm f/2.8, can be used at the highest
UV wavelengths between 380 and 400 nm.
The largest lists of legacy lenses suitable for UV imaging are those on
ultravioletphotography.com, but these lists have been compiled from multiple sources that used different test criteria. Before
purchasing anything, you should do your homework, Google for actual UV images taken with the lens model
you are interested in, and compare them with UV images taken with other lenses of comparable focal
lengths.
A problem with many general-purpose lenses used in UV photography is a so-called
focus shift between the visible and UV ranges (strictly speaking, this is not focus shift, which
is a different phenomenon, but a type of chromatic aberration). This problem is usually not serious when
focusing with live view in UV-only imaging, but must still be taken into account in multispectral
photography, when superposing images recorded at widely different wavelengths.
Field UV photography
Swapping filters is the most common method for recording images in UV and VIS, when it is necessary to
compare images in the two bands. If a precise registration of the images in the different bands is
desired, it is also necessary to work with a tripod. Many public places, however, place limitations on the
use of tripods, monopods and selfie sticks. In several cases, I have heard that photographers in botanical
gardens have been accosted, and even harassed, by overzealous staff even while using tripods in a safe and
unobtrusive way. It seems their motivation is often not the well-being of visitors and plants, but rather
the worry that the photographers are carrying out commercial work. Since universities and non-profit
research institutions in most of the world are in a chronic state of economic strangulation by their
respective governments, they appear to have instated requirements to extract even the smallest thinkable
profits from commercial photographers, by demanding the payment of fees, licenses and copyright
proceedings for any even remotely commercial photographic activities carried out on their premises and
assets.
When a perfect registration is not essential, or unwelcome attention should be avoided, I find that the
easiest, fastest method is to carry with me two cameras, one equipped for UV and the other for VIS. They
do not need to be the same model or format, as long as they provide the same angle of view. For example,
an Olympus E-M1 Mark II with
12-40 mm f/2.8 Pro zoom at 12 mm is an almost perfect match in VIS for my
full-spectrum Sony 7R II with AI-S Nikkor 24 mm f/2.8 in UV.
The unusual appearance of dichroic-coated filters like the Bader U and
Primalucelab U can prompt stares and questions from passers-by, in turn
attracting the attention of staff who might interfere with your photography plans. Using a rear-mounted
filter avoids this potential problem (although this is not the most important reason to use rear-mounted
filters).
First I shoot the UV image, which takes a little time because it requires manual focusing and the use of
image magnification, plus typically manually stopping down the lens. Then I let the UV camera hang down on
my chest, lift up the VIS camera and snap a quick picture with AF and auto exposure in A mode, which takes
a couple of seconds or so. As long as the neck straps of the two cameras are adjusted at different
lengths, the risk of banging the two cameras together is low. A variation on this method can use a waist-
or shoulder-mounted bag as a double camera holster.
Finspång Castle, Sweden, top: VIS, bottom: UV.
Although UV images have an esthetic appeal on their own, one of the technical and forensic uses of UV
images is that sometimes they reveal obvious differences in UV reflectivity where none are displayed in
VIS. In the above example, the UV image reveals that extensive repair/repainting has been carried out on
the left wing of the castle, while none of this is displayed in the VIS image.
UV photography normally requires a filter that blocks longer wavelengths than UV, so that they do not
contribute to pictures. When photographers talk about UV filters, usually they mean filters that are
opaque to UV and transmit longer wavelengths. These filters are more properly called UV-cut filters. This
is the opposite of what we need for UV photography. What we want is UV-pass filters. A special problem
with digital cameras is that their sensors are very sensitive to near infrared (NIR), and any NIR that
leaks through a UV-pass filter will usually spoil the recorded image.
Traditionally, UV-pass filters were made from different types of ionic glass. Virtually all these types of
glass also transmit NIR. For this reason, traditional types of UV-pass filters are essentially useless for
digital UV photography, unless combined with a NIR-cut filter. Multiple filters increase the risk of
internal reflections and loss of contrast.
The most frequently used modern filters for UV photography are of three types:
Sandwich-type filters, made by cementing together a stack of different types of ionic glass to allow the
transmission of UV but not of IR. The optical glue used to cement the layers must transmit UV (Canada
balsam is not usable). Multi-layer filters of this type often display a lower contrast and image
resolution than other filter types.
Combination dielectric and ionic filters, which combine a single layer, or multiple stacked layers, of
ionic glass with dielectric coatings on one or more surfaces of the filter. The most useful filter types
for UV photography have a single layer of ionic glass and different types of coatings on either side.
The dielectric coatings may consist of up to one hundred layers.
Dielectric, or interference, filters, which use dielectric coatings on a substrate of fused silica that
transmits UV, visible and NIR radiation.
Dielectric coatings have variable spectral transmission properties, depending on the angle of incidence of
the radiation. For this reason, they should not be used with wideangle lenses. Anti-reflection coatings
are similar to dielectric coatings, but typically consist of fewer layers. Some of the traditional UV-pass
ionic filters are available in anti-reflection coated versions (e.g. from Thorlabs) and perform better
than their uncoated counterparts in terms of image contrast. However, anti-reflection coatings do not
solve the NIR-leak problem.
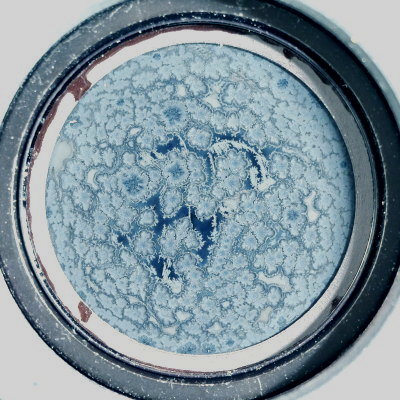
Ionic UV-pass filter, degraded by exposure to air.Detail of degradation of optical surface.
Many traditional types of ionic UV-pass optical glass deteriorate on exposure to air and/or humidity. This
deterioration makes the surface of the filter "matte" and strongly degrades its performance.
Some of these types of glass, depending on the climate and humidity, may visibly deteriorate in as little
as a few months, typically developing visible "flowering", "icing", or moss-like matte
areas, on their optical surfaces (see above example). This degradation may look like molds, but is not of
biological origin, and cleaning the filter only makes it worse. In other types of UV-pass ionic glass,
deterioration is not immediately visible, but cleaning one of these filters causes microscopic glass
particles to detach from its optical surfaces and makes the filter unusable for UV photography.
It has been reported that appropriate cleaning of air- and humidity-sensitive UV-pass ionic glass filters
is feasible while the damage is still in its initial, barely visible state. Dielectric coatings usually
protect the filter surface from this type of damage, but require extra care when cleaning. In general,
unless I need to clean an accidental fingerprint, I only use an air blower to clean coated filters. It
takes a lot of dirt and dust on a filter before image quality is affected, especially if the filter is
protected by a lens shade or rear-mounted between lens and camera. Molds, on the other hand, should be
cleaned out before they have a chance of etching themselves into filter coatings or optical surfaces.
Unless the optical surfaces of these ionic glass types are protected by sufficiently thick dielectric
coatings or by sandwiching with more resistant types of glass and air- and humidity-proof optical glue,
these filters are only usable for photometry (although they may require a periodic re-calibration of the
equipment), but not for imaging and photography. The filter in the above images has a dielectric coating
on the opposite surface, which is still pristine. Any scratch in dielectric coatings, however, opens the
way to more significant, and steadily growing, damage. In extreme cases, degradation that starts at the
edges of a sandwich- or combination-type filter, where the ionic glass is exposed to air, can eat its way
through the glass toward more central regions of the filter. In these cases, the filter edges should be
air-proof sealed with epoxy or silicone within a metal cell.
Other UV-pass filter types exist, but are typically very expensive. For instance, so-called
solar blind filters (which transmit only UV wavelengths that are selectively absorbed by the
atmosphere or not emitted by the sun) use a nano-scale grid of metal wires on a fused quartz substrate to
reflect higher wavelengths. A partially similar technology, which uses parallel nanowires, allows the
construction of polarizing filters effective in the UV. These are very expensive specialty filters with
military and industrial applications, and rarely seen on the second-hand market.
Strong and/or lengthy exposure to UV radiation degrades many types of UV-pass filters and results in a
lower UV transmission. This is sometimes called solarization (and is unrelated to the darkroom
printing process known with the same name). Typically, this type of degradation does not affect image
quality, but does require a longer exposure or stronger UV source. This is especially likely to happen to
filters placed on a UV source, rather than on a camera lens. For some uses, manufacturers recommend
replacing the UV-pass filters after six months or one year of use, although this recommendation may be
dictated by the necessity of avoiding a combination of solarization and air degradation.
For maximum durability in UV photography use, one should choose only filters with optical surfaces coated
with dielectric layers, if possible use them on the camera lens rather than light source, and protect them
from excessive humidity and strong light when not in use. The use of
lens shades left permanently attached to UV-pass filters,
in addition to improving image contrast and reducing the risk of internal flare (see
here), reduces the risk of accidentally touching the
filter surfaces.
A lens cap mounted on a filter also makes it easier and less risky to handle the filter. Remove the lens
cap after screwing the filter into the filter mount of the lens, and reattach the cap before unscrewing
the filter.
Wipe optical surfaces only with a new (never before used) optical-grade paper towel, and only with the
towel moist (not dripping) with alcohol, lens cleaner or water. Throw away a lens-cleaning paper towel
immediately after using it, to make sure you will not re-use it by mistake. The portion of surface of the
lens towel that will wipe an optical surface must not touch or wipe anything else (including your fingers)
before being used. Never wipe an optical surface with a dry lens cleaning towel, or with anything else
than a lens towel (I do not trust reusable micro-pore towels on optical surfaces, although they are fine
for other surfaces). Practice cleaning a piece of glass or a cheap UV-cut filter with a new cleaning fluid
or lens cleaning towel type, before using them on expensive equipment.
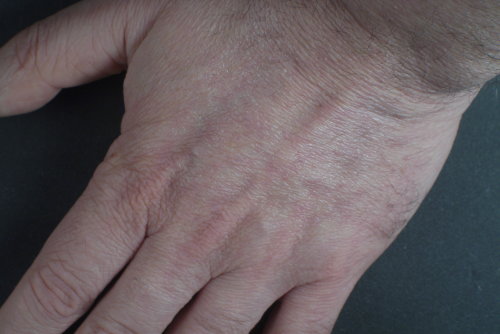
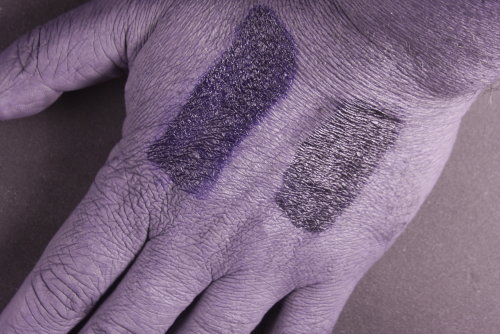
Two streaks of different types of sun lotion, in visible light (top) and UV (bottom).
Sun lotion, cosmetics and all sorts of spray cans should be kept well away from photographic equipment.
They can be very difficult to remove from optical surfaces and some of them block UV radiation extremely
well.
Warning. UV damages the eyes and skin (especially UV-B and UV-C, but UV-A is by no means
safe), so you should not stare into UV light sources and avoid skin exposure. Even if the sources are not
powerful, exposure to UV is compounded by the fact that the eye's iris does not contract in the presence
of UV, thus increasing the effective irradiation of the eye. It is also a good idea to switch off the UV
sources when not in use and to wear protecting goggles that cut UV radiation (e.g., made by UVEX and
specifically classified for UV protection, not just ski or fashion goggles), to prevent long-term exposure
to indirect UV during photography sessions. Some prescription glasses do not cut UV, and many cheap
sunglasses are transparent to UV.
As UV-only sources, initially I tried both "black light" fluorescent tubes (of the type that can
be screwed into an ordinary socket for a light bulb) and UV LED banks (which can be mounted in 12 V
sockets for halogen lights). The latter seem to produce more blue and indigo light and less UV than
fluorescent tubes (at least in the models I tried). LED banks can be battery-powered or fed with a 12V DC
power supply, but they draw so little current that the 12 V solid-state transformers used for halogen
lights sometimes are fooled into thinking that no lamp is present, and refuse to provide a current.
Ordinary incandescent light bulbs (especially those of higher power and higher Kelvin temperatures) do
emit potentially usable amounts of UV, but they also emit a lot more IR. I tested
additional UV sources here and
here.
Specialist continuous light sources are capable of producing relatively large amounts of UV (e.g., for
adhesive curing and fluorescence microscopy). The tube of electronic flashes does produce a lot of UV,
which normally is filtered out by a yellowish coating on the outer surface of the tube (sometimes the
filter is colored glass used to make the tube, and therefore is not removable). The plastic exit window of
flashes also cuts UV, and sometimes has a distinct yellowish color that indicates the presence of
UV-absorbing materials.
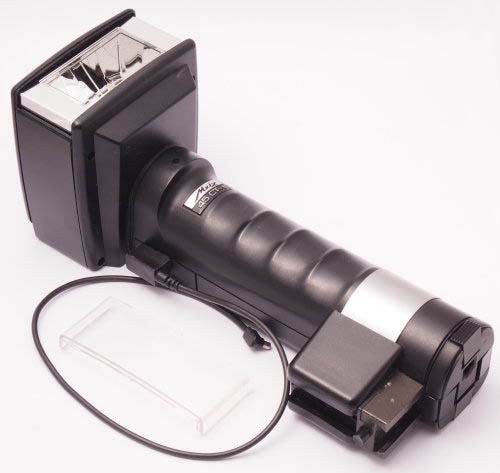
Vivitar 285HVMetz Mecablitz 45 CT-1
There are a few specialist electronic flashes designed to provide unfiltered UV, but they are scarce, and
probably mostly discontinued (this includes the Nikon SB-140). In principle, one might attempt to convert
a general-purpose electronic flash with uncoated tube by removing the plastic exit window. Among old (and
usually cheap) battery-operated flash models known to have been modified with success are the Vivitar 285
(and its more recent and more expensive revival, the 285HV) and the Metz Mecablitz 45 CT-1.
Removing the flash window of the Vivitar 285 is difficult and messy (it is actually better to just cut a
rectangular hole in the window), while doing it with the Metz 45 is easy. The Metz 45 CT-1 has been
suggested as a UV source for film UV photography (even without removing the front plastic window,
which means it would only be usable down to 360-370 nm) as early as the 1990s. It is frequent and cheap on
the second-hand market, and recommended by a few UV photographers. Once the window is removed, I found it
usable at least down to 325 nm, and possibly 300 nm. It produces a significantly higher amount of UV than
the Vivitar 285.
The original rechargeable Ni-Cd battery packs of the Metz 45 CT-1 are almost always unusable. A
replacement battery holder for 6 AA alkaline batteries, made in China, is cheap and commonly available. It
is often mentioned on web sites and bulletin boards that the rechargeable and alkaline battery packs are
different, and use different electrical contacts (which is true). However, I and other photographers have
been successful in loading the unmodified alkaline battery holder with six Eneloop nickel hydride
batteries, and using the flash in this way without any obvious problems. With these batteries, voltage is
about 1.5 V lower than with alkalines, and the electronics seem to be able to cope with this difference.
It is not necessary to add a capacitor in the alkaline battery pack for this purpose (the capacitor in the
original Ni-Cd pack is only used to smoothen out the recharging voltage, and early original rechargeable
packs don't have it).
The trigger voltage of the Metz 45 CT-1 can be quite high, and it is recommended to fire it through an
optical or radio slave instead of connecting it directly to a digital camera.
It is stated on some bulletin boards that the plastic front window of the CT-1 is easily popped out
without opening the flash casing. This is not quite true, as doing so is likely to break the window and/or
casing. The head part of the casing is easily opened by removing four screws (attention must be paid not
to touch any of the electronics, see below). The window then slides out, and can be put back if
desired.
Some of the subsequent Metz models may have UV-coated tubes.
Studio strobes can be modified by replacing a UV-coated tube with an uncoated one. Uncoated replacement
tubes for studio strobes are cheaper than the ones coated with a UV-cut layer. Cheap, amateur-level studio
strobes made in China sometimes use uncoated tubes. These cheap strobes are neither durable, nor reliable,
nor especially powerful, but they may be an acceptable compromise for studio UV photography. See
here and
here for an updated discussion of studio flash units for UV
photography.
A word of caution when modifying electronic flashes: their capacitors store a potentially deadly
high-voltage charge even when the power is turned off and power cords and batteries are removed. The
capacitor may remain charged for hours or days, especially in battery-operated units and cheap studio
units that do not actively discharge the capacitor when power is switched off.
There may be a dangerous charge left in the capacitor even after manually triggering the flash. This
applies also to battery powered units. Make sure you know what you are doing and check for high voltages
before replacing flash tubes.
In my personal experience, flash units with uncoated tubes are by far the most practical sources of
radiation for UV photography (above examples). With powerful ones, I can record radiation down to about
300 nm (imaged as blue in the picture at the right; see
details here). However, a continuous UV source is also very handy,
because it allows focusing and framing the subject in live view, without removing the UV-pass filter from
the lens. UV LED torches are useful for this purpose down to about 365 nm, but LEDS that emit shorter
wavelengths are weak and expensive. LEDs nominally specified as emitting 365 nm radiation often emit 370,
375 or even 380 nm instead. This is especially common in cheap Chinese UV flashlights sold on eBay (some
of them are even known to emit only at 405 nm, which is in the visible range).
Certain types of specialized fluorescent tubes emit a more broadband UV radiation in the UV-A, UV-B and
UV-C ranges. Different types of tubes must be used for different wavelength bands. As a rule, their
emission is too week for photography, and their usefulness mainly in framing and focusing.
Links to electronic flash for UV photography on this site:
The title of this section sounds like a conundrum, since UV photography records a part of the
electromagnetic spectrum invisible to human eyes. However, the white balance (WB) set in a UV camera has a
large impact on the false color recorded by the camera in UV photography. An inconsistent WB makes the
false colors of images recorded in the UV impossible to compare across cameras. Unlike WB in the visible
range, in UV photography there is no single "correct" WB, and the main purpose of WB in UV
photography is to obtain comparable results with different cameras.
The illumination source is also important in this context. WB in the visible range is typically set for a
subject in direct sunlight or electronic flash. Given that these seem to be the most frequently used
illumination sources in UV photography, it does make sense to use one of these sources for WB.
My current understanding of this problem is that two types of WB can be used in UV photography for the
purpose of making images comparable across cameras:
Setting the WB while using no filters except for a UV-cut and NIR-cut filter (like the B+W 486 or the
Baader UVIR cut) that approximately restores the original spectral performance of a camera before its
built-in UV- and IR-cut filter was removed. Usually, this is moderately, but not very, different from
the "standard" sunlight or electronic flash WB of the camera.
Setting the WB on a reference substrate while using the same UV-pass filter used to record images. The
reference substrate can be one of the following:
Spectralon white target. Spectralon is chemically similar to PTFE (also known as Teflon), albeit
Spectralon seems to be a highly reflecting sintered powder containing plenty of microscopic air
spaces, while Teflon is usually a compact, less reflecting solid. For this reason, Spectralon is
sensitive to contamination by oily substances, which permeate its pores, and even by airborne
traffic pollution. Spectralon is often found on the second-hand market in the form of integrating
spheres recovered from optical equipment, as well as flat, round targets (either calibrated or
uncalibrated.
PTFE white target. As mentioned above, solid PTFE is less reflective than Spectralon. However, its
spectral properties remain similar. A problem with PTFE is its relatively high translucency, which
means a thickness of at least 5-10 mm should be used.
A matte aluminium panel. The reflectivity of clean, non-anodized aluminium is practically linear
well into the far UV. This highly desirable property is counterbalanced by the difficulty of
obtaining a non-directional reflectivity by brushing an aluminium surface. Sand-blasting may be
better than brushing.
A combination of a thin (about 2 mm) PTFE sheet backed with a slightly matte aluminium foil or
sheet. This combines the best properties of the two materials. No glue should be used to keep the
two materials together.
The first method uses the same WB, regardless of the UV-pass filter being used. This is the type of white
balance I use for my pictures when I need to quickly alternate between VIS and UV imaging. The second
method can be used with one specific UV-pass filter to set a "reference" WB, or can be set
individually for each filter type. This means that the second method is more dependent on the used
equipment. Both methods have advantages and disadvantages and, as mentioned above, there is no objectively
right method.
Ordinary white and gray cards used for WB in the visible range have unpredictable UV and IR reflectance,
and should not be used for this purpose. However, sintered PTFE, unless contaminated by other chemicals,
performs very well as a VIS and UV reflection target. Even a clean, ordinary PTFE sheet with a thickness
of several mm can be satisfactory for relatively non-demanding uses.
The problem of white balance in UV imaging is discussed above. Without an appropriate white balance, even
if the image contains some false color, with the wrong white balance this false color may pass unnoticed
and the image will look monochromatic.
If you wish to publish UV images that need to be compared with the UV images recorded by other
photographers, you need to use a white balance that produces a consistent visual impression. If you need
to compare images shot with the same camera and filter but with different lenses, you need to use exactly
the same white balance and the same subject and illumination source for the comparison shots. For reliable
comparisons, this rules out sunlight, which changes with weather, location, time of day and season.
Electronic flash, and especially studio flash units with non-coated tubes, are a more consistent source
for this type of tests.
Electronic flash.
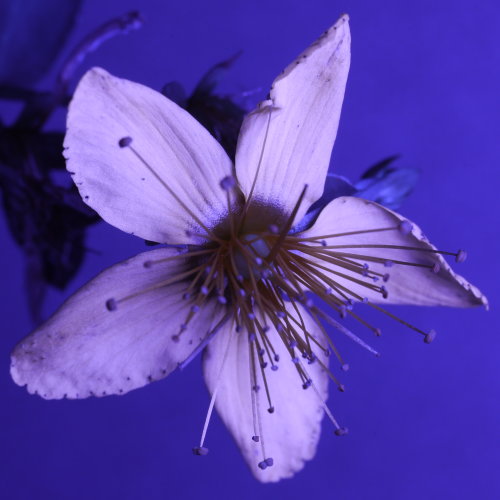
Exo Terra ReptiGlo 10.0 "UV-B" fluorescent tube . Both images with stacked Schott BG40 and
Thorlabs FGUV5 filters. No post-processing.
The effects of fluorescent tubes and electronic flash on certain subjects can be subtly different. In the
above example, electronic flash was used at the left, and a "UV-B" fluorescent tube at the
right. The petals near the center of the flower and the filaments of the stamina reacted very differently
with the two sources. This is possibly due to a different spectral emission of the two sources, but
probably also to the UV behavior of certain biological materials being strongly dependent on the angle of
illumination.
Electronic flash, 325BP10 filter and CoastalOpt 60 mm lens.
No post-processing.
Same setup, enhanced red channel and minor contrast and gamma changes (right). No color remapping, no
color channel swapping.
Sometimes, I record UV images that I don't quite understand, like the above. This filter transmits between
320 and 330 nm, which I know from previous tests to be recorded as green or a slightly yellowish green.
Then where does the red in the above image come from, and why is it clearly restricted to the flower and
not the background? UV around 370 nm is typically imaged as orange, rusty or ruddy, but this particular
flower reflects almost no UV at these wavelengths, and in addition, this filter has very sharp cutoffs at
the borders of its range. NIR at wavelengths just above the visible range is imaged as violet or pink, but
this filter shows no evidence of NIR leaks with other subjects. Perhaps the flower is selectively
reflecting at 330 nm (which is imaged as a slightly yellowish green, and therefore contains some red) but
not 220 nm (imaged as a purer green)? So far, I have no good explanation. This is the first time I get
such a combination of "UV colors".
I concluded that the red in this
case is due to a small NIR leak of the 325BP10 filter. The red color disappears when using a fluorescent
lamp known to emit only negligible amounts of NIR. The reason why this NIR leak is not a problem with
other subjects may be an unusually high NIR-reflectance of this particular subject. A larger NIR leak is
displayed by the PrimaLuceLabs U filter.
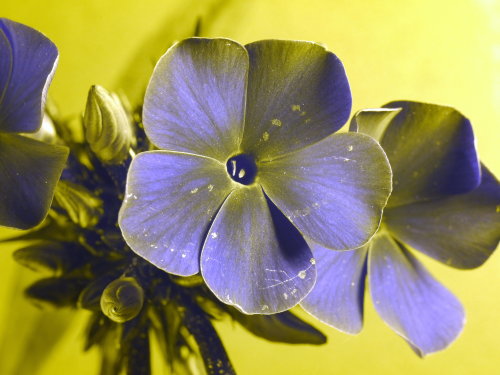
Electronic flash, CoastalOpt 60 mm lens and Baader U filter. No color remapping, no color channel
swapping, minimal post-processing.
Same setup, stacked Schott BG40 and Thorlabs FGUV5 filters.
Just for fun, the same flower with two other UV-pass filters. A second flower (extreme right) was not
invited but suddenly decided to join the party.
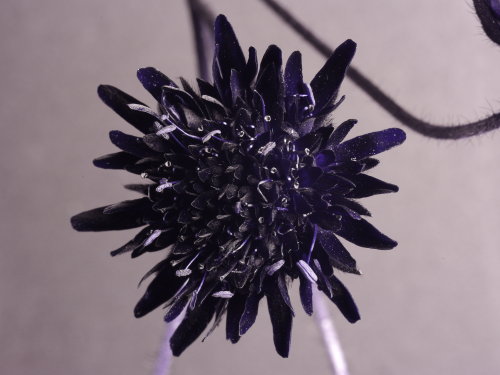
Stacked Schott BG40 and Thorlabs FGUV5 filters and CoastalOpt 60 mm lens. Electronic flash. No color
remapping, no color channel swapping, minimal post-processing.
Same setup, Exo Terra ReptiGlo 10.0 "UV-B" fluorescent tube.
For some time, I have been puzzled by green hues visible in UV pictures (often in combination with yellow
hues) by other photographers, recorded with filters that transmit the higher UV wavelengths, but not the
310-340 nm wavelengths that I know to be recorded as green by Bayer sensors. Examples of these hues are
often illustrated on
photographyoftheinvisibleworld as
produced with a "mystery" XBV6 filter (frequently used, but so far unexplained, by the author of
that blog). See
these examples. According to discussions on
ultravioletphotography.com, these peculiar green hues
can be reproduced with stacked Schott BG40 and Thorlabs FGUV5 filters. However, I did not obtain them
until I tested this filter with a "UV-B" fluorescent tube (above sample images). This is another
example of substantially different color rendering produced with electronic flash and fluorescent tubes,
possibly caused, at least in part, by the very low amount of NIR contained in the radiation emitted by
fluorescent tubes.
It appears that the small NIR leaks of many popular types of UV-pass filters have a larger impact in UV
photography than I acknowledged until recently. At this point, what is really necessary is a NIR-cut
filter that cuts NIR and red light with an optical density (OD) of at least 6, but at the same time
transmits all UV down to 280 nm (or at a minimum down to 320 nm) with a transmission around 70-80% (OD
≈ 0.1). I am not aware of such a filter, and I am open to suggestions.
My current kit for UV photography
In the end, my current, satisfactorily working solution for UV photography involves a few unusual pieces
of equipment (not counting various adapters needed to make this equipment work together):
A Jenoptik CoastalOpt 60 mm f/4 Apo when I need the best results (i.e.,
most often), one of the several "accidental" 35 mm UV lenses when I
need a shorter focal length, and an AI-S Nikkor 24 mm f/2.8 (on full frame) when I need a
"real" wideangle for landscape UV imaging. I use a
UV Rodagon 60mm lens to save space and weight in travel photography. This
is a good lens, but otherwise not particularly useful since I also own a CoastalOpt 60 mm. I used in the
past Nikon El Nikkor enlarger lenses, which are a good and cheap starter solution if one does not need
to go below 370 nm (The El Nikkor 80 mm and 105 mm are most usefult in this context).
MTE U301 or 365 nm Convoy S2+ LED torch (the
latter is smaller and cheaper), especially useful for Live View framing and focusingwithout removing the
UV-pass filter. Note that there are several variants of Convoy S2+. The "right" one uses a
Nichia 365nm UV LED.
These torches are equipped with a 3W Nichia 365 nm LED. They are mostly useful for focusing and
framing with a Baader U or other filters that transmit well at this wavelength. They are occasionally
useful as an alternative to electronic flash for heat-sensitive subjects, but only for subjects that
do not require a more broadband UV source. This LED is quite powerful (650 mW radiated power) but the
beam of these torches is narrow and not focusable. It needs to be diffused either with an external
aluminium reflector (cheap, inefficient, enlarges the source area) or a concave fused silica lens
mounted directly in front of the torch (expensive, efficient, but source area remains small).
Three types of small fluorescent tubes.When swapping different filters, fluorescent UV tubes are more
versatile than LEDs for framing and focusing, because they emit a more broadband UV radiation.
They are also occasionally useful as illumination sources for long exposures.
Things that I attempted but did not work well
I attempted several of the commonly discussed "fixes" for near-ultraviolet photography, (i.e.,
attempts at using and/or modifying lenses not designed for this purpose), with scarce success. At the time
not being able to afford a true UV lens, which would have removed most problems, I tried, for instance:
Removing the coating on the front lens element in a Nikkor E 35mm f/2.5 and
a Nikkor E 100mm f/2.8. These lenses are described as the subject of a similar treatment on
another web site. I did this by rubbing the
lens surface with a damp cotton cloth dusted with cerium oxide polishing powder. This substance is very
hard, and used for polishing gemstones. Also the lens coating is very hard, but rubbing by hand for a
couple of hours did remove most of the coating. An unexpected problem was that the lens material is much
softer than the coating, so the lens surface turned slightly bumpy on a microscopical scale. The
polished lenses did transmit fair amounts of UV (see example
here), but also turned into interesting examples of soft
focus lenses (the effect is slight, but interesting for portraits, and subtly different from using a
soft filter). However, a soft focus lens is not what I wanted. Removing the coating by chemical
treatments has been attempted by other photographers, albeit with no reports of success.
Using some enlarger lenses that are transparent to the near-UV. The
EL-Nikkor 63mm f/3.5 is often recommended for this purpose. Perhaps because of this fame, it seems to be
hoarded by collectors, and is much scarcer and more expensive than other EL-Nikkor models and focal
lengths. However, my tests show that
eight other EL-Nikkor models are roughly as good for near-UV photography.
(see also my
comparison of 63 mm EL-Nikkor models in near-UV and photomacrography).
Probably, all EL-Nikkors, especially those from older series in metal barrels, are approximately as good
for this purpose (see also independent information
here, or the whole blog here). This did
work, but not very far into the UV. Cheaper legacy lenses are actually better suited for photography
below 370 nm.
Using normal, modern lenses with a UV-pass filter and enormous exposure times. Eventually, some UV
becomes detectable, but usually buried in noise. Modern lenses are less likely to work in UV photography
than legacy ones (with the exception of lenses specifically designed for UV photography). However, even
among legacy lenses, perhaps only 1% are of any use in UV photography. This is why the cumulative
experience of dozens of UV photographers is so useful.
Fluorescence is not UV photography
This is photography of UV-induced fluorescence in the visible range.
This is not UV photography.
UV photography is very different from the photography of UV-excited fluorescence in the visible range.
Fluorescence is the emission of longer wavelengths than those of incident light. Thus, illumination with
UV radiation can cause the subject to fluoresce by emitting visible light. This is, for all practical
purposes, photography in the visible range, and in fact it does not require special lenses and may even be
carried out with a UV-cut filter on the lens. The above pictures are an example of UV-excited visible
fluorescence. Some of the markings on a banknote, which are almost invisible in ordinary light (left),
fluoresce strongly when illuminated with near-UV light (right). Visible light illumination was used in
both pictures (in addition to UV illumination in the second picture).
For years, Google ranked the above picture high in searches for "UV photography". I had to fix
both the picture metadata and figure caption to decrease the chance that this misleading search result
comes up in the context of UV photography.
Some materials fluoresce in the near IR when illuminated with visible light. This fluorescence is
typically weak, but has scientific applications. In rare cases, materials fluoresce at shorter wavelengths
than the incident radiation (by absorbing two photons in quick succession before releasing their energy as
a single photon). Also this type of fluorescence is typically very weak.
Fluorescent materials release photons a very short time after capturing incident photons. For practical
purposes, absorption and fluorescent emission are simultaneous. Phosphorescence is partly similar to
fluorescence, but phosphorescent materials capture photons and store their energy for a longer time (even
minutes or hours) before releasing it. This characteristic allows the imaging of phosphorescence by
starting the exposure after the stimulating radiation source has been switched off, and in this way
requires no filter to cut out the incident wavelengths.
Phosphorescent materials also emit photons when exposed to other types of radiation than photons. A small
amount of radioactive material is sometimes mixed with phosphorescent materials to make them weakly glow
even in the absence of any ambient light. This use is now less common than in the past, because of health
concerns about low-dosage radiation.
Quite a few web sites talk about "underwater UV photography". In all cases I am aware of, they
do not deal with UV photography, but with UV-excited fluorescence in the visible range (or sometimes, blue
LED-excited fluorescence in the visible range). Many of their images are very interesting, but I have yet
to see true examples of underwater UV photography.
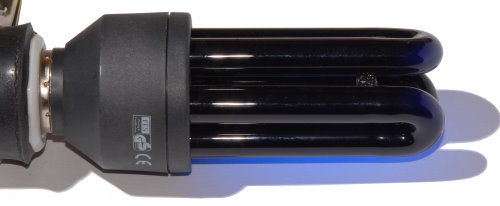
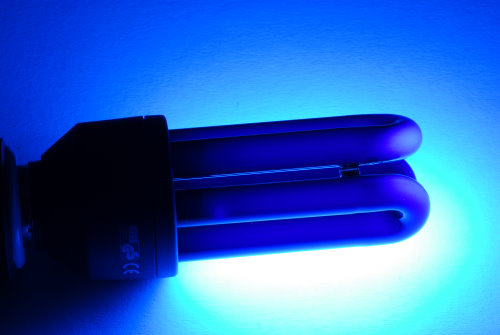
The above picture shows visible fluorescence of a white cardboard sheet illuminated by the UV fluorescent
tube visible in the picture. The fluorescence in the picture is much brighter that the surface of the UV
bulb. This picture was taken without additional light sources. This example shows that, even with a
UV-only light source, often it is necessary to use a UV-pass, visible-cut filter on the camera, in order
to eliminate visible fluorescence of the subject that may overwhelm its actual UV reflectance. Some UV
fluorescent tubes do emit also large amounts of IR.
Some people report "seeing" UV light. Most of these people do not possess unusual capabilities.
There are documented genetic traits in humans that produce minor differences in spectral response
of the eye photo-pigments, and some people are indeed slightly tetra-chromatic, but they do not include UV
vision. Instead, those who report seeing UV at improbably short wavelengths may be, more likely,
experiencing UV-induced fluorescence of parts of their eyes, which causes a stimulation of the retina in
the visible range. The most common result of fluorescence of the cornea, crystalline or vitreous humor is
a perception of "haziness" in the presence of UV. If the retina itself is fluorescing, instead,
the images of bright UV sources can be perceived as very sharp. This is especially likely in cataract
patients who have had the crystalline surgically removed and are using prosthetic lenses transparent to
UV. In other cases, reports of people "seeing" the UV output of a monochromator are simply
seeing the equipment leaking radiation in the visible range.
The human eye crystalline acts as a strong UV-cut filter, and usually prevents UV damage to the retina.
The crystalline itself, however, can be damaged by long-term UV exposure, often leading to cataracts. In
people who have had the crystalline surgically removed (usually to restore vision in cataract patients),
UV from sunlight reaches the retina almost unimpeded. As a result, the retina is easily damaged by UV (and
perhaps even by blue and violet light), and these persons must protect their eyes from sunlight with
UV-absorbing glasses or contact lenses. They may also need to wear UV protecting lenses when indoors in
buildings with large windows. In my house, double-pane windows transmit about 50% of solar UV at 340 nm,
and still a relatively high amount at 325 nm.
I installed so-called UV-blocking film (metallic gray) on some of my windows, but these windows became
only slightly less transparent to UV than windows without this UV-blocking film. The difference is perhaps
less than one stop, or 50% of transmission. I would not call this an effective UV-cut filter.
 Quite a few web
sites on UV photography seem to link to this page. They are welcome to do so, but this page contains only
partly updated materials since I created it. Other pages of my site contain more recent information, as
well as information on special topics in UV photography not mentioned on this page. If you want to make
sure that you did not miss any subsequent additions on UV photography I made to this site, always check
the
Quite a few web
sites on UV photography seem to link to this page. They are welcome to do so, but this page contains only
partly updated materials since I created it. Other pages of my site contain more recent information, as
well as information on special topics in UV photography not mentioned on this page. If you want to make
sure that you did not miss any subsequent additions on UV photography I made to this site, always check
the